Actually did last weekend! Had to pay retail for the cylinder. I was told that there has been no design changes when it was obvious that there was.

I developed some techniques during the repair and it can easily be done despite how difficult it looks. The most difficult part of the job was to get a tool to pop out the ball ends with a tie rod removal tool. Honestly, they give them different names for different configurations so I took advantage of the free loaner program by the local auto parts store and borrowed two but only used this. Not perfect but I got it off. The “fingers” were thick, making it difficult to get it under. I didn’t want to damage the boot, that’s why I didn’t opt for the long tool with a U shaped wedge. Make sure you have jacked the front end of the tractor first before starting this. You want to raise it enough so the front tires are 5” off the ground. When you get it free with the tool, reinstall the castle nut loosely until later. You may find it helpful to rotate the cylinder rod forward to provide clearance for the tool.

Before dropping the axle in order to provide clearance around the steering cylinder, the drive shaft has to be disconnected. This was easily done by loosening the clamp around the shield and simply slide back the shield rearward, away from the axle. Drive the roll pin out from the middle of the coupler and slide back the coupler and it’s now free. Mine slid back after a few light taps. I would ensure that the front drive is disengaged prior to starting the project so it can spin free.
Next step is to remove the side shields then disconnect the hydraulic lines BEFORE dropping the axle. They are short and don’t have any slack.
Loosen the 4 bolts holding the steering cylinder so they can be removed by hand.
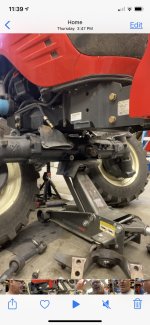
I was able to drop the axle without it flopping around by replacing the rear bolts with two long ones before undoing the front bolts. This kept the axle in alignment and easier repositioning when reinstalling. This is critical! (Image shows AFTER I already dropped the axle)
Hopefully, you have already removed the loader and put jack stands to hold the front end of the tractor right by the loader arm supports? I didn’t want to put the stands out front so I can have space to work.
Then one it was in, the next step was to support the axle with a floor jack before removing the front bracket from the axle (3 bolts, cover, O-ring, and shims) and then from the frame (4 bolts). By then, the axle can be slowly lowered to enable you to service the cylinder.
View attachment 696230
Extra tips.....
- Measure the toe-in of the wheels & make note of it so they are positioned the same after the new cylinder is installed. Mine was 1” shorter at the front.
- Steering cylinder have opposing threads on one end, do pay attention to it!
- It pays to have a metrics wrench set in the large sizes (24mm thru 30mm), you’ll thank me.
- Guide pins on the top part of the steering cylinder assembly. There’s two! I almost missed one. It was still stuck in the old one, used vise grips to twist it out so they could be reinstalled in the new.