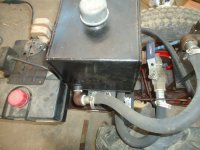
It's pretty crude actually. I took one of the spare David Bradley chassis I had, added the engine, (It's a Tecumseh 5 hp with electric start..!!) hydraulic pump, oil tank, hydraulic valve, and other misc. parts for the power unit. I did add a flow control valve for the hydraulic oil, as I wasn't just sure how fast it would move. It will make just a tad bit of difference, and mostly speed up travel when tramming backand forth to the barn where I keep it.
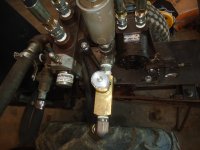
The hydraulic valve for the splitter is set in the detente/return position, for oil flow to the hydraulic drive motor. I also utilized the OEM DB clutch, so as to pause to drop a plant. The one video showing setting plants non-stop, but I've always put a tsp. of Epsom Salts under each tomato plant, to help prevent blossom end rot. This was the first year I used it, and was more concerned with setting plants. Hence the stopping for a few seconds to add the epsom salts, drop the plant, then move forward the 24" -30" spacing. To simplify adding the epsom salts, I got a hand squeeze sugar dispenser off Amazon. It has several different pieces you put in it to dispense a certain amount of "whatever". It just happened to have the piece that will dispence 1, tsp. of what you need. Sure speeds up the process.
In that video, it pretty well shows the framework. Furrow shovel, drop tube, hiller to cover the plant, and packer wheels to tuck them in. The furrow shovel is what is called an irrigation shovel. Got it from I believe Norwest Mfg. They make all sorts of cultivator shovels, sweeps, etc. This works perfect for what I had in mind. 3" PVC for the drop tube, and a 3" to 4" adapter for a funnel top. The hillers are actually a middle buster for a tiller. I took the plasma cutter, and split it down the center. Welded some small angle iron on the back, so as to attach to the shank. Packer wheels are just some spare lawn mower wheels I had laying around. Tabs the wheels are mounted to are bent at a slight angle to pack the dirt inward, and give some spacing back away from the plant. I've found it worksbest to soak the plants well with water, while in the tray. Just the little bit of extra weight at the bottom,makes the plant stand pretty well straight up when you drop it down the tube. Occasionally I need to take my toe, and straighten one up, if a small clod of dirt rolls inwhere the plantwill drop,and make it fall over.
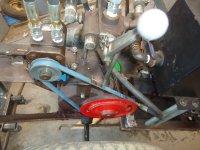
I built the frame, (way over built..!!) and used a set of depth gauge wheels from a bent up set of DB cultivators. Frame was bent, but the depth gauge set up was fine. I did make a larger set of wheels for it, as the OEM DB wheels didn't give enough space below the furrowing ahovel when tramming back & forth like I wanted. These are worn out opener discs for a no-till planter. I made the hub from 1-1/4" round stock, and bored the 3/4" hole through them on the metal lathe. The smaller disc that is welded to the hub, that bolts it to the "wheel were cut with a 4" hole saw on the drill press. And just used the holes that are in the wheels to bolt them on.
No plans were ever drawn up. No fancy computer programs involved. I just had a picture in my mind of what I wanted to build, and this is the result. Sometimes it's good, to have a good imagination, even better if you can build it. The only thing written down was some measurements for this & that, and degreeof angle needed to make the drawbar the same as other DB attachments. I do need to add one more thing at the moment. A tool box to hold several wrenches,pliers, and a hammer to make depth adjustments on the furrow shovel, hillers, and packer wheels. Other than that, I'm happy with the results, and works very well for me.
Sonny has built some cool things too, neat to see what others have made, and utilize. Using a chassis/pieces/parts from something, then transform in to your intended purpose, to make life easier, with all of the ginger bread.
MAH00190 - YouTube
MOV02153 - YouTube