JRP
Platinum Member
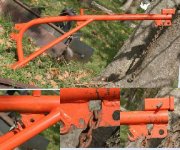
When you make a hydraulic top link you want to end up with a link that has the same extracted dimensions and the same extended dimensions as your original top link. This is important.
Here is a picture of a hydraulic top link. You will need a new cylinder, two rod ends sized for Cat I top link (I think 3/4" hole), and some steel plate about 3/4 or 1" thick. I think my cylinder was 8" stroke, 3" diameter piston.
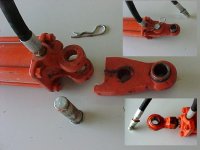
1. Adapter for the non-rod end of the cylinder:
Make a template out of plywood that will slip in the cylinder end between the ears. Drill the plywood with a 1" twist drill through the holes in the ears. You will hacve a cutting template that will be used to make a steel plate that will fit snuggly between the ears and not wobble. It should touch the cylinder end such that it will not rotate on the pin. Drill a 1" hole in the 1" steel plate. Pin the plywood to the plate with the pin that came with the cylinder. Trace the template and cut out your adapter with a fire hatchet (cutting torch). Weld on a 3/4" rod end.
2. End of cylinder rod: Cut off the standard rod end with a portaband bandsaw, leaving enough threaded end so to weld to without the weld smashing the seal to destruction. When retracted the weld must not enter the seal area. Weld on the 3/4 rod end. Be sure to protect the cylinder rod so you dont get weld spatter on it.
3. Clean up your welds, paint, and install hoses. I made a mistake and got large diameter hoses. These swell under pressure and make a little spongy top link, even with the air bled out. Small 1/4 ID hoses would be better I think.
Another easier and safer way to get a hydraulic top link is to just go buy one.
My hydraulic top link was one of the first custom items. Once installed, I think it has never been removed. You will wonder how you did without it.
Here is a picture of a hydraulic top link. You will need a new cylinder, two rod ends sized for Cat I top link (I think 3/4" hole), and some steel plate about 3/4 or 1" thick. I think my cylinder was 8" stroke, 3" diameter piston.
1. Adapter for the non-rod end of the cylinder:
Make a template out of plywood that will slip in the cylinder end between the ears. Drill the plywood with a 1" twist drill through the holes in the ears. You will hacve a cutting template that will be used to make a steel plate that will fit snuggly between the ears and not wobble. It should touch the cylinder end such that it will not rotate on the pin. Drill a 1" hole in the 1" steel plate. Pin the plywood to the plate with the pin that came with the cylinder. Trace the template and cut out your adapter with a fire hatchet (cutting torch). Weld on a 3/4" rod end.
2. End of cylinder rod: Cut off the standard rod end with a portaband bandsaw, leaving enough threaded end so to weld to without the weld smashing the seal to destruction. When retracted the weld must not enter the seal area. Weld on the 3/4 rod end. Be sure to protect the cylinder rod so you dont get weld spatter on it.
3. Clean up your welds, paint, and install hoses. I made a mistake and got large diameter hoses. These swell under pressure and make a little spongy top link, even with the air bled out. Small 1/4 ID hoses would be better I think.
Another easier and safer way to get a hydraulic top link is to just go buy one.
My hydraulic top link was one of the first custom items. Once installed, I think it has never been removed. You will wonder how you did without it.