CDN Farm Boy
Veteran Member
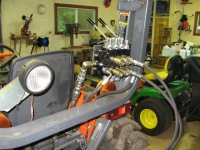
When I bought my tractor, I knew I wanted rear remotes. In fact, I knew I wanted a bunch of them. The Kubota kit was astronomical in price for just one valve, never mind their 2 or 3 spool options. I wanted minimum of 3, 4 was better. Dealer was a bit confused when I wanted the blower with the tractor purchase with the hyd rotation but no way of turning it. They actually delivered the blower with the manual crank and had to send the service guy out to install the hyd motor. He also was confused how I was going to operate it. Parts and Service desk was nice enough to email me the factory remote install manual for reference. Once I saw the first pic of how they mount the valve, am I ever glad I didn't get it. It mounts horizontal on the outside of the ROPS! By the time you get the mounting plate and the 3 spool option, it sticks out further than the tires. 
Here's how I did mine, with reference to the factory manual and input from JJ and MtnViewRanch (thanks guys):
Valve from Surplus Center, I used this one https://www.surpluscenter.com/item.asp?item=9-7864&catname=hydraulic for it's compact size.
Fittings from Discount Hydraulic Hose
Local made hoses at Princess Auto

This takes up less than 3" of room on the inside. I'm 6'2, 235 lbs and fit no problem even bundled up doing snow or running the BH. I already had the lights installed and made the valve mount work with them, keeping things up as high as I could so that there was room under the levers for my arm. The hole spacing on the valve body was just a little bit narrower than the ROPS so I ground the side off the 2 lower mounting bolts to give clearance, with the sole purpose of keeping the mount as compact as possible.

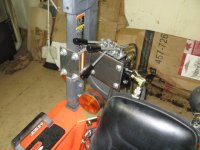
Top 2 valves have 1/4" QDs, the 3rd has 3/8" for the BH and I plan to run the bottom spool up to the front which are just capped for now. QD plate was mounted on the lower section of the ROPS. It was just a mock-up/test run and I ended up re-drilling a couple of the holes. One of these days I'll get around to making a new mounting plate for the QDs, complete with paint.

No cutting of any of the factory components of the PB loop was done that if for any reason I wanted to return to stock everything is unboltable (is that even a word?) and all the stock parts are still there.
Here's how I did mine, with reference to the factory manual and input from JJ and MtnViewRanch (thanks guys):
Valve from Surplus Center, I used this one https://www.surpluscenter.com/item.asp?item=9-7864&catname=hydraulic for it's compact size.
Fittings from Discount Hydraulic Hose
Local made hoses at Princess Auto
This takes up less than 3" of room on the inside. I'm 6'2, 235 lbs and fit no problem even bundled up doing snow or running the BH. I already had the lights installed and made the valve mount work with them, keeping things up as high as I could so that there was room under the levers for my arm. The hole spacing on the valve body was just a little bit narrower than the ROPS so I ground the side off the 2 lower mounting bolts to give clearance, with the sole purpose of keeping the mount as compact as possible.
Top 2 valves have 1/4" QDs, the 3rd has 3/8" for the BH and I plan to run the bottom spool up to the front which are just capped for now. QD plate was mounted on the lower section of the ROPS. It was just a mock-up/test run and I ended up re-drilling a couple of the holes. One of these days I'll get around to making a new mounting plate for the QDs, complete with paint.
No cutting of any of the factory components of the PB loop was done that if for any reason I wanted to return to stock everything is unboltable (is that even a word?) and all the stock parts are still there.