jackl
Bronze Member
- Joined
- Apr 8, 2005
- Messages
- 67
- Location
- Central New York
- Tractor
- 2013 Kubota B2920 364FEL and 5ft Bush Hog Finish Mower, 1952 Ford 8n, Cub Cadet
After years of using either my finish mower or my scoop as a counterweight and not wanting to spend $275-$350 on a steel ballast box for my Kubota B7510, I decided to fabricate one for my 2013 Kubota B2920. I looked at a number of homemade versions and included some of the features that I liked. My 3pt hitch lift capacity is a bit over 1,350 pounds, so I planned to make it around 550 pounds. I chose not to fill the rear tires as I use the tractor to mow my lawn. The ballast weight allows me to easily remove it and mount the mower.
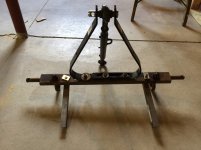
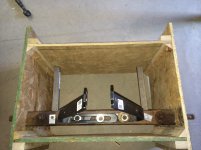
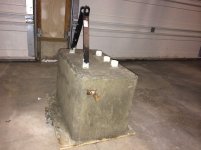
I decided to fabricate it out of concrete using my old 3 point hitch tow bar from my 8N and sway bars I purchased from Tractor Supply for the center link mount. I found a handy on line calculator and determined that I would need a 17L x 24W x 17H form to create 530lb block of cement. I made the form with some scrap 1/2" OSB, bent the sway bars to form the center link mount, and bolted it to the tow bar. Then I added angle iron to the tow bar to extend the steel structure to the back of the form. I had some pretty large eye bolts already mounted in my tow bar and left those in extending downwards for additional structure for the concrete to harden around.
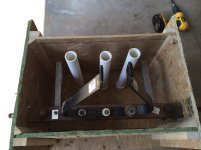
I mounted the hitch frame in the form and added some wood to the corners cut on a 45 degree angle as I didn't want 90 degree corners which could be more prone to chipping. I also, took an idea from another on line project and added 3 - 1.5 inch PVC tubes. I capped them off, drilled a hole for drainage and screwed them to the form from the bottom.
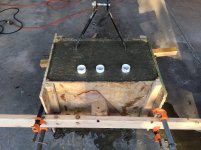
Not shown in the photos is the wire mesh and re-bar I added during the pour. The reinforcement was attached to the hitch frame. Then I mixed 9 60 pound bags of quickcrete, and filled the form carefully ensuring all the voids were filled. I didn't have a concrete vibrator so I tapped the form with a hammer and ran my random orbital sander around the outside of the OSB to eliminate pockets and air bubbles.
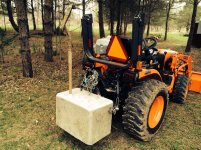
I let the concrete cure a while before finishing the top with a trowel. Before it, I formed 45 degree edges along the top to match the corners. A day later I removed the forms and occasionally sprayed it with water to slow the cure. I plan to paint it, but had to try it first. I'm really happy with the way it turned out and it makes an amazing difference when using my FEL. Much more compact and low to the ground than using my rear scoop.
I decided to fabricate it out of concrete using my old 3 point hitch tow bar from my 8N and sway bars I purchased from Tractor Supply for the center link mount. I found a handy on line calculator and determined that I would need a 17L x 24W x 17H form to create 530lb block of cement. I made the form with some scrap 1/2" OSB, bent the sway bars to form the center link mount, and bolted it to the tow bar. Then I added angle iron to the tow bar to extend the steel structure to the back of the form. I had some pretty large eye bolts already mounted in my tow bar and left those in extending downwards for additional structure for the concrete to harden around.
I mounted the hitch frame in the form and added some wood to the corners cut on a 45 degree angle as I didn't want 90 degree corners which could be more prone to chipping. I also, took an idea from another on line project and added 3 - 1.5 inch PVC tubes. I capped them off, drilled a hole for drainage and screwed them to the form from the bottom.
Not shown in the photos is the wire mesh and re-bar I added during the pour. The reinforcement was attached to the hitch frame. Then I mixed 9 60 pound bags of quickcrete, and filled the form carefully ensuring all the voids were filled. I didn't have a concrete vibrator so I tapped the form with a hammer and ran my random orbital sander around the outside of the OSB to eliminate pockets and air bubbles.
I let the concrete cure a while before finishing the top with a trowel. Before it, I formed 45 degree edges along the top to match the corners. A day later I removed the forms and occasionally sprayed it with water to slow the cure. I plan to paint it, but had to try it first. I'm really happy with the way it turned out and it makes an amazing difference when using my FEL. Much more compact and low to the ground than using my rear scoop.