5303 Second SVC Install -- With Pics

   / 5303 Second SVC Install -- With Pics #1  

Wombat125

Gold Member
Joined
May 9, 2008
Messages
413
Location
SE Wyoming
Tractor
John Deere 5303
After six months, I finally bit the bullet and started the install for my second SVC. I don't actually have any implements that reqire a second remote, but I figured the 5003 series were end of life and I wanted to get the parts while they were still easily obtainable.

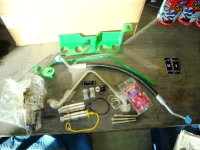
First Picture: Here's all of the pieces parts in the kit. Seems like I should get a little more for over $500.

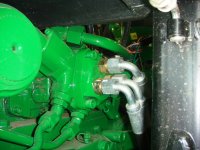
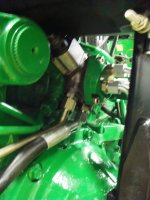
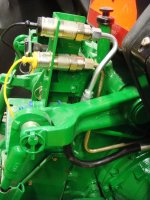
Second Picture: The unmolested first SVC that sits just over the right rear axle. You can see the rock shaft on the left and the ROPS on the right.

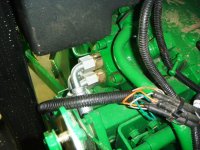
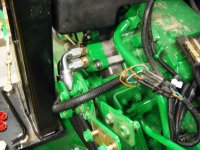
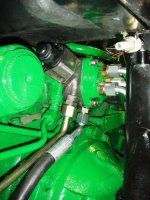
Third Picture: Same as second picture, only taken from the front of the right rear axle.

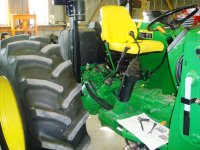
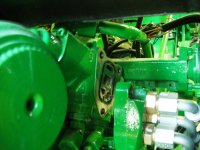
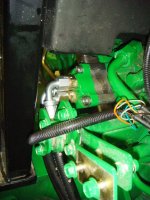
Fourth Picture: The instructions say you need to remove the right fender. That is completely true. They also say you need to remove the right rear tire. I didn't need to do this since my tires are set out pretty wide.
 

Attachments

  • DSC01870.JPG
    DSC01870.JPG
    291.1 KB · Views: 1,296
  • DSC01872.JPG
    DSC01872.JPG
    332.1 KB · Views: 1,121
  • DSC01873.JPG
    DSC01873.JPG
    387.6 KB · Views: 1,093
  • DSC01874.JPG
    DSC01874.JPG
    298.5 KB · Views: 2,284
   / 5303 Second SVC Install -- With Pics
  • Thread Starter
#2  
<part 2>

First Picture: Now I'm committed. Three allen head bolts came out easy. With only one SVC, there's lots of room to work between the transaxle and the ROPS. Notice the tiny little super fragile spring outboard of the first SVC.

Second Picture: Same as first picture, only from front of tractor.

Third Picture: New spool installed. No, it's not painted. I didn't paint it ahead of time because I didn't want to risk contaminating the sealing surfaces of the spool. Plus, I figured I would follow JD's principle of completely soaking everything in paint after the final assembly.

Fourth Picture: Same as third picture from rear of tractor. Lesson: Get all three of the new longer allen bolts in the cap before you insert the new spool. If you don't the bolts will not fit between the cap and the ROPS when everything is positioned correctly.

I had a bugger of a time getting the three bolts started. I think I could have made this much easier by unbolting the quick connect bracket on the back of the tractor. This would have allowed me to use the first SVC hard lines as lever arms to align the spool assembly. As it was, my existing hard lines forced the spool assembly into a slightly misaligned position, thus causing me to weave a tapestry of obscenities that is still floating around the shop.
 

Attachments

  • DSC01880.JPG
    DSC01880.JPG
    219.7 KB · Views: 787
  • DSC01879.JPG
    DSC01879.JPG
    291 KB · Views: 729
  • DSC01878.JPG
    DSC01878.JPG
    332.3 KB · Views: 578
  • DSC01877.JPG
    DSC01877.JPG
    274.3 KB · Views: 789
   / 5303 Second SVC Install -- With Pics
  • Thread Starter
#3  
<part 3>

First Picture: Hooking up the hydraulic lines was almost easy. I was neither contorted into weird positions nor covered with oil. The only problem I had and, in fact, still have, is that one of the original SVC quick connect hard lines needs to be about 2 mm longer to allow the snap rings to sandwich the quick connect into the mounting bracket. I'm sure this problem will be recitified one day when I neglect to disconnect that hydraulic hose before I drive off. The tension exerted will allow the quick connect to seat nicely right before the attached hydaulic hose snaps in half.

Second Picture: The Wife was frozen and tired of being in the shop. She went into the house about five minutes later.

Third Picture: New SVC with hydraulic lines connected.

Fourth Picture: Same as third picture from front of axle.


By this time, I was getting a little cold and tired. I did manage to get the lever installed which was pretty easy other than JD using the tightest roll pins ever ever ever ever to hold the lever pivot shaft in place. You need to remove two of these pins to install the lever. I was wailing on them with a 3 lb sledge before they would budge. Sheesh.

So tomorrow all I have left to do is paint everything and then think about trying to get the one quick connect to seat correctly in the bracket with the snap rings. I'll probably also put the 3 point and draft control levers back on and remount the fender.
 

Attachments

  • DSC01881.JPG
    DSC01881.JPG
    303.7 KB · Views: 784
  • DSC01882.JPG
    DSC01882.JPG
    271.2 KB · Views: 756
  • DSC01883.JPG
    DSC01883.JPG
    336.6 KB · Views: 697
  • DSC01884.JPG
    DSC01884.JPG
    344.6 KB · Views: 690
   / 5303 Second SVC Install -- With Pics #4  
Great documentation and pictures! They will surely help somebody in the future.
 
   / 5303 Second SVC Install -- With Pics #5  
Good work! The pictures and explanations will definitely benefit other users should they decide to take on a project like this. It'll be right there in the database... :)

AKfish
 
   / 5303 Second SVC Install -- With Pics #6  
I had thought a 5203 would not take a 2d scv if it had a loader. Anyhow, impressive job.
You will find a use for the second one I am sure.

thanks for the post.
 
   / 5303 Second SVC Install -- With Pics #7  
I had thought a 5203 would not take a 2d scv if it had a loader. Anyhow, impressive job.
You will find a use for the second one I am sure.

thanks for the post.
I believe that was the older model with the black frame...
 
   / 5303 Second SVC Install -- With Pics #8  
Yep, makes me "almost" want to go out and order the kit:).
 
   / 5303 Second SVC Install -- With Pics #9  
I had thought a 5203 would not take a 2d scv if it had a loader. Anyhow, impressive job.
You will find a use for the second one I am sure.

thanks for the post.


Go back and reread the post, it was said to be a 5303!
 
   / 5303 Second SVC Install -- With Pics #10  
I saw the 5303. Guess I typed the 5203 because I have one. Mine is the black frame model. don't think it made any difference which model it was, you could only get one scv with a loader. Did not know JD upgraded to 2 with the green frame. I bought a 5325 to make sure I could get 3 rear scv with loader. Have a nice Bush Hog rear blade that takes 3.
 
 
Top