918h flail mower gear shaft seal replacement

   / 918h flail mower gear shaft seal replacement #1  

farmermaker

New member
Joined
May 2, 2018
Messages
21
Tractor
Oliver 1365
Hi folks, I've run into a snag. I am not sure how to remove the pulley. Any tips? I unscrewed all of the Allen bolts that was keeping this flange thing on there. How do I remove the flange (circled in image)? Does it come off with a gear puller along with the pulley?

The gear shaft oil seal gave up yesterday and found a puddle of oil under the belt cover.

Any tips to get this done is much appreciated.

IMG_20220726_204232.jpg
 
   / 918h flail mower gear shaft seal replacement #2  
It looks like a tapered collar. If so, you would screw in the bolts that you took out into the threaded holes. Once they are bottomed in the threads, tighten evenly until the pulley pops off of the hub. To remove the hub, wedge a screwdriver into the slot in the hub to open it up and slide off of the shaft.

When you put back on, make sure your hub is in the same place on the shaft and make sure the pulley is lined up with the driven pulley.
 
   / 918h flail mower gear shaft seal replacement #3  
Now that I see it on a monitor, not my phone screen, look for holes in the hub that are threaded at the top of the hole. It looks like the holes at 10 and 4 might be the ones, but just need to be cleaned.
 
   / 918h flail mower gear shaft seal replacement #4  
You have a taper lock bushing there. if it is not removed in the correct sequence, it will be damaged. At the same time the shaft will be damaged.

Can you please help me by providing more images of your flail mower?
Your description of the work you need to do seems wrong; THAT IS unless you are not unbolting the gearbox, propeller shaft and cross shaft and their mounting plates to remove it to change an oil seal.

YOU HAVE TO BE SURE YOU HAVE DONE THE FOLLOWING!!!!!!!!!!!!!!!!!!!!!!!!!!!!!!!!!!!!!!!!!!!!!!!!!!!!!!!!!!!!!!!!!!!!!!!!!!!!!!!!!!!!!!!!!!!!!!!!!!!!!

If you have removed ALL 7 Allen Head caps crews from the "Taper Lock" bushing you can begin cleaning out the three threaded pusher bolt holes used to push the tapered locking collar up and away from the gearbox shaft and pulley using three of the Allen Head Cap screws

The 3 remaining pusher holes have to be cleaned out with a bottoming tap and then you can use three of the Allen Head Cap Screw bolts to push it up and away from the shaft and pulley.

WHEN THE THREE PUSHER BOLT HOLES ARE CLEAN YOU MUST DO THIS IN EXACTLY THIS WAY TO PREVENT DAMAGING THE PULLEY AND SHAFT.

Once all three of the Allen Head caps screws are threaded into each hole BY HAND until they stop without force you can start putting tension on the Allen Head Cap Screws.

You can begin tightening each of the Allen Head Cap Screws one quarter of a turn at a time tightening each bolt by hand by starting at o ne pusher hole and going clockwise around the taper lock as you tighten each one.

Once the head of each of the ALLEN HEAD CAP SCREWS is bottomed STOP!! you should be able to lift the Taper Lock bushing up and off the shaft by hand.

DO NOT GET IMPATIENT, if you hurry the job, you will cause damage.

YOU MUST do it in this this way or you will damage the pulley, taper lock bushing and shaft.

You also need to change both gearbox seals to avoid having the opposing seal leak on you as well.
 
Last edited:
   / 918h flail mower gear shaft seal replacement
  • Thread Starter
#5  
You have a taper lock bushing there. if it is not removed in the correct sequence, it will be damaged. At the same time the shaft will be damaged.

Can you please help me by providing more images of your flail mower?
Your description of the work you need to do seems wrong; THAT IS unless you are not unbolting the gearbox, propeller shaft and cross shaft and their mounting plates to remove it to change an oil seal.

YOU HAVE TO BE SURE YOU HAVE DONE THE FOLLOWING!!!!!!!!!!!!!!!!!!!!!!!!!!!!!!!!!!!!!!!!!!!!!!!!!!!!!!!!!!!!!!!!!!!!!!!!!!!!!!!!!!!!!!!!!!!!!!!!!!!!!

If you have removed ALL 7 Allen Head caps crews from the "Taper Lock" bushing you can begin cleaning out the three threaded pusher bolt holes used to push the tapered locking collar up and away from the gearbox shaft and pulley using three of the Allen Head Cap screws

The 3 remaining pusher holes have to be cleaned out with a bottoming tap and then you can use three of the Allen Head Cap Screw bolts to push it up and away from the shaft and pulley.

WHEN THE THREE PUSHER BOLT HOLES ARE CLEAN YOU MUST DO THIS IN EXACTLY THIS WAY TO PREVENT DAMAGING THE PULLEY AND SHAFT.

Once all three of the Allen Head caps screws are threaded into each hole BY HAND until they stop without force you can start putting tension on the Allen Head Cap Screws.

You can begin tightening each of the Allen Head Cap Screws one quarter of a turn at a time tightening each bolt by hand by starting at o ne pusher hole and going clockwise around the taper lock as you tighten each one.

Once the head of each of the ALLEN HEAD CAP SCREWS is bottomed STOP!! you should be able to lift the Taper Lock bushing up and off the shaft by hand.

DO NOT GET IMPATIENT, if you hurry the job, you will cause damage.

YOU MUST do it in this this way or you will damage the pulley, taper lock bushing and shaft.

You also need to change both gearbox seals to avoid having the opposing seal leak on you as well.
Thanks for these detailed instructions Leonz! I successfully removed the pulley. I will post more photos in a reply below.
 
   / 918h flail mower gear shaft seal replacement
  • Thread Starter
#6  
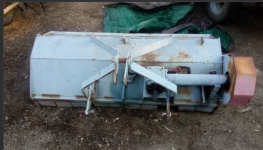
Thanks for the replies. I managed to remove the pulley. I have the service manual, but they only offer instructions on removing the entire gearbox. Is that the only way to go to replace the oil seal? If so I might as well take my time and inspect every part.

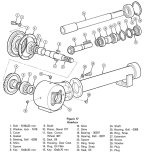
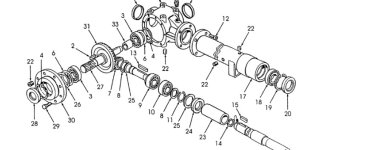
From the manual, the instructions for Gearbox disassembly are:

1. Remove the drain plug and drain the oil.
2. Remove bolts (28), from the extension housing.
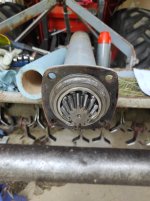
3. Remove the extension housing from the gearbox. Pull the pinion assembly from the gearbox.
4. Remove seal (23), snap ring (26), and bearing (25), from the extension housing. Remove shaft (24), from the extension housing. Remove the pinion assembly from the gearbox.
5. Remove snap ring (22), from the pinion assembly. Remove key (15), shims (17), snap ring (21), shim (16), bearings (18 & 19), and spacer (20).
6. Remove the bolts (1 ), securing the rear cover to the gearbox. Remove the rear cover (3), and bearings (5). Remove shim (6), and spacer (7).
7. Remove the input shaft (9), keys (8), gear ( 11), shim (6), bearings (5) and seal (12) as an assembly.
8. Remove the seal (12), bearing (5), shim (6), gear ( 11), and keys (8), from the shaft.

Clean all parts in solvent and air dry. Examine all parts for nicks, burrs or chipped teeth. Rotate bearings by hand to check for smoothness of operation. Replace all gaskets and oil seals.
 

Attachments

  • Flail mower.png
    Flail mower.png
    379.8 KB · Views: 117
  • gearbox diagram.jpg
    gearbox diagram.jpg
    257.4 KB · Views: 130
   / 918h flail mower gear shaft seal replacement #7  
You have a taper lock bushing there. if it is not removed in the correct sequence, it will be damaged. At the same time the shaft will be damaged.

Can you please help me by providing more images of your flail mower?
Your description of the work you need to do seems wrong; THAT IS unless you are not unbolting the gearbox, propeller shaft and cross shaft and their mounting plates to remove it to change an oil seal.

YOU HAVE TO BE SURE YOU HAVE DONE THE FOLLOWING!!!!!!!!!!!!!!!!!!!!!!!!!!!!!!!!!!!!!!!!!!!!!!!!!!!!!!!!!!!!!!!!!!!!!!!!!!!!!!!!!!!!!!!!!!!!!!!!!!!!!

If you have removed ALL 7 Allen Head caps crews from the "Taper Lock" bushing you can begin cleaning out the three threaded pusher bolt holes used to push the tapered locking collar up and away from the gearbox shaft and pulley using three of the Allen Head Cap screws

The 3 remaining pusher holes have to be cleaned out with a bottoming tap and then you can use three of the Allen Head Cap Screw bolts to push it up and away from the shaft and pulley.

WHEN THE THREE PUSHER BOLT HOLES ARE CLEAN YOU MUST DO THIS IN EXACTLY THIS WAY TO PREVENT DAMAGING THE PULLEY AND SHAFT.

Once all three of the Allen Head caps screws are threaded into each hole BY HAND until they stop without force you can start putting tension on the Allen Head Cap Screws.

You can begin tightening each of the Allen Head Cap Screws one quarter of a turn at a time tightening each bolt by hand by starting at o ne pusher hole and going clockwise around the taper lock as you tighten each one.

Once the head of each of the ALLEN HEAD CAP SCREWS is bottomed STOP!! you should be able to lift the Taper Lock bushing up and off the shaft by hand.

DO NOT GET IMPATIENT, if you hurry the job, you will cause damage.

YOU MUST do it in this this way or you will damage the pulley, taper lock bushing and shaft.

You also need to change both gearbox seals to avoid having the opposing seal leak on you as well.
Thanks for adding your description. I could not tell from the picture what type of bolt/screw was there or if it was still there. Thanks for detailing
 
   / 918h flail mower gear shaft seal replacement
  • Thread Starter
#8  
@leonz or @TractorTech : Can you suggest how to remove the shaft from the casing? The written instructions I posted above are too vague and I can't see any obvious snap rings or clips holding the shaft in place. Your guidance is greatly appreciated.
 

Attachments

  • 1659035356321.jpg
    1659035356321.jpg
    2 MB · Views: 114
   / 918h flail mower gear shaft seal replacement #9  
Well I'm not either of the requested people;
If that shaft is item #10 in your parts breakdown.
It may go out through the tube after removing the snap ring on the far end.
Otherwise it will require quite a pull to separate the shaft from the pinion.
 
   / 918h flail mower gear shaft seal replacement #10  
@leonz or @TractorTech : Can you suggest how to remove the shaft from the casing? The written instructions I posted above are too vague and I can't see any obvious snap rings or clips holding the shaft in place. Your guidance is greatly appreciated.
Like LouNY, there is a snap ring on the shaft at the opposite end. Should be #11 in illustration
 

Attachments

  • 918H Flail.jpg
    918H Flail.jpg
    109.8 KB · Views: 104
 

Tractor & Equipment Auctions

2018 CATERPILLAR 308E2 CR EXCAVATOR (A50458)
2018 CATERPILLAR...
2011 IC Corporation PB105 School Bus (A49461)
2011 IC...
2018 INTERNATIONAL LT625 SLEEPER (A51219)
2018 INTERNATIONAL...
Kubota SVL65-2 Open Station Rubber Block Tread Skid Steer (A51039)
Kubota SVL65-2...
2012 MACK PINNACLE CH613 FLAT TOP DAY CAB ROAD TRACTOR (A51243)
2012 MACK PINNACLE...
CHALLENGER MT465E TRACTOR (A51406)
CHALLENGER MT465E...
 
Top