OP
W5FL
Veteran Member
- Joined
- Apr 7, 2000
- Messages
- 1,558
- Location
- Central Texas
- Tractor
- TYM T-1104/TX10 Loader Kubota M6800SD/LA1002 Loader Kubota RTV900
The easiest way to do this job is to simply remove the right rear tire. Since the tire was weighted with water and anti-freeze, this is a difficult job for one person, unless you have a way to support the tire from overhead to prevent it from falling.
The second way is harder, but doable. The seat can be removed with two knobs and two bolts. Unfortunately the seat adjustment frame is anchored from the bottom with 4 nuts. It would have been much easier if it had been anchored with bolts instead of studs pressed into the adjustment frame. They can be removed, but there is very little space and when you drop one of the nuts, you need a magnet to retrieve it. There are three brass nuts that hold the center chassis to the fenders that you have to remove, then 10 screws with large washers, and a spacer that falls out easily. Then remove about 18 skirted nuts. Spread the fenders from the center chassis and protect the paint with cardboard so the studs don't scratch the finish.
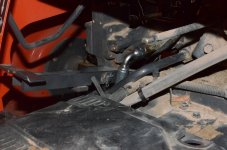
All the control knobs simply pull off except the 4 wheel engage knob and the slow/fast lever which both screw on. At this point you can easily get to the hydraulic hoses without disconnecting any wiring.
The hoses were built by a local hydraulic company and they use high quality parker hoses. The connectors are a little longer than the original Kubota connectors, but have never found out who makes the Hydraulic connectors for Kubota.
Watch how these three hydraulic hoses are connected as mine were not connected the same in the loader manual.
1) Return Line Hose is 1/2 inch and goes from the fitting on the rear axle to the lowest connector on the loader control (which is on the right side).
2) The Pump line hose is 3/8 inch and the one with the 90 degree tubing fitting (which was the hard one to get at) and goes to the inside fitting (highest). This is almost an interference fit, and you have to put the bottom (Return line) hose on first.
3) The Power Beyond hose fitting is the one that had the 45 degree tubing fitting and is also a 3/8 inch hose that goes to the fitting on the rear side of the loader control.
It took 14 years for any hoses to go bad. Now that I have replaced 8 of them, I only have 8 more to go (not counting the back hoe attachment hoses). Hope these hoses do indeed last another 14 years.
The second way is harder, but doable. The seat can be removed with two knobs and two bolts. Unfortunately the seat adjustment frame is anchored from the bottom with 4 nuts. It would have been much easier if it had been anchored with bolts instead of studs pressed into the adjustment frame. They can be removed, but there is very little space and when you drop one of the nuts, you need a magnet to retrieve it. There are three brass nuts that hold the center chassis to the fenders that you have to remove, then 10 screws with large washers, and a spacer that falls out easily. Then remove about 18 skirted nuts. Spread the fenders from the center chassis and protect the paint with cardboard so the studs don't scratch the finish.
All the control knobs simply pull off except the 4 wheel engage knob and the slow/fast lever which both screw on. At this point you can easily get to the hydraulic hoses without disconnecting any wiring.
The hoses were built by a local hydraulic company and they use high quality parker hoses. The connectors are a little longer than the original Kubota connectors, but have never found out who makes the Hydraulic connectors for Kubota.
Watch how these three hydraulic hoses are connected as mine were not connected the same in the loader manual.
1) Return Line Hose is 1/2 inch and goes from the fitting on the rear axle to the lowest connector on the loader control (which is on the right side).
2) The Pump line hose is 3/8 inch and the one with the 90 degree tubing fitting (which was the hard one to get at) and goes to the inside fitting (highest). This is almost an interference fit, and you have to put the bottom (Return line) hose on first.
3) The Power Beyond hose fitting is the one that had the 45 degree tubing fitting and is also a 3/8 inch hose that goes to the fitting on the rear side of the loader control.
It took 14 years for any hoses to go bad. Now that I have replaced 8 of them, I only have 8 more to go (not counting the back hoe attachment hoses). Hope these hoses do indeed last another 14 years.
Last edited: