Adding a Third Remote to a TN

   / Adding a Third Remote to a TN #1  

Phred

Veteran Member
Joined
Mar 7, 2001
Messages
1,019
Location
Arkansas
Tractor
TN70D, 4wd, 16x16 trans
Well guys I finally got around to putting the third remote kit on my TN. I will bore you with the details...... so feel free to read no further.


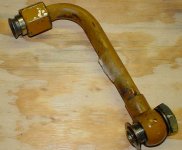
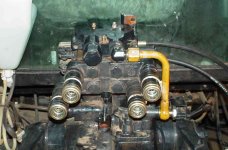
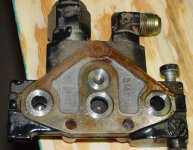
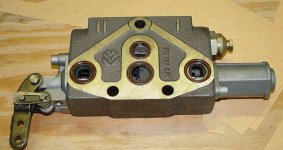
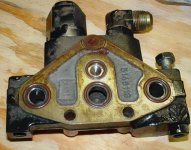
It comes as a kit and its about $500. The instuctions are of marginal value. They opted for pictographs rather than italian.
The first big problem was that the parts list does not have part numbers just the description of the part such as "o-ring". Of course there is more than one kind of o-ring so a little detective work is in order. /forums/images/graemlins/confused.gifBut they do have the description in four languages! /forums/images/graemlins/tongue.gif

My kit turned out to be missing several different small o-rings and required a trip to the dealer to correct. So check the kit carefully.

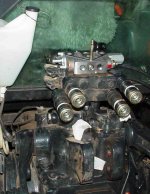
First step was to remove the rear "passenger side" tire. You could probably do it with the wheel on but it would be a pain. This step requires a jack with greater than 24" max height. Not easy to find. So I found some jack stands that claimed a 24" height and planned to use the tire as a jack. Problem was that they were a little short so a 2x4 was used to make up the difference.

The second stand in the picture is just in case the 2x4 slips out, its not touching the bottom of the axel.
 

Attachments

  • 327324-wheel.JPG
    327324-wheel.JPG
    76.4 KB · Views: 341
   / Adding a Third Remote to a TN
  • Thread Starter
#2  
Boy am I glad those tires are just full of air. I would recommend you do not lay the tire on its side.

Next step was to remove the yellow return pipe from the top of the valve block.

Note that the top is just a flare fitting. The bottom has an o-ring on either side. The ring is metal with rubber in the middle, all one part. The dealers new parts list shows these as rubber o-rings now but I did not swap the outer one since this setup was working.
 

Attachments

  • 327328-return tube.JPG
    327328-return tube.JPG
    57.9 KB · Views: 255
   / Adding a Third Remote to a TN
  • Thread Starter
#3  
I went ahead and pulled the top link off.
Not really required but makes it easy to get at the remotes.
Just one pin and it comes off.
 

Attachments

  • 327329-top link.JPG
    327329-top link.JPG
    28.5 KB · Views: 231
   / Adding a Third Remote to a TN
  • Thread Starter
#4  
Also pulled the bracket that supports the top link when not in use. Again not required but its in the way. just two bolts and its off.
 

Attachments

  • 327330-top link bracket.JPG
    327330-top link bracket.JPG
    30.2 KB · Views: 218
   / Adding a Third Remote to a TN
  • Thread Starter
#5  
So now its time to take the studs out. There are three studs, threaded rods, that hold the valves togheter and to the tractor. There is a bolt on the top and a bolt and washer on the bottom. You want to take them out one at a time to make sure that the orings between the valves do not come loose.

You will replace these short studs (~6 1/2" for two remotes) with longer ones from the kit (~8 3/4" for three remotes).

Here is the view with the bolts out of the tops of the studs. I found that I had to take the bottom bolt off pull the whole stud out, only one at a time! I then used a vise and a stud wrench to remove the top bolts which are painted on in my case.
You then put the longer studs in place of the old short studs, again only one out of the stack at a time.
 

Attachments

  • 327333-two remotes start.JPG
    327333-two remotes start.JPG
    87.9 KB · Views: 264
   / Adding a Third Remote to a TN
  • Thread Starter
#6  
Now you pull the top valve block off, which serves as the fluid return to the tank.

Here is the bottom view of this top block.
 

Attachments

  • 327334-bottom of return block.JPG
    327334-bottom of return block.JPG
    81.1 KB · Views: 215
   / Adding a Third Remote to a TN
  • Thread Starter
#7  
There are four sets of o-rings that go in these recessed cavities between each valve segment.

My tractor was missing a ring /forums/images/graemlins/shocked.gif /forums/images/graemlins/mad.gif, but it did not leak so no harm done.

The top three are larger and have metal rings inside a rubber o-ring. The bottom one does not have the inner metal ring. The middle two, both top and bottom, have a plastic ring on the outside of the rubber o-ring.
My installation was missing one of the metal rings.

Sorry for the sloppy focus.
 

Attachments

  • 327357-orings.JPG
    327357-orings.JPG
    20.6 KB · Views: 213
   / Adding a Third Remote to a TN
  • Thread Starter
#8  
So now you install the new valve from the kit. Here it is with the rings all ready to go.
You must turn it ring side down to install so use a little grease on all the rings to keep them from falling out.
 

Attachments

  • 327358-valve.JPG
    327358-valve.JPG
    78.7 KB · Views: 239
   / Adding a Third Remote to a TN
  • Thread Starter
#9  
Here it is installed.

Ready to put that top return block back on.
Note the longer stud in the picture. The other two are in they have just fallen down so you can not see the top.
 

Attachments

  • 327361-third valve in place.JPG
    327361-third valve in place.JPG
    62.8 KB · Views: 265
   / Adding a Third Remote to a TN
  • Thread Starter
#10  
So here is the top part ready to go back in place.
Again just a dab of grease will hold all the rings in place.
 

Attachments

  • 327362-return block ready to install.JPG
    327362-return block ready to install.JPG
    78.9 KB · Views: 202

Tractor & Equipment Auctions

2025 Swict 84in Bucket Skid Steer Attachment (A50322)
2025 Swict 84in...
2024 JT10 - 5' X 10' TRAILER (A51243)
2024 JT10 - 5' X...
2025 Swict 78in Bucket Skid Steer Attachment (A50322)
2025 Swict 78in...
2020 KUBOTA RTV X1100C UTV (A51406)
2020 KUBOTA RTV...
UNUSED FUTURE MINI EXCAVATOR RIPPER (A51244)
UNUSED FUTURE MINI...
IF YOU BID ON AN ITEM YOU MUST PAY FOR IT!! NO BACKING OUT AFTER IT IS SOLD!! (A50775)
IF YOU BID ON AN...
 
Top