Angle iron on FEL Bucket

   / Angle iron on FEL Bucket
  • Thread Starter
#21  
And another...
 

Attachments

  • 705503-DSCN1099.JPG
    705503-DSCN1099.JPG
    48 KB · Views: 366
   / Angle iron on FEL Bucket
  • Thread Starter
#23  
As far as the discussion goes, I don't think there is any one perfect answer to our dilemma for FEL bucket chain attachments. It was after alot of listening in here that I decided to go with the Angle iron.

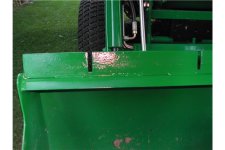
I don't see the notches as 'lost stiffness', I look at them as being the real reason for putting the angle iron there in the first place. I see the horizontal stock of the angle iron as a bonus, not the end all of stiffness I may need. Again it's not the perfect answer but it's a great start!

I did not reinforce underneath the bucket top, if I find some appropriate material I may have some welded in there, we'll see.

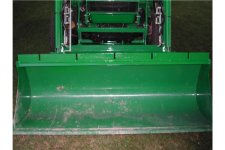
I have used this quite a bit already and am very pleased. I always try to put the weight towards the edges whenever possible. I love the options 5 slots give me, and have had seen no indication that the chain will 'slip' out the top.

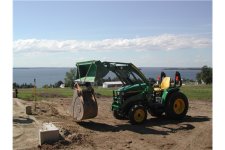
With this setup I can even help out the big boys...
 

Attachments

  • 705518-DSCN1225.JPG
    705518-DSCN1225.JPG
    54.8 KB · Views: 352
   / Angle iron on FEL Bucket #24  
You would gain a lot of stiffness welding a piece of anle iron to the inside top of the bucket. Install it such that you weld the 2 edges to the top of the bucket forming a triangle shaped tube. Hope this makes sense. Attached a very simple diagram to clarify.

Matt
 

Attachments

  • 705674-angle iron.bmp
    6.1 KB · Views: 435
   / Angle iron on FEL Bucket #25  
What tool did you use to cut the slots? They are very neat and clean.
 
   / Angle iron on FEL Bucket
  • Thread Starter
#26  
MBrule,
Thats a good idea. It's low profile and under the bucket roof, I'll be keeping my eye out for some angle iron for that application. Hopefully before I bend my bucket /forums/images/graemlins/smile.gif

Caylor,
Well it took me some time but I wanted it done right. I started with a miter chop saw. That worked well for each side of the notch but if the blade didn't have support on both sides it would bias to the weak side. So when I did the center of the notches (the blade was a little less than a third of the width of the notch) I had to use light pressure and just ease my way down so it wouldn't slide off to one edge or another.

Then when all the notches were done as much as I could with the saw I used a grinder to make the edges straight and clean. Finally I used good old fashion elbow grease and a file to get the bottom corners nice and square, and not too deep, just a touch higher than the flat part of the iron.

They came out great and every one fits a 3/8 chain just right.
 

Tractor & Equipment Auctions

Pull Behind Mower (A46502)
Pull Behind Mower...
3pt. Blade (A49339)
3pt. Blade (A49339)
2012 (A46502)
2012 (A46502)
3059 (A46502)
3059 (A46502)
2018 John Deere 310L EP Backhoe (A49339)
2018 John Deere...
2004 Ford E-250 Cargo Van (A46683)
2004 Ford E-250...
 
Top