leonz
Super Member
Thanks again for the additional info, leonz! I very much appreciate your effort and knowledge! Do you suppose there were any guards on the front and back for the blades?
The flail mower rotor will slice the grass and lift it up and over the flail mower rotor and let it drop back down to the ground.
As you are standing on the left side of the mower-the blower side of the engine the rotation of the flail mower rotor will be clockwise.
The curved mower shroud which aids the aerodynamic suction created by the Y blades/grass slicers have enough of an arc that the grass and brush will only travel over the rotor to the rear and down making it a very safe mower.
Adding a rubber flap to the rear of the housing will only aid in plugging the mower housing as the clippings will build up quickly.
You can add rubber flap of stiff rubber conveyor belting to the front with the aid of 2 pieces of thin strap iron and be sure to place the strap iron forward enough to be out of the orbit of the grass slicer knives as the head of the bolt or the nylock nut could be struck with a grass slicer knive
Use grade 8 Allen bolts and 2 Allen Spring washers when installing the strap iron and belting with each bolt as the allen bolts will be easier to tighten from the outer side of the shroud.
If you have a ratchet box end wrench set you can place the Allen bolt heads on the exterior of the shroud and simply tighten the bolt by hand or with an allen socket wrench sized for bolt head-measure bolt lengths three times install once.
Please purchase a pair of very heavy duty shocks to replace the originals as you have a mower without a rear roller as the shocks help to keep it level and centered while mowing to reduce all the bouncing and posssible scalping on good turf and also reduce the strain on the side weldments of the mower shroud where the tires are.
Now about the tires and wheels:
Please at your convenience remove one wheel and bearing if it cooperates-if not we will get to the issue; The stub shafts most likely have a washer and a cotter pin holding the wheel in place.
The problem is bearing life with the small flailmowers as the rims go bad before you realise it as it does in our case with a pick up mower which collects the clippings.
If the wheels are in good shape and the bores are not egg shaped you can purchase ball bearings to match them and the grease fittings are tucked the hub and hopefully exposed.
The problem is the bearing life as the small flailmowers will log hundreds of miles of travel per week due to the small tire and rim size if larghe areas are mowed.
The bearings are a press fit in the wheels as rule and can be popped out with a long punch normally and replaced easily as long as you put the bearings in the freezer overnight as they will slip in the wheel bore and simply let them warm up before installing them on the stub shaft.
If you can keep the wheels and replace the tires plan on changing the wheel bearings twice a season (depending on mowing time and acreages) as you will mow all the time once you have the engine rebuilt and rotor bearing replaced.
We went to a new tire and wheel and heavy roller bearings to replace our originals due to the wieght of the mower when empty and loaded with grass clippings- we have to have the hitch reinforced as it has a bend in it.
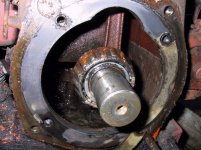
The main rotor bearings will be easy to replace and maintain and I will get into that a bit later when you have closer more defined pictures.
FYI the rotor bearings if intact will have the ID numbers and size on the inner race wide edge and you will need to use the same type of bearing which is a bearing sealed on one side typically.
All bearings are metric and it will be easy to replace the old bearings.
You can replace the original wheels and bearings with better ones if you desire to do so and I can help you with that as I have an excellent supplier for tires, wheels, and bearings.
You most likely will find severe checking on the side walls and cracking of the rubber most likely.
Awaiting more photos from you

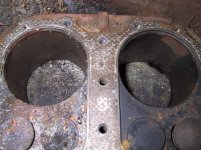
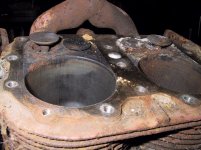
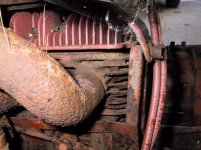
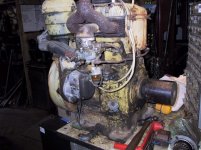
 Seems like it overheated- the pistons are broke to the top ring, and there is no ring visible on the one piston, and there is shrapnel damage on the head and piston crown. Could have been run with that mouse nest in there... Note that one exhaust valve is stuck open higher than the other- it probably was run with that valve sticking, and the cam hammers it open further- saw that on a generator a while back. These Wisconsin twins will run on one cylinder. That is the top end!