scarg
Bronze Member
Lance wrote-
</font><font color="blue" class="small">( <font color="blue"> Steve,
Arch building - can I get more information? company name? quality? ease of construction? etc. Am considering purchasing one also.
MR, should this be another thread?
Lance
</font> )</font>
Lance- glad to pass on some info about the arch building.
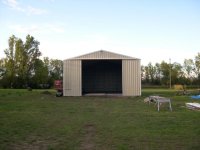
The building we bought was from U.S. Buildings
http://www.usbuildingsdirect.com/model_s.html
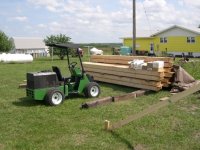
It is 30'x60' and the package consisted of (30) 2 foot wide arch panels- it takes 7 segments to make a complete arch.
The mfg recommends building all of the arches complete on the ground and then getting 6 people together to raise them.
Unless you have 6 very strong agile men available to work with you for about (4 to 5) ten hour days you can forget this approach.
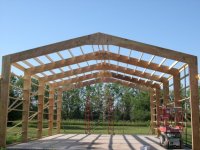
We tried many methods of raising complete arches and we had success with the recommended method- however for safety reasons we decided to construct the building by pre building each arch in 4 separate segments. This way my wife and I are able to finish the building and can finish one complete arch in about 1.5 hours.
We have 8 arches left now and have it down to a science.
It is not extremely hard work- if you don't mind climbing around on the structure (make sure your soles don't slip on the steel).
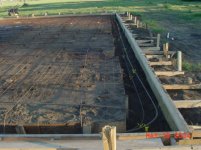
We poured a foundation called an "alaskan slab" about a foot wider than the outside of the building. I chose to design my own method of fastening the building to the concrete because the u-channel option from us buildings was well over 2,000 dollars.
I bought some 2"x2"x.125" thick angle iron in 20' lengths and we waterjetted slots in the angle at our factory on 24" centers to bolt the arches to. Total of 12 required 6 on the inside and outside. We plan to put the inside angle on after finishing the arches.
One critical note is that it is imperative to use the top straps that have 24" bolt holes on center at the top of the building to keep the top section of the building plum with the bottom.
We tried to get away without using them because everything was perfectly square to start with. We also began tightening the bolts securely in lieu of finger tight as recommended in the instructions.
To ensure we were on track I checked the bottom arch bolts with the top arch bolt about 1/4 of the way through and we were within 1/4".
At the half way point however we were about 2.0" off with the top of the arch leading ahead. This made sense becuase the bottom leading edge of the arches were beginning to push hard into the concrete the farther we went. Keep in mind that this stuff is very flexible toward center and that each leading edge of each arch needs to be pulled back to 24" on center to line it up with the slots in the angle iron. This too became more difficult to the point that we could no longer winch it back with a polaris sportsman 400 atv with 2500# winch. (the atv only weighs 800#'s though)
I called for backup at the mfg and they suggested that we loosen all the nuts and bolts to the point of less than finger tight for the last 3 or 4 arches that we had built.
We did this which only took about an hour and I rechecked the alignment and found that we really did not gain much.
So up on top of the building went with my handy come along and trailer straps. After a couple hours starting at the beginning end of the building we pulled each arch back and installed the 24" on center angle iron supports supplied by the mfg. Not a big deal but it is the first time I have ever seen one of the smaller motorcycle type straps and (1) of the mfg supplied 1/16" thick angle iron piece break from tensile stress!
That was pretty impressive.
I had to switch to the heavy duty straps that are about 2" wide and 1/8" thick - the yellow nylon type. These did not break and with the come alongs we were able to draw all the arches back to 24" on center.
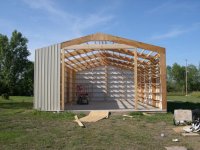
Needless to say we now follow the instructions to nth degree except raising complete sections. The arches are simply too flimsy and we even had one come crashing down at the beginning and crease one of the panels.
Way too dangerous even when done by the book in my opinion.
Sooo- to summerize.
If you have 80 hours for you and a pal (for the arches alone) to spare they are a very economical and strong building once in the finished position. Our building was about $9,000 delivered to upstate NY from North Carolina. Add another $6,000 for concrete and if you have access to a backhoe for power and water lines you have a building with no ends.
I would think that the ends complete with garage doors will add another 3 to 5 thousand depending on what materials we use. Most likely 2x6's and then have lowes or home depot install the garage doors and a service door on each end.
I don't know any other way to get a building that size for under 25K.
It is time consuming but not extremely hard work.
The original reason we built it is to put our 3 horses (1/4horse mare, belgian mare and 1/4horse/belgian cross gelding) into in the bad weather and also to house their feed/hay and wood for our woodstove in the winter. However it will also be good to store atv's lawn mowers and of course the PT!
Any other questions I would be glad to answer. One item I left out is that the outside height is 14" to the center. It is nice to be able to help someone else out in the forum and not just be a information gathering leech! /forums/images/graemlins/smirk.gif
Best Regards,
Steve
</font><font color="blue" class="small">( <font color="blue"> Steve,
Arch building - can I get more information? company name? quality? ease of construction? etc. Am considering purchasing one also.
MR, should this be another thread?
Lance
</font> )</font>
Lance- glad to pass on some info about the arch building.
The building we bought was from U.S. Buildings
http://www.usbuildingsdirect.com/model_s.html
It is 30'x60' and the package consisted of (30) 2 foot wide arch panels- it takes 7 segments to make a complete arch.
The mfg recommends building all of the arches complete on the ground and then getting 6 people together to raise them.
Unless you have 6 very strong agile men available to work with you for about (4 to 5) ten hour days you can forget this approach.
We tried many methods of raising complete arches and we had success with the recommended method- however for safety reasons we decided to construct the building by pre building each arch in 4 separate segments. This way my wife and I are able to finish the building and can finish one complete arch in about 1.5 hours.
We have 8 arches left now and have it down to a science.
It is not extremely hard work- if you don't mind climbing around on the structure (make sure your soles don't slip on the steel).
We poured a foundation called an "alaskan slab" about a foot wider than the outside of the building. I chose to design my own method of fastening the building to the concrete because the u-channel option from us buildings was well over 2,000 dollars.
I bought some 2"x2"x.125" thick angle iron in 20' lengths and we waterjetted slots in the angle at our factory on 24" centers to bolt the arches to. Total of 12 required 6 on the inside and outside. We plan to put the inside angle on after finishing the arches.
One critical note is that it is imperative to use the top straps that have 24" bolt holes on center at the top of the building to keep the top section of the building plum with the bottom.
We tried to get away without using them because everything was perfectly square to start with. We also began tightening the bolts securely in lieu of finger tight as recommended in the instructions.
To ensure we were on track I checked the bottom arch bolts with the top arch bolt about 1/4 of the way through and we were within 1/4".
At the half way point however we were about 2.0" off with the top of the arch leading ahead. This made sense becuase the bottom leading edge of the arches were beginning to push hard into the concrete the farther we went. Keep in mind that this stuff is very flexible toward center and that each leading edge of each arch needs to be pulled back to 24" on center to line it up with the slots in the angle iron. This too became more difficult to the point that we could no longer winch it back with a polaris sportsman 400 atv with 2500# winch. (the atv only weighs 800#'s though)
I called for backup at the mfg and they suggested that we loosen all the nuts and bolts to the point of less than finger tight for the last 3 or 4 arches that we had built.
We did this which only took about an hour and I rechecked the alignment and found that we really did not gain much.
So up on top of the building went with my handy come along and trailer straps. After a couple hours starting at the beginning end of the building we pulled each arch back and installed the 24" on center angle iron supports supplied by the mfg. Not a big deal but it is the first time I have ever seen one of the smaller motorcycle type straps and (1) of the mfg supplied 1/16" thick angle iron piece break from tensile stress!
That was pretty impressive.
I had to switch to the heavy duty straps that are about 2" wide and 1/8" thick - the yellow nylon type. These did not break and with the come alongs we were able to draw all the arches back to 24" on center.
Needless to say we now follow the instructions to nth degree except raising complete sections. The arches are simply too flimsy and we even had one come crashing down at the beginning and crease one of the panels.
Way too dangerous even when done by the book in my opinion.
Sooo- to summerize.
If you have 80 hours for you and a pal (for the arches alone) to spare they are a very economical and strong building once in the finished position. Our building was about $9,000 delivered to upstate NY from North Carolina. Add another $6,000 for concrete and if you have access to a backhoe for power and water lines you have a building with no ends.
I would think that the ends complete with garage doors will add another 3 to 5 thousand depending on what materials we use. Most likely 2x6's and then have lowes or home depot install the garage doors and a service door on each end.
I don't know any other way to get a building that size for under 25K.
It is time consuming but not extremely hard work.
The original reason we built it is to put our 3 horses (1/4horse mare, belgian mare and 1/4horse/belgian cross gelding) into in the bad weather and also to house their feed/hay and wood for our woodstove in the winter. However it will also be good to store atv's lawn mowers and of course the PT!
Any other questions I would be glad to answer. One item I left out is that the outside height is 14" to the center. It is nice to be able to help someone else out in the forum and not just be a information gathering leech! /forums/images/graemlins/smirk.gif
Best Regards,
Steve