ATV rear cargo carrier build

   / ATV rear cargo carrier build
  • Thread Starter
#11  
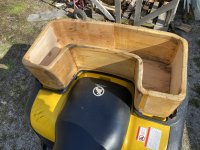
Most of the sanding and shaping is completed. The exterior was gone over with the belt sander, the top and bottom surfaces rounded over with a router, and the interior joints touched up with the marvelous little belt sander seen in the photo, and the whole thing gone over with a random orbital sander. There was one incident when the belt sander grabbed onto the carrier and slid it partially off the workbench. In catching it, the belt sander had a chance to take a bite out of the back of my hand. Nothing serious, just a couple scrapes, a minor battle scar that is typical of most projects. I still have all 10 fingers, so I'm happy about that.

Something was needed to help with some of the tight interior joints and corners where there was up to 1/8" of mismatches between two sections. I do not receive any kickbacks for recommending this product. The little "WEN 6307 Variable Speed Detailing File Sander" can be found on Amazon for $37, and is an amazing little tool. At that price, I expected a super cheap, crummy tool that sort-of worked. This is not the case here. It works perfectly, is well made, and can reach in to very tight spaces and remove material rapidly where needed.

In an earlier post the comment was made that the exterior of the carrier needed to be glassed because the epoxy-butt joints would have a tendency to crack. I proved that to be true since two of the joints cracked just with the stress of being worked over with the belt sander. I'm not worried because those cracks will be healed and strengthened with the epoxy used for putting down the glass cloth. I should have used more epoxy on joints where one or both parts were end grain. The end grain will absorb a lot of adhesive and leave a joint that is a little bit dry.


Shaping done.jpg
 
   / ATV rear cargo carrier build
  • Thread Starter
#12  
Test fit of the new cargo box in the ATV. Perfect fit. I put a first coat of epoxy on the box, but ran out of epoxy, so its partially coated.
 

Attachments

  • 4D005D9F-485B-47FA-85FC-1B2FA282746A.jpeg
    4D005D9F-485B-47FA-85FC-1B2FA282746A.jpeg
    3.4 MB · Views: 143
  • 322F5952-7540-4321-80F6-BF61DF5F14E6.jpeg
    322F5952-7540-4321-80F6-BF61DF5F14E6.jpeg
    4 MB · Views: 160
   / ATV rear cargo carrier build
  • Thread Starter
#13  
First piece of glass cloth was applied this morning. This resin was picked up at Michael's locally. The black epoxy pigment (Mica powder) came from Amazon. The epoxy resin was mixed, then a little denatured alcohol added to reduce it enough for easy brushing over the glass cloth laid out on the carrier, then enough pigment sprinkled in to make it black. I found that brushing the epoxy onto the cloth at the perimeter worked well to get the cloth positioned, then the rest of it was brushed on. This is being done in the unheated garage, so it will take a bit longer to cure in the cold temps. Temperature was 34 degrees when this was applied, so I have a lot of working time to check on it and squish down any areas where the cloth lifts up off the wood. I can also smooth out any runs as it cures. I can already see that I'll need to order more glass cloth. The interior will just be coated with epoxy. Putting glass cloth on the entire inside would be a miserable job. It would make some sense to put a strip of glass cloth over each joint on the inside though.


ATV3.jpg


ATV2.jpg


ATV1.jpg
 
Last edited:
   / ATV rear cargo carrier build #14  
LOL, I also see that you are into SCUBA, the lead belt weight is a giveaway.
\Nice hobby!

I have used my old weights as rear weights for my CUT.
 
   / ATV rear cargo carrier build
  • Thread Starter
#15  
I'm into everything. I got certified a long time ago, but haven't been in the water for about 25 years. Since then, those weights have been repurposed. I always loved to go diving in a nice clear lake and see what's down there.
 
   / ATV rear cargo carrier build
  • Thread Starter
#16  
OK, I finally took the time to get this ATV cargo box completed. I found some 1" thick foam that was cut to shape to go under the box and then also some to line the bottom. When you're driving around, it's nice if stuff isn't rattling all over the place, and the foam fixes that. The interior foam is easy to slip out in the case of a rain storm. I still may drill a hole at the bottom as a drain, and then epoxy that so the wood can't absorb it, but with the foam at the bottom, water still has to be dealt with. That has already happened once, and I just wringed out the foam and left it out until it dried.

I'm quite happy with it, and mostly happy that I was able to resaw 2" wood that I milled from trees at the camp, into a curved profile and get that put together into a robust completed carrier that is fully fiberglass covered on the outside.

The only downside to this is that I wish that I had removed the steel fence around the rear carrier, and made the cargo box larger. I can't fit a chainsaw into the box. But I figured that out pretty early on and went with it anyway. I don't get into "would-a-could-a-should-a" very much. It is, what it is, and its a nice cargo box to have.

I will have to build an external chainsaw mount, as I had stated in an earlier post. Anyway, it's still very very handy to have and it's nice to look at too. Additionally, it's compatible with the Polaris 700 and also the Polaris 500 that I have.
 

Attachments

  • cargo box.jpg
    cargo box.jpg
    4.3 MB · Views: 140
  • cargo box1.jpg
    cargo box1.jpg
    4.8 MB · Views: 149
   / ATV rear cargo carrier build #17  
Given the oily and gas mess of a chainsaw, prefer external mount.
 

Tractor & Equipment Auctions

2008 John Deere 608C combine head (A50657)
2008 John Deere...
2015 MACK ELITE LEU633 GARBAGE TRUCK (A51406)
2015 MACK ELITE...
Set of AG R4 Wheels and Tires (A52748)
Set of AG R4...
2014 FORD F-550 ROUSTABOUT(INOPERABLE) (A52472)
2014 FORD F-550...
2008 Chevrolet Malibu Passenger Car (A51694)
2008 Chevrolet...
2017 FORD F-550 XL SERVICE TRUCK (A51406)
2017 FORD F-550 XL...
 
Top