Hey all,
I am sinking fence corner and other posts 5' and my auger only goes down 3 feet. After hand digging the last 2 feet for 5 holes over 2 days, I figured there had to be a better way. I have a County Line/SpeeCo auger with a 2" round drive shaft. I searched for weeks for an extension with no success. I do not have welding equipment, but got to looking at the standard sizes of black pipe. Here is what I found:
SCH 40 Pipe 1 1/2 in
Outside Diameter 1.9"
Inside Diameter 1.61"
SCH 40 Pipe 2 in
Outside Diameter 2.375"
Inside Diameter 2.067"
The inside diameter of the 2" pipe would be .067" (approx 1/16") wider than my auger receptacle on my existing auger bit (part that attaches to auger head)
Inserting the 1.5" pipe into the 2" pipe would have 0.167" (approx 3/16") clearance
Inserting the 1.5" pipe into the auger bit would have .1" (approx 1/16") clearance
This all sounded like pretty reasonable tolerances, so I decided to make my own extension. Another idea I had that I didn't take advantage of, is by having one pipe inside the other, you could potentially make the length of the extension adjustable. I found, for at least my skills and equipment, getting holes lined up was very difficult, so makeing it adjustable was next to impossible.
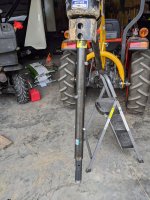
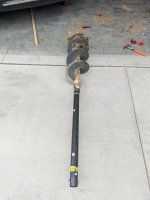
Here is what I built.


I used clevis pins on each end to make swapping easy. However, that displaced shear pins, so there may be some risk with that. I am in sand and am not digging near my woods-lines (roots), so I figured I'd be ok.
It took one auger hole to become efficient and learn some lessons. When we started on the first hole, we drilled until the auger was buried, then added the extension, then drilled way down, then learned we couldn't pull it back up! That was a hard lesson. I had to dig the dirt off the top of it, then dig down beside it and get dirt of the blade. Lesson learned. I'm not sure if it's the perfect process, but on the second and third hole, things went very well and rather fast, so we are sticking with it:

Yesterday we got 3 holes done before we got rained out. Doing the math, it looks like it takes 25% of the time (75% less) than digging 2/5 of each hole by hand. It's totally worth the time and money for the extension.
I am sinking fence corner and other posts 5' and my auger only goes down 3 feet. After hand digging the last 2 feet for 5 holes over 2 days, I figured there had to be a better way. I have a County Line/SpeeCo auger with a 2" round drive shaft. I searched for weeks for an extension with no success. I do not have welding equipment, but got to looking at the standard sizes of black pipe. Here is what I found:
SCH 40 Pipe 1 1/2 in
Outside Diameter 1.9"
Inside Diameter 1.61"
SCH 40 Pipe 2 in
Outside Diameter 2.375"
Inside Diameter 2.067"
The inside diameter of the 2" pipe would be .067" (approx 1/16") wider than my auger receptacle on my existing auger bit (part that attaches to auger head)
Inserting the 1.5" pipe into the 2" pipe would have 0.167" (approx 3/16") clearance
Inserting the 1.5" pipe into the auger bit would have .1" (approx 1/16") clearance
This all sounded like pretty reasonable tolerances, so I decided to make my own extension. Another idea I had that I didn't take advantage of, is by having one pipe inside the other, you could potentially make the length of the extension adjustable. I found, for at least my skills and equipment, getting holes lined up was very difficult, so makeing it adjustable was next to impossible.
Here is what I built.


I used clevis pins on each end to make swapping easy. However, that displaced shear pins, so there may be some risk with that. I am in sand and am not digging near my woods-lines (roots), so I figured I'd be ok.
It took one auger hole to become efficient and learn some lessons. When we started on the first hole, we drilled until the auger was buried, then added the extension, then drilled way down, then learned we couldn't pull it back up! That was a hard lesson. I had to dig the dirt off the top of it, then dig down beside it and get dirt of the blade. Lesson learned. I'm not sure if it's the perfect process, but on the second and third hole, things went very well and rather fast, so we are sticking with it:
- Drill the whole twice with just the bit, pulling it out and pulling/knocking off the dirt each time.
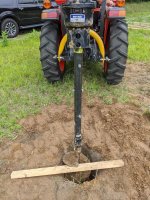
- Lower the bit into the hole until the top blade is just above ground level, then put a board across the blade to hold it in place.
- Disconnect the head from the bit, raise it, and attach the extension. Doing the head first is key, as you can turn it to match the holes in the bit, whereas the bit is in the hole and turning that would be very hard.
- Lower the auger with extension down and connect it to the bit.
- Drill until the soil goes over the top blade. Raise it and pull/knock off the dirt. Repeat to desired depth.
- Lower into the hole until the top blade is just above ground level. Put a board across the blade to hold it in place.
- Disconnect the extension from the bit. Raise the head, remove the extension.
- Lower the auger and connect to the bit. Pull it out. Hole done.

Yesterday we got 3 holes done before we got rained out. Doing the math, it looks like it takes 25% of the time (75% less) than digging 2/5 of each hole by hand. It's totally worth the time and money for the extension.