Dyer retired
Gold Member
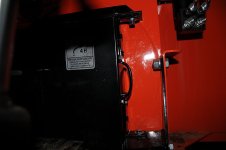
This is overkill and no one else will find it necessary, but here goes. I took my new B2782 reduction gear cover off last week to oil the chain, but mostly to check the set screws, nuts, and bolts for tightness. When I first had my old BX2750 I opened the back up after a couple of uses and found just about everything loose, so I wanted to make sure those issues didn't exist on the new rig. The cover is held in place by two bolts, one easily accessible from the top gear box support frame, but the bottom bolt has to be accessed from underneath the quick attach frame, so a little crawling is needed and I can't really get a very good look up underneath, but it wouldn't matter anyway. The cover piece looks like it was punched with an awl and then the metal tapped for the bolt thread...if that makes any sense? There isn't much there and just a little too much wrench would strip the threads. I know it doesn't require much to hold the cover in place, but I don't like the bolts loosening up either, so I tend to tighten them fairly well.
The chain got oiled and and everything else was tight inside, so I was happy about that, but when I went to put the cover back in place...I spent about 35 minutes lining the bottom bolt up through the quick connect frame and trying to get that cover in the right place for the bolt to catch the threads, none of which you can see while doing it. It was way more miserable than it needed to be, but I finally got it. The top bolt was easy, because you can see the holes light up, unlike the bottom setup. Even though it would make sense that once the top bolt was inserted, the bottom would have to line up, but it sure didn't want to.
My intention is to take that cover off regularily to lubricate the chain and check that everything stays tight, so if I had to go through this frustration everytime, it was going to be a long winter! I welded a couple pieces of 1/2" wide flat stock at a 45 degree angle and attached one top and bottom to the cover piece with 1/4" bolts. I then drilled holes for the bolts to attach down through an existing hole on the quick attach frame, which allows me to see the holes line up and I can easily get a washer, lock washer, and nut on the bottom of the bolt. The top bracket uses another hole on the reduction gear box support that was not used for anything previously. I could have used the top bolt and threads on the cover, but it seemed pretty fragile and so I went with a matching bracket up top. I'm not sure if the picture will be all that great, since everything was painted black to match the cover. The cover fits tightly between the frame and the support bracket, so was having to try and fingertip the thing out of there. I just added a handle to adjust the cover to where the bolts will drop through and is now easy to put on and take off.
Another $15.00 solution to a $ .05 problem from Dyer, retired.