MadDog
Platinum Member
This fall I sold my Honda 928TA (pretty much the king of the walk-behinds) and bought a Pronovost Puma-64 for the 3ph.
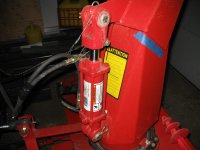
Well, I had just finished setting up the chute and deflector hydraulics and put a set of new chains on the rear wheels last weekend, so yesterday's mini-blizzard in Eastern Mass couldn't have come at a better time.
We had snow that changed to drizzle for about an hour and then changed back to snow with a vengeance. By the time I got home from work, we probably had about 8" on the ground, although it was pretty hard to tell since the wind was gusting to 50mph+ and even the wet and heavy snow had drifted.
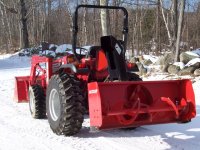
This was my first use of the Puma and it's mighty burley compared to even a first rate walk behind like the track-wheeled Honda.
Of course, the 64" cut makes it fast compared to any walk behind. I did my driveway and front walk, 2d driveway to the barn, some space in the back for the dogs to play in, and the driveways of 9 neighbors on my street and then eliminated the mountain of compacted snow the town plow always leaves at the end of the cul-de-sac; all in about 2 hours. The driveways averaged about 5 minutes per and when I get more skillful at adjusting blower height on the move to take account of road crown and uphill driveways, it will be faster.
The most impressive difference, though is power. My B7800 has 22 pto hp and that, pushed by a 3000# machine with R4s and chains, enabled me to just cut right through the plow-compacted stuff. The piles at the end of the street were about 5' high so I pushed everything higher than about 2 1/2' back with the FEL and then backed into it with the Puma, which just chewed right through it like a chainsaw going through white pine. Moreover, the 4 impeller blades just hurl it out without clogging or even slowing.
The Puma only set me back about $500 beyond what I sold the Honda for (it sold 2 days after I advertized it, with two buyers eventually bidding it up to $100 more than I paid for it 3 years ago) and, even without considering that I now have one less engine to maintain, the change is a great improvement.
Many thanks to MadRef for his many helpful snowblower posts and also for much-needed insights on the hydraulic setup. At present, I'm using the remotes and joystick that run my top-n-tilt in the summer, but I think that I have power beyond on the valve and I'll add on in the spring.
One operating tip; you definitely want to run pto snowblowers at full 540rpm rear pto speed for two reasons. (1) That maxs the impeller blades' velocity, which is what gives you distance when you want it. (2) The auger is geared way down so at less than 540, the augers would draw the snow into the impellers so slowly that you'd just be able to inch along. In compacted material at max cut height (24") you kinda have to take it easy on the speed anyway.
BTW, unless you are running one of these on large acreage where it doesn't matter where you throw the snow or how far it goes (and maybe even then if you need to change direction and/or distance because of gusty winds) the hydraulic chute rotation and deflection are well worth the added cost.
Next snowstorm, I'll get some pictures; I was too busy havin' fun to take out the camera yesterday.
Well, I had just finished setting up the chute and deflector hydraulics and put a set of new chains on the rear wheels last weekend, so yesterday's mini-blizzard in Eastern Mass couldn't have come at a better time.
We had snow that changed to drizzle for about an hour and then changed back to snow with a vengeance. By the time I got home from work, we probably had about 8" on the ground, although it was pretty hard to tell since the wind was gusting to 50mph+ and even the wet and heavy snow had drifted.
This was my first use of the Puma and it's mighty burley compared to even a first rate walk behind like the track-wheeled Honda.
Of course, the 64" cut makes it fast compared to any walk behind. I did my driveway and front walk, 2d driveway to the barn, some space in the back for the dogs to play in, and the driveways of 9 neighbors on my street and then eliminated the mountain of compacted snow the town plow always leaves at the end of the cul-de-sac; all in about 2 hours. The driveways averaged about 5 minutes per and when I get more skillful at adjusting blower height on the move to take account of road crown and uphill driveways, it will be faster.
The most impressive difference, though is power. My B7800 has 22 pto hp and that, pushed by a 3000# machine with R4s and chains, enabled me to just cut right through the plow-compacted stuff. The piles at the end of the street were about 5' high so I pushed everything higher than about 2 1/2' back with the FEL and then backed into it with the Puma, which just chewed right through it like a chainsaw going through white pine. Moreover, the 4 impeller blades just hurl it out without clogging or even slowing.
The Puma only set me back about $500 beyond what I sold the Honda for (it sold 2 days after I advertized it, with two buyers eventually bidding it up to $100 more than I paid for it 3 years ago) and, even without considering that I now have one less engine to maintain, the change is a great improvement.
Many thanks to MadRef for his many helpful snowblower posts and also for much-needed insights on the hydraulic setup. At present, I'm using the remotes and joystick that run my top-n-tilt in the summer, but I think that I have power beyond on the valve and I'll add on in the spring.
One operating tip; you definitely want to run pto snowblowers at full 540rpm rear pto speed for two reasons. (1) That maxs the impeller blades' velocity, which is what gives you distance when you want it. (2) The auger is geared way down so at less than 540, the augers would draw the snow into the impellers so slowly that you'd just be able to inch along. In compacted material at max cut height (24") you kinda have to take it easy on the speed anyway.
BTW, unless you are running one of these on large acreage where it doesn't matter where you throw the snow or how far it goes (and maybe even then if you need to change direction and/or distance because of gusty winds) the hydraulic chute rotation and deflection are well worth the added cost.
Next snowstorm, I'll get some pictures; I was too busy havin' fun to take out the camera yesterday.