Basement Project

   / Basement Project #1  

RobS

Super Member
Joined
Jun 26, 2000
Messages
7,189
Location
Goshen, IN
Tractor
None!
Here's what I do when the weather isn't conducive to tractoring...

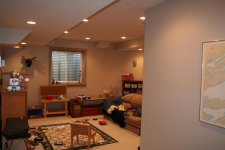
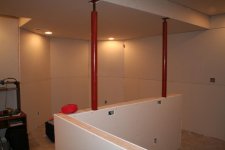
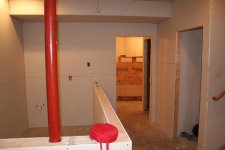
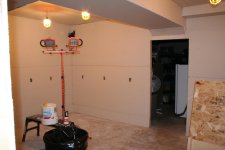
This is phase II of my basement finishing project. I started it last winter but stopped after hanging sheetrock. I had hoped to pay someone to do the finishing but I am finding myself getting ready to take it on.

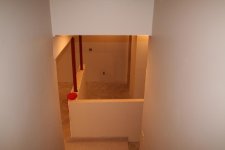
Here's what you see coming down the stairs /forums/images/graemlins/smile.gif
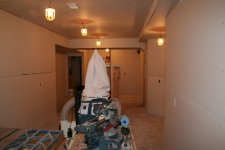
 

Attachments

  • 776858-IMG_0807_1_1_1.JPG
    776858-IMG_0807_1_1_1.JPG
    43.7 KB · Views: 1,007
   / Basement Project
  • Thread Starter
#2  
Around the stairs to the left is Phase I which I finished a couple of years ago. It's a rec room/home theatre. Primarily the domain of the kids /forums/images/graemlins/smile.gif
 

Attachments

  • 776859-IMG_0808_2_1_1.JPG
    776859-IMG_0808_2_1_1.JPG
    82.6 KB · Views: 716
   / Basement Project
  • Thread Starter
#3  
This will be a dinette like area, probably a game table and chairs. The half wall will be a bar which will include a sink, fridge and dishwasher. Columns will be covered in something, depending on the final decorating decisions /forums/images/graemlins/smile.gif
 

Attachments

  • 776863-IMG_0811_4_1_1.JPG
    776863-IMG_0811_4_1_1.JPG
    58.6 KB · Views: 600
   / Basement Project
  • Thread Starter
#4  
Here's where the real fun begins. To the right is the stairwell, then a closet under the stairs. Straight ahead will be my wood/hobby shop. Left of that is more of the bar, then a half bath just out of view /forums/images/graemlins/smile.gif
 

Attachments

  • 776864-IMG_0812_5_1_1.JPG
    776864-IMG_0812_5_1_1.JPG
    70.1 KB · Views: 579
   / Basement Project
  • Thread Starter
#5  
Just inside my shop door. The doorway across the way will be an unfinished storage area. Eventually, I want base and upper cabinets in this corner and my woodworking bench will sit in the middle /forums/images/graemlins/smile.gif
 

Attachments

  • 776867-IMG_0813_6_1_1.JPG
    776867-IMG_0813_6_1_1.JPG
    77 KB · Views: 520
   / Basement Project
  • Thread Starter
#6  
View in the shop to the right. This will be the stationary machines with my chop saw sitting in the bumpout in the middle. Convenient of the house architecture to be so accomodating to my needs! I'll build a long, narrow table along the entire wall to support wood being cut to length /forums/images/graemlins/smile.gif
 

Attachments

  • 776869-IMG_0817_8_1_1.JPG
    776869-IMG_0817_8_1_1.JPG
    81.5 KB · Views: 488
   / Basement Project
  • Thread Starter
#7  
And finally for now, the view to the left. The closet to the far end is a sump pit. Opposite it (towards the camera and around a corner), is the utility closet with wiring, heating, etc. It's big enough for some storage of less frequently used tools and such.

I spent the morning clearing some accumulated clutter and going over all the screw heads. Tomorrow I'll seal off the finished areas and begin the taping. Any volunteers?

/forums/images/graemlins/smile.gif
 

Attachments

  • 776871-IMG_0818_9_1_1.JPG
    776871-IMG_0818_9_1_1.JPG
    75.5 KB · Views: 516
   / Basement Project #8  
Rob,

Looks like allot of mud work in your future. Sanding the ceilings is what I hate the most, but it's like anything else, you just do it until it's done. /forums/images/graemlins/smirk.gif

I'm curious about your lights. They look like temporary lights that you just wire to in while working, but I've never seen them with cages on them. Am I seeing them right? Why the cages? Is it required by code in your area?

Thanks for the pics and keeping us updated. I'm looking forward to seeing your progress.

Eddie
 
   / Basement Project #9  
Mud and tape... good fun, especially when you are too cool to wear a dustmask or goggles to sand. I did the sheetrock on a couple of garages and then a bathroom. I enjoy it as long as the weather is cool. All the labor and dust doesn't mix well with hot and humid for me. Looks real nice and makes a lot of useful space for you, enjoy.
 
   / Basement Project
  • Thread Starter
#10  
EW, the cages on the lights are just temporary. I knew I'd have the lights up for some time so I got them. Don't know about codes for temp lights but I just thought they made sense and they weren't too expensive. Once the area is finished, it's a four foot flourescent in on each pigtail. I like lots of light in a workspace.

And yes, mudding and sanding is quite a lot of fun. Thus, the invitation. I will provide any beverage of anyone's choice for assisting. Wife is shopping tomorrow morning so I'll get a late start. Funny how her early morning is more like my normal morning. Once the boys are up, we'll head to the big box for corner bead, tape and mud. At least the weather is cooperating. Absolutely miserable out there /forums/images/graemlins/smile.gif
 
   / Basement Project #11  
Very nice work. So just how much beer has it taken to get to this point?
 
   / Basement Project #12  
RobS
Great project.
Just had some drywall work finished (painter did it) and he used something that didn't require dusty sanding (he said there would be no dust, and it was a wet sanding method). I didn't see him do it, but it looks great and there was no dust. Thought you might like to know, if not already.

I also noticed your window wells, looks like the corrugated window well units. If so, what did you cover them with? Or going without covers - i.e. problem with animals, kids, etc getting in to them, as well as snow and rain. My son has these, and we fashioned some plastic corrugated covers, that really are only temporary (for three years now /forums/images/graemlins/wink.gif ). Wondering if there are any commercial products for covers.
 
   / Basement Project #13  
I use the plain old paper tape but have seen the adhesive mesh type that doesn't require any skill at getting both sides of the tape mudded yet not so much mud that the joint sticks out. I'd like to try it to see how it goes. My biggest trouble is hiding those joints.
 
   / Basement Project #14  
</font><font color="blue" class="small">( and he used something that didn't require dusty sanding (he said there would be no dust, and it was a wet sanding method). I didn't see him do it, but it looks great and there was no dust. Thought you might like to know, if not already. )</font>

I normally use just a flat rectangular sponge .... and a bucket of warm water to rinse it in. /forums/images/graemlins/grin.gif
 
   / Basement Project
  • Thread Starter
#15  
mega_me, it's only taken one round of beers so far. I've done all the work myself other than having four buds over to get the sheetrock into the basement. Those big windows were worth it!

beenthere, the windowells came with and there are grates over them that must have been part of the package. They are made of steel strip and rod stock. Pretty simple with tabs around the edges to sit on the corrugated windowell.

Another future project is to remove the steel and make a more decorative windowell with landscape block. Also, I'll taper it more to let more light in.

I've heard of sanding with a sponge but not had success with it. I don't do much sanding between coats, only the finish coat. Unless of course, I goof up. I've also heard of another method that mixes latex paint, plaster of paris and drywall mud (?) to make a one step joint. I can't remember the name, but it sounded pretty tricky for an amatuer like me /forums/images/graemlins/smile.gif
 
   / Basement Project #16  
Thanks
About the mud, my son also tried taping and mudding his drywall (he did great putting that up) using the mud in buckets from the box store. He ran into a lot of trouble because it was too thick and didn't realize it. The joints were not turning out well, and the job too overwhelming, so he found a drywaller with some time between jobs. What he mixed up was real thin mud, and the job looked easy.

Good luck with the project. It will be great to have it done, but also fun doing it.
(Now, back to my project of going into the attic 'crawl' space and running a new wire into a light fixture that is about 4' from the outside wall under a 5:12 pitch roof. Not looking forward to doing it, but no alternatives come to mind in this 10° temp. and fiberglass insulation. Yuucckk! ) /forums/images/graemlins/wink.gif
 
   / Basement Project #17  
Sometimes the tools professionals use to make their work look better or go faster are just the ticket for amatures or part-timers. Recently, I did some drywall work in my home. I rented a toll made by Porter-Cable. It is a dust-less power drywall sander. It employs a wet-vac attached to a sander that will sand faster and smoother than any hand sander I've ever used. I'm told most good rental marts have them nowdays.

I also have an account with Ames Tools. They rent "drywall Bazooza's" They will apply mud and tape at an incredable pace. The only drawback is clean-up time. Unless you have a lot of mudding to do, they take longer to fill and then clean out than the job takes with conventional tools.

But that dustless power sander is all that AND a bag of chips!
 
   / Basement Project #18  
Looks like fun, Rob! I'd love to help but the wife frowns on me working on other people's projects when I have so many to finish, myself. /forums/images/graemlins/tongue.gif

Get a good, wide knife for the final pass on the joints. And make many thin coats VS a couple/three thick ones. I had a sander with a dust pickup on it that worked great until my brother-in-law burned it up. /forums/images/graemlins/mad.gif Those work very well, especially if you get lots of hose and place the shop/vac outside. Then, virtually no dust gets recirculated in the house by the vac.
 
   / Basement Project #20  
It's coming along Rob /forums/images/graemlins/cool.gif. Wish I was at the drywall phase on my attic project. So far, just planning & a heating/AC quote /forums/images/graemlins/crazy.gif... After 4 months I really understand the phrase - "slowing/settling down to start a family"
 

Tractor & Equipment Auctions

TOOTHED BUCKET FOR MINI EXCAVATOR (A58214)
TOOTHED BUCKET FOR...
2020 KENWORTH T680 TANDEM AXLE SLEEPER (A59905)
2020 KENWORTH T680...
2023 Unverferth 3PT 10 FT Perfecta Field Cultivator (A56438)
2023 Unverferth...
2008 CHEVROLET C8500 DUMP TRUCK (A59823)
2008 CHEVROLET...
UNUSED FUTURE XLA59 - 59" DRUM SPIKE LAWN AERATOR (A52706)
UNUSED FUTURE...
SHOPMADE MANIFOLD TRAILER (A58214)
SHOPMADE MANIFOLD...
 
Top