Coolnorth
Bronze Member
- Joined
- May 7, 2009
- Messages
- 82
- Location
- Dryden, Ontario, Canada
- Tractor
- Massey Harris Model 20, IH 240 Utility
After being rushed into trying to build something for last winter and having attempt # 1 fail miserably, attempt # 2 barely make it through the winter, I am at attempt # 3 which seems to be the right direction.
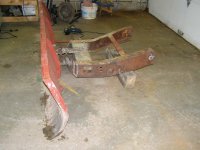
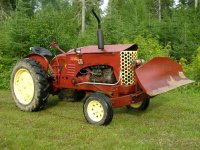
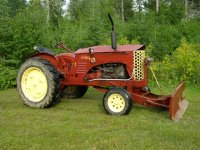
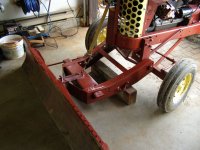
My Dad found a blade in a friend's yard. It had been an "on again off again" project for the guy - you could see the different attempts made on it over time, but the pivot plates were out of alignment and not parallel with the cutting edge. The blade form itself was excellent in curve, looking like the original idea was right on target, able to roll the material it is pushing.
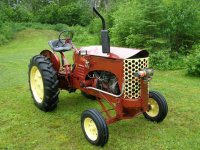
The next thing was to adapt it to my 1947 Massey Harris Model 20. With lots of scrap metal in the yard to choose from, I found the best thing to use once I realized it was 2 matched sections from a Chevy truck frame, 1/2 of a radio rack base, some 2" angle, 3" x 1/2" plate and 4" channel iron. Also some other bits and pieces like 3/4" and 1" pipe, 3/4" round bar, 1" round bar.
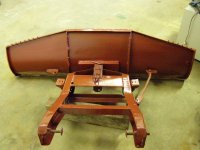
I don't have photos of it going together, but closer to complete photos, below.
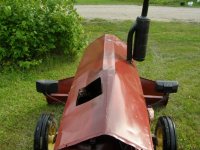
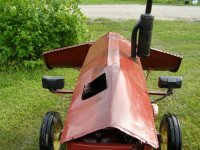
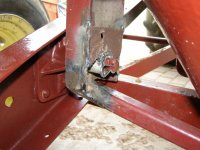
The 2 sections of truck frame are cut from the front of a 4 wheel drive truck, flipped upside down, with the rack base plate welded in across the front of the assembly, 2" angle welded across for bracing underneath and near the back, plate steel added out as a "nose" to give room for the blade to pivot. I've used the spring shackle mounts for the pivot bushings with some reinforcement.
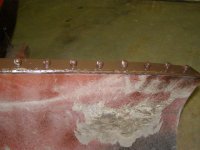
The last major part of the project was to reshape the blade itself to decrease weight and give it a bit more of a "look". I'm no pro welder and I've seen much more professional work on the forum. but after trying this assembly out and having it work is quite promising!
A few things left to do like add some points for adjusting the blade angle, maybe a quick-swing arm for holding the blade up while being stored, and also to upgrade to hydraulic lift, not electric winch.
My Dad found a blade in a friend's yard. It had been an "on again off again" project for the guy - you could see the different attempts made on it over time, but the pivot plates were out of alignment and not parallel with the cutting edge. The blade form itself was excellent in curve, looking like the original idea was right on target, able to roll the material it is pushing.
The next thing was to adapt it to my 1947 Massey Harris Model 20. With lots of scrap metal in the yard to choose from, I found the best thing to use once I realized it was 2 matched sections from a Chevy truck frame, 1/2 of a radio rack base, some 2" angle, 3" x 1/2" plate and 4" channel iron. Also some other bits and pieces like 3/4" and 1" pipe, 3/4" round bar, 1" round bar.
I don't have photos of it going together, but closer to complete photos, below.
The 2 sections of truck frame are cut from the front of a 4 wheel drive truck, flipped upside down, with the rack base plate welded in across the front of the assembly, 2" angle welded across for bracing underneath and near the back, plate steel added out as a "nose" to give room for the blade to pivot. I've used the spring shackle mounts for the pivot bushings with some reinforcement.
The last major part of the project was to reshape the blade itself to decrease weight and give it a bit more of a "look". I'm no pro welder
and I've seen much more professional work on the forum. but after trying this assembly out and having it work is quite promising! A few things left to do like add some points for adjusting the blade angle, maybe a quick-swing arm for holding the blade up while being stored, and also to upgrade to hydraulic lift, not electric winch.