Best Workshop/Bench Design Concepts

   / Best Workshop/Bench Design Concepts #1  

toddwulf

Silver Member
Joined
Oct 25, 2001
Messages
228
Location
Cameron Park, CA.
Tractor
1998 New Holland 1920
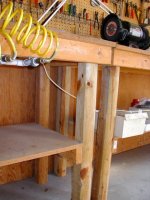
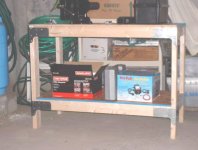
OK TBN'ers. I'm pouring my slabs tomorrow so the framing will begin by mid month. What I'm looking for is also your chance to show off your workbench in your garage/shop etc... because I'm looking for ideas on the ultimate setup.

Doesn't matter whether it's simple, elaborate, practical, impractical or job specific. If you don't have pictures, describe what you have (or wish you had). I'm going to take the best design concepts and build mine from scratch.

It'll be in a 3 car garage (Gotta make sure door #3 is high enough for the ROPS) that's 25' deep. The bench wall will have a 5'0x4'0 window in it's center. How high should the bench be? I'm going to plum w/220v but what about 110v plugs - Against the backwall at tabletop height? Where to put the vice for long jobs? Any neat power tool hideaways like for my compound miter saw. Tool (hand and power) storage idea's? How do you store all those nuts/bolts/washers/screws/nails/bulbs/ errata that seems to accumulate through the years and yet you can never find when you need it? I currently use some of those drawer boxes but I'm not terribly happy with them.

So let's see the toy's boy's! Todd in Placerville.
 
   / Best Workshop/Bench Design Concepts #2  
Todd,
I have a goal to be the only TBN member without a digital camera and so far so good. It wasn't planned this way it just happened.

I have 72 feet of workbenches all built the same. I'll try to describe them.

Height 30", depth 32 inches
Surface Hem/Fir Std or better 2x12's
Front support is, a 4 x4's running parallel to the bench. Front is supported vertically ever 8' by 4x4 to the ground. Back is against the wall and supported by 2x4 and screwed to the wall, The front 4x4 is recessed 8" from the front of the bench. Surface 2x 12's are cut to 32" and run normal to the wall and screwed to the 4x4 front and 2x4 back with 4 1/2 inch wood screws (4 places). The next 18 inches above the bench is 1x4 tongue and grove nailed to the wall. A 2x12 shelf is then above that the length of the bench, supported every 8 ft vertically. Next is a single 1x4 rabbited (sp) to fit, 4x8 sheets of white heavy duty peg board for the length of the bench. Last is tongue and grove 1x4 to the ceiling, first piece again rabbeted to slip over the peg board. I added 3 coats of spar varnish to all the wood surface. My vise is in the mid span of a 26 ft long bench. I wired power at the front and under the bench with the outlet boxes mounted on the 4x4. I use glass jars to hold stuff and stack them wherever I can. I did add drawers underneath on one section but don't like drawers much, never can remember whats in where.

If you followed this your a better man than I./w3tcompact/icons/wink.gif Good luck on your quest for the ultimate shop bench.
Al
 
   / Best Workshop/Bench Design Concepts #3  
This is not a very good picture, but shows the ends where I put two workbenches together. The landscape timbers for legs were cheaper than 4 x 4s, then used 2 x 4s around the perimeter under the top and a single one under the center of the bottom shelves. Both the top and the bottom shelf for each bench came from one 4 x 8 sheet of 3/4" particle board, and it's all put together with 3" countersunk screws. They're solid and heavy and serve my purposes well in the shop. I have a 4" vice mounted on one corner of one of them, and a 6" bench grinder and a 3 ton arbor press mounted on the other. Of course, you would not want to get them wet. Particle board is much smoother, harder, etc. than plywood as long as you keep it dry.
 

Attachments

  • 35-98719-Workbench.jpg
    35-98719-Workbench.jpg
    79.6 KB · Views: 558
   / Best Workshop/Bench Design Concepts #4  
Here is a little snip-it of a work bench I plan to build. Already have the plans.

/James
 

Attachments

  • 35-98720-wwrkbnch-exp.gif
    35-98720-wwrkbnch-exp.gif
    18.7 KB · Views: 1,433
   / Best Workshop/Bench Design Concepts #5  
Bird,
Good idea with the air lines. Looks like it would stop you from having 200ft of air lines all over the floor.

As for the 110/220v lines. I would put in 2 220 plugs. One tucked away in a corner for an air compressor, and one near the center of the shop for a welder. For 110v. Put in as much as you can. You never have too many. Put a lot neer the work bench, but don't forget the rest of the shop.
 
   / Best Workshop/Bench Design Concepts #6  
I don't have a workbench/workshop worthy of a picture, but here are my thoughts.

1. Any need for either a pit or a place for a lift to get under vehicles? You can get some very nice, portable lifts for $4,500.

2. I'd look into the bins that many hardware stores use to display bolts, nuts, nails, etc. My local True Value uses both the bins as well as a carosel/lazy susan.

3. A lockable place to store the more valuable tools, e.g., pneumatic nailers.

4. A place that's easy to use/access for storing fluids you plan on recycling, e.g., used motor oil.

5. Any need to be able to curtain off an area for doing painting? Or will you need a way to segregate the working area of the garage from where the vehicles are parked?

6. Will it get cold enough so that florescent lights wont start easily?

7. A place for fire extinguishers.

8. A place for a parts washer?
 
   / Best Workshop/Bench Design Concepts #7  
My garage is 24 feet deep. There is a workbench in the middle of the wall with a cutoff saw on it. I have supports on each end, one going to the back wall and another going to the door. It never fails, I get something that is longer than 12 feet to cut and I can't get it to the side of the saw that I want to use. When I get the chance, I'll move the saw bench closer to the door end and get some portable supports so that I can run about 20 feet to the back wall and even longer out the door.
 
   / Best Workshop/Bench Design Concepts #8  
A couple of weeks ago I needed to quickly fab a small workbench for the basement here at camp. Home Depot had reinforcing brkts along with screws packaged together for building workbenches or shelving.
You supply your own lumber.

Makes for a very solid assembly./w3tcompact/icons/grin.gif

Back at my main place the workbenches (3) are steel framed tables.
1 1/2" round pipe legs with 1/2 nut welded to the bottom for adjustable feet, with 1 1/2" pipe crossbracing, and uses 1 1/2" angle for the rest. Originally all had 3/4" particleboard tops. The tops have seen their better days though. I'm probably gonna replace them with 5/8" OSB.

DFB
 

Attachments

  • 35-98785-bench.jpg
    35-98785-bench.jpg
    48.1 KB · Views: 429
   / Best Workshop/Bench Design Concepts #9  
DFB, besides the two I built (shown in the picture I posted), I also have one that looks exactly like yours. My youngest daughter bought a house several years ago when she was single and built it for her garage. When she got married, she gave it to me. My drill press and belt sander are mounted on it.
 
   / Best Workshop/Bench Design Concepts #10  
"and a 6" bench grinder and a 3 ton arbor press mounted on the other."

Bird
I used to have my bench grinder on a wood bench similar to yours.That all changed when a friend of mine had the same setup and was grinding some iron.He left to go to town and came back to a garage on fire.Hot embers caught his woosd bench on fire and burned down the garage.I immidiately took mine off the wood bench and made a grinder stand on wheels for the grinder.Now just roll it to the job, lock the wheels and grind you little heart out.I will try to post a picture later.
 

Tractor & Equipment Auctions

2011 Hyundai Tucson SUV (A48082)
2011 Hyundai...
Guard Rail Joints (A48081)
Guard Rail Joints...
2025 K1119 UNUSED Metal Carport (A50860)
2025 K1119 UNUSED...
2017 NISSAN NV200 VAN (A51406)
2017 NISSAN NV200...
2024 iDrive TDS-2010H Pro Jack M2 Electric Trailer Jack System (A48081)
2024 iDrive...
2005 International Pier Drilling Truck (A49461)
2005 International...
 
Top