braided rope horse fencing

   / braided rope horse fencing #11  
This is another picture of that fence line.

Here are some mistakes so many folks make.

They don't paint if the framework isn't galvanized. You take on this one. I welded in the framework and the plan was for the homeowner to power wire brush it and put on two coats at least of paint.

He rubbed it with steel wool half heartedly and then put on one coat of paint. Two years later he had fence ties and fence fabric rusting through, clean clear through. Rust just does that. It will go for the prettiest thing in sight and ruin it just cause it can.

Folks think, "ha ha, I'm not putting fabric up I'm gonna just use pipe and rod". Rust just digs in it's heels and gets after it. This particular fence has places where there's a sliver of post left. Yup, rust done et it up.

Paint paint paint paint. And always remember a cardinal from me that isn't original but I'll still claim it cause it's so good. IT DON'T RUST UNDER A RUN!!
 

Attachments

  • 33-153167-MVC-001F.JPG
    33-153167-MVC-001F.JPG
    87.2 KB · Views: 416
   / braided rope horse fencing #12  
Here's a little thing that I do and I've never seen anyone else do. It's to help with the problem of having kids and horses and gates. Kids have a time remembering to shut the gates and horses love them dearly not only with their faults but also because of their faults.

I call it a walk through. You put it in a line, simple as you're welding up the framework you slide two sleeves over the hinge post and two sleeve stoppers. Sleeves a little longer than the diameter of the walk through frame. Stoppers are there just to hold the sleeves--hinges in place top and bottom so the have to be slid on first and last and can be half an inch or so long.

The two sections of the walk through are welded just a little longer than the opening and ninety degrees of each other.

It works kinda sorta like a turnstill thingy at the fairgrounds or zoo. But instead of going all the way around it only goes back and forth. So a human animal can walk through. Horses can't.

The only problem I've ever envisioned with this would be if a person had the one side closed and the other side sitting perpendicular to the fence line. A horse walking the line could conceivably walk into it and get a bruise. They can't see well to begin with and anything up close is just a blur to them.

I've put these adjacent to gates just because it simplifies life.

Another thing I do is try to put the water troughs in the fence line between pastures. It just makes things simpler.

When I'm walking out a fence job with a customer I make them walk through their normal routines. Then I put the gates in the right place and of the right size to match their habits. Again making life simpler.
 

Attachments

  • 33-153169-MVC-004F.JPG
    33-153169-MVC-004F.JPG
    122.6 KB · Views: 887
   / braided rope horse fencing #13  
This is a picture of one of my gate latches. It's an early one and the little lock on the end is a homeowner misadventure cure of a problem that doesn't exist.

A couple of things to notice about the gate. First and most importantly is the gate is just a tad bigger than the opening. Around livestock I always do this unless there's a compelling reason like the gate is part of system to move animals from pen to pen.

I always try to set it up where if the animal works the latch open or someone doesn't latch it the animal has to pull the gate towards themselves and then walk around it.

Another reason for that logic is if you're entering a pen and the animal is dangerous you have the gate between you and it. And if you're leaving in a hurry bringing the gate closed behind you is a natural and good thing. Something you can't say if the gate passes all the way through.

Anytime there's the option of that gate being left open, say like between stalls or pastures I try to use one hundred and eighty degree hinges so the gate will lay flush against the fence and not be out there to be in the way. And with a hundred and eighty degree hinges the easiest way to ruin them is to run them over which you will do with the gate not stopped at the latch post.

Most folks look at the two horse shoes and thing "that's cutesy". What they don't see is they are there for a purpose. First thing is the back one is welded to the gate frame. The front one is welded to the slide bolt. Soooo if you put a padlock over them cutsey becomes the locking mechanism. If you're a homeowner you can look out at the gate to the pasture. If you see one horseshoe then chances are the latch is closed. If you see two horseshoes side by side then you can be positive it isn't latched.

Horses and cows undo latches by worrying them. When this latch is inside with the animal I weld a little tab so that the horseshoe on the bolt has to be lifted all the way up and then intentionally slid sideways to get it open.

I've had some customers prouder'n bad parents about how their horse could undo latches. I've never had a customer call me and tell me their horse was smart enough to undo mine.

These are just some simple rules on gates and livestock I've come up with. At the Ft Worth Zoo the gates I did there open out to latch together to make a pathway between pens across the railroad tracks.

Another customer had a system of working her cows where she wanted what she'd been told was the impossible. The gate was to lay flat against the fence ninety nine percent of the time. But occasionally it was to be closed. And every now and then it was to go the other way to catch another gate to allow cows to move through another pen.

It took some doing but I figured out and installed a working two hundred and seventy degree set of hinges for that gate, pipe, fourteen feet by five feet with a horse panel welded to it. And it worked and works still.
 

Attachments

  • 33-153174-MVC-002F.JPG
    33-153174-MVC-002F.JPG
    86.8 KB · Views: 361
   / braided rope horse fencing #14  
Harv, thanks for all the great info. I really like your thinking about making the gates larger than the openings. It sure does make sense for those areas where you do not need the gates to swing both ways.

My question was not so much about how to keep the fence itself from leaning, as I think I have a pretty decent handle on that (shorter post spacing, longer posts deeper into the ground, more concrete, mix the concrete, and clean out the holes well), but rather on how to keep the fence, especially the woven springy types from stretching out and eventually looking more like a giant slinky than a nice straight fence. I know that hot wire would be one way, but I really do not want to use hot wire. I just don't like it... I know that it works well, and is cost effective and many people just love it, but it is not for me.

Please keep those pictures coming, your work is certainly something I am interested in seeing more of. Thanks again for the help.
 
   / braided rope horse fencing #15  
Morning Ron,

The only time I've seen real problems with well installed fabric fencing bowing out from animals riding it has been with small pens and too many animals, feedlots, dairies, rodeo grounds etc.

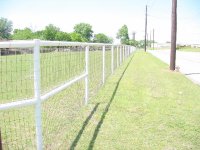
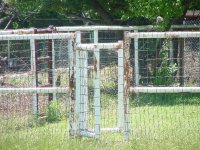
If you think it's gonna be a problem then seriously consider V Mesh. It's twice the price of two by four but in my opinion it's three times the fence. And that is what I've always heard referred to as H-3, the normal V Mesh.

I've done one job with J-2 which is a heavier gauge V Mesh. It was back in the old days when I was a charger and had a real company with employees and secretary etc. The fence was for a super high dollar throrobred stud. I remember when we had it all finished walking around the inside of the fence with the owner and going over every square inch of fabric to make sure there was nothing that was sticking out to hurt the horse.

Of course his stall barn was cinderblock with a two inch layer of soft stucco on the inside walls and he had a special rubber padded floor that was almost Olympic wrestler quality.

What I've learned about horses over the many years of dealing with their owners is that horses are the blonds of the animal kingdom. They're gorgeous but gawdawful dumb at times.

I've got a saddle maker here in Wylie that makes me my rod pouches. He has to do one about every eight years or so. And that's with him usually doing two or three patches on the current one. He uses blacksmith apron leather. It's to my design but he's the one that makes it so great.

The reason I mention this is a long time ago I learned that the worst thing you can do when welding up a fence where livestock is gonna be is to drop your used rod ends. Mine all go right back into the pouch. That's why he has to occasionally patch it. He rivets a double layer at the very bottom because of this but still in three years the thread will burn out and a rivet or two will loosen up.

A piece of steel rod about two inches long and an eighth in diameter will wreck havoc on the digestive track of a horse or cow. Even and especially if they are extremely valuable emotionally and or financially. I've never had a problem. But I was most fortunate that one of my early customers had heard about such a problem and was on me like a bad coat of paint about the potential. I never forgot it.

The same rule applies for when you do your ends of the fabric and splices. All those little pieces go into the welding rod pouch. I have a pouch on my pouch for pliars. Normal everyday use I carry a pair of slip joints. When I'm doing wire fencing of any kind I carry a pair of fence pliars instead.

Another thing is on the stretching. Stretching V Mesh is a bugger bear. It's just plain hard work. Sorta like digging the post holes. You just bear down and do it right and years later you can drive by and a grin will start deep inside and work it's way out.

The good thing is it comes in hundred and sixty five foot rolls so you don't have to splice as often as with two by four which comes in hundred foot rolls.

What I do is do one end. I then roll out the wire. If it's more than one roll long I'll do a temporary stretch. I make a stretching board if I don't have one. (they develop legs almost as bad as post drivers, friends.......) the way I make my stretching board is I take good two by fours. I like to use the oak you get in pallets if you can. I like them at least two inches longer than the height of the wire, preferably four inches. That is so the top and bottom horizontal strands are firmly gripped also. On two by four these are the bigger gauge strands.

I take two pieces of quarter by one and a half flat bar the same length as my boards. I drill three eighths holes in them together so they exactly match up. I then cut two pieces of three eighths round stock just a tad longer than the straps-boards. These round pieces I bend together at a sharp angle. I want them to be exactly alike. I want the ends of the round bar to meet the flat straps about a foot from the bottom and the top of the straps. I weld them to the straps. I usually weld a stabilizer across the round stock about half way between the angle and the board. I drill through my holes in the flat bar through the boards.

Then I tack, not weld solid three eighths bolts to one of the bars. This is when quality bolts are a necessity. If you grab them out of your bargain bin at the box home improvement store they're only going to be good for a couple of uses. So you use quality bolts and you tack them because you will wear them out and they will have to be replaced. If you weld them up solid then that chore is twelve times as hard.

I use wing nuts instead of conventional nuts. The reason I do this is then I only need the pliars I have in my pouch to secure it and with wingnuts I can snug it up by hand before I hit if for the final touch with the pliars.

So I've rolled out a hundred and sixty five feet. I put on my stretching board about five feet from the end of the roll. If the framework is welded (some folks do all of this with galvanized framework like they use in industrial chainlink applications which is good too). If the framework is welded I'll grab a post about ten feet past the end of the wire and with a Massdom Power Pull or something comparable I'll snug it up until the wire is tight. Then I'll go back and tie for about the first hundred and thirty feet or so.

I like to use a cable jack, Power Pull, to pull it tight over doing it with a tractor or truck. Mostly cause I work by myself but also there's no slipping back if someone doesn't lock down the vehicle at just the right moment. Also it gives me more of a sense of the amount of force I'm using.

The way I usually gauge tight is I pull until my teeth hurt. What I mean by that is I pull until I get real nervous about the fact that I might have it too tight. Then I very carefully pull it a couple of more licks just in case.

If this pull is in a long section make sure your cable jack cable is on the frame side of the wire. This allows you to do splice in the next roll comfortably. It's hard to do to begin with and every bit of comfort you can engineer in is well worth the effort.

If the pull is less than the length than the length of the roll of fabric then I will set my truck sideways beyond the last post. A tractor will do but I use my truck. It's got tools and weighs twelve thousand pounds plus before two hundred pounds of orneriness climbs in behind the wheel.

This makes making up at the last post much easier. You don't have the complications of working around your cable jack or trying to pull tight that little bit of wire between the boards and your end post.

What I do is I guesstimate, approximately three and a quarter times the diameter of the post twice, etc. I guess just a tad longer than what I think it will take to wrap the post with a horizontal wire and cut it.

I do the middlest horizontal wire first. With V Mesh it's a pair of wires, I told you it was harder to work with. I next skip up one. Then I skip from the middlest one down one, back and forth until I I have every other one done and tight. I then do all those I missed. It's done and tighter than anything you could ever truly love as much.

I don't wear gloves when doing this. I pay the price. But after about two horizontals you should have an idea exactly where to cut so that you have the amount where you can use just your fingers to wrap your joint. What I usually do is do two wraps. Then after I've got the wire cut when everything is done I'll come back with the fence pliars and tighten it all up. Try to keep your ends in as tight to the fabric as possible.

Horses can't see squat up close. That's why when you move your hand towards them they jump back. You've startled them. So if you have an end sticking out two or three inches they won't see it if they're investigating something by that piece of wire until it's in the eye.

One of the reasons I don't have employees per se is because I'm hell on wheels about the little things like that, wire ends, rod ends, clean holes, etc. It's just hard to get folks to understand there are rules to be broken and there are rules never to be broken. Much less teaching them which is which.
 
   / braided rope horse fencing #16  
Thanks for all of your help and insight Harv. I really do appreciate all of your time. As I said before it is really refreshing to see someone who takes such pride in his work. Keep those pics coming.../w3tcompact/icons/smile.gif
 
   / braided rope horse fencing #17  
On your tubing, what lengths are you getting?

The problem I always had with drill stem was it's random lengths.

The stuff I get now I get in thirty two feet lengths. This makes life simpler. First because I use eight foot centers and eight foot posts. Figuring the materials for a job is simple, find the footage, double it, and add a little for whatever and that's the amount of tubing I need.

I always splice the top rail over the middle of a post. This gives me the satisfaction of knowing not only that I have the butt weld of the joint working but I also have the weld of the notched post also doing it's part.

Something I don't always do but is nice to do if you have the time. I do it when the fence is around an entryway or across the property running along the highway. Those places where it is not only something functional but something to look at too.

I normalize the tubing over the post weld. What happens is after you weld in the top rail you can look back down the line and see the rail dipping between posts. It's the normal thing pipe does after welding.

What I do is I use the torch and put a bright red oval on top of the rail over each side of the post. When it cools the rail straightens right up. It takes a good job and makes it into one that's better than that.

It's amazing what you can do with a torch and some heat placed in the right place.

One time I cut in a walk gate for a bud. We'd put in a lockbox so the gate was locked with a dead bolt. The receiver side was a 2 7/8" post. So to catch the dead bolt I used a piece of angle iron. I cut a hole in it and then welded it to the post. I checked it for clearance and then went into visit with bud.

One of his men came in and told us that the gate was frozen shut. As soon as he said it I had one of those "DOH!" moments. So I told bud I had it under control. As I walked out with the employee, a young guy, they are so easy, I explained that I was gonna have to cut the angle iron off and it looked like they'd have to use a chain and padlock to secure the place.

By the time I got the torch back out there was five or six of the employees watching, young guys, they are so easy. I heated up the opposite side of the post and then shut off the torch. Of course when it's hot it exaggerated the problem. I shook the gate and told the guys that I wasn't sure if I could fix it and they might just have to live with it.

I went back inside and started visiting with bud. As soon as it cooled down of course the post pulled back enough to free the gate. I'm sure the jury is still out in the minds of those young guys about if I was just lucky or what.
 
   / braided rope horse fencing #18  
Electric fence ( of any various types ) should be fine for horses.. but I don't trust it with cattle.

I have a few pastures that share horse and cattle. The horse hit it once and remember.. the cattle test it often, and try to stick their head through in low areas.. get hit, then bolt, and take the whole fence down.
In some remote areas, I use solar ( battery ) fence chargers. They work as good as a regular fence charger, but are not always on.. more like a 50-50 duty cycle of pulses. They are rated for predators, but again.. cattle or hogs are hard on e-fence.

Soundguy
 
   / braided rope horse fencing #19  
Well, he is definately calm. I don't keep him penned up, and he does real well. And I don't trust him one bit.
 
   / braided rope horse fencing #20  
Good Morning Harv,

The tubing I am getting is random lengths but with an average of 32'. I have heard pretty good things about this place giving you about 90% 32' lengths and some odds and ends making up the rest. I agree that the 32' lengths are easier, with less leftovers. I too think that all the splices of the rail should be done over a post.

Could you explain a little further your technique of heating to straighten the top rail? I have seen quite a few fences which have the pulled down appearance over each post, and sure would like to be able to make mine straight. Do you heat directly over the post on top of the rail, or on each side of the post, but still on top of the rail, or on the sides of the rail?

Like the story about the gate, I bet that you were seen to have some magic voodoo powers after that one./w3tcompact/icons/laugh.gif
 

Tractor & Equipment Auctions

Craftsman YTS 3000 42in. Riding Mower (A49346)
Craftsman YTS 3000...
2000 John Deere 770CH Articulated Motor Grader (A49461)
2000 John Deere...
2015 JEEP PATRIOT (A51406)
2015 JEEP PATRIOT...
2008 International 8600 T/A Day Cab Truck Tractor (A48081)
2008 International...
2017 Ford F-550 Ext. Cab Valve Maintenance Truck (A50323)
2017 Ford F-550...
2005 STERLING LT8500 SERIES MIXER TRUCK (A50854)
2005 STERLING...
 
Top