Adding a rear remote set to a Branson 4220/4720 which came equipped with a backhoe is a piece of cake (took under two hours) and can be done for about $150 (you of course do so at your own risk; working with hydraulics requires care, and sloppy work can create a danger to the modifier and/or future operators of the machine). Other models should be just as easy. Even if you didn't buy a Branson backhoe, your tractor may have the hose loop with QDs needed to connect one; this consists of a hose which runs across the top of the PTO rear shield with a right angle elbow and female/male QD set behind the right wheel (as viewed from the rear); one end of this hose goes up front to the FEL valve out port, while the other end goes to the three-point lifter inlet behind the left rear wheel. First, get a Cross Converta-valve (about $90) at Tractor Supply (TSC), along with a two foot 1/2" hose, two 1/2" male/male unions, two 1/2" female Q/D couplers and two 1/2" female to 3/4" male couplers (one of these should be a right angle type). Take the hoe off, and turn the tractor off. Be sure to lower the FEL and exercise all hydraulic controls to relieve pressure before opening any connections. Keep hoses as high as possible while open to minimize fluid loss. Start by disconnecting (separating at the QD) the two hoses you'd normally have plugged together when the hoe is not mounted. You'll likely find the sump hose (the one with the male quick disconnect) has considerable free length tied off behind the the left wheel; remove the wire ties so you can extend it fully, and remove the male QD from its end. Install this QD on one end of the new 1/2" hose. Screw the two new female QDs onto the two new unions, and then screw the two unions into the two 1/2" work ports on the Converta-valve. Screw the two remaining couplers into the in and out 3/4" ports on the valve (the right-angle coupler goes on the inlet side pointing toward the bottom of the valve), and connect the remaining threaded end of the new hose to the coupler on the inlet side. This leaves you with a hanging hose long enough to plug into the original supply hose female QD, which you should do. If you really want to do yourself a favor, remove the right angle elbow from the supply hose, so the QD can be mounted with a bracket (TSC sells a neat little $14 kit for this) facing out the rear of the tractor. My 4720 has a unused welded attachment point in just the right place to anchor the bracket to. This makes plugging and unplugging the backhoe supply hose MUCH easier, because it gives you something to press against. This QD used to be a real animal to connect, and I have the skinned knuckles to show for it; now it takes ten seconds and almost no effort. Lastly, connect the sump hose to the outlet side of the valve. Now you have a complete remote circuit; connect your hydraulic upper link or whatever to the two work ports and have at it! You'll find the valve can be permanently mounted right at the top of the sheet metal (right side behind the seat) in such a manner that the handle ends up right where it can be easily operated but doesn't get in the way (when assembling the valve handle, orient it so it extends over the back of the valve; this puts it right next to the seat back), and that hose dress is a breeze (my sump hose runs behind the caution trangle; the right angle adaptor aims the inlet hose right where it needs to go to plug in to the supply hose QD).
Some caveats;
1) This arrangement puts your new valve in series with the three point hitch lift; if both are operated simultaneously, the motion of both will be slower than normal (just as one backhoe motion interacts with the other two). Note that this series arrangement is the same one used by Branson for the FEL and three point (or hoe); the supply hose you're working with comes directly from the FEL valve outlet!
2) The remote circuit isn't operable when the hoe is connected, just as the three-point hitch already wasn't; I can't imagine a need to use both at the same time.
3) The Converta-valve is not meant for metered lifting (I'm not sure whether a hydraulic upper link qualifies as a lifting load, but my best guess is yes); TSC sells a very similar one (the SBA2; 18-20762) for about $120 that is intended for metered lifting. I use my remote circuit to operate the horizontal cylinders on a towed "soil mover" (grading box), so the nonlifting valve works fine.
4) Watch your valve and hose placement! Make sure the three point lifting yoke and links will clear your valve and hose arrangement throughout the full range of movement before you permanently mount the valve and dress your hoses. There's plenty of room, but placement is important to avoid rubbing and hose snagging.
TSC stock numbers used;
(1) 18-20128 valve
(1) 18-19240 hose
(2) 18-22403 QDs
(1) 18-18731 coupler
(1) 18-18749 90 degree coupler
(2) 18-18082 unions
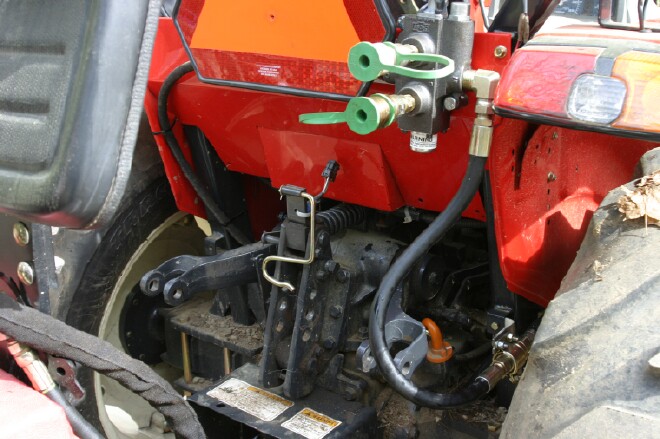
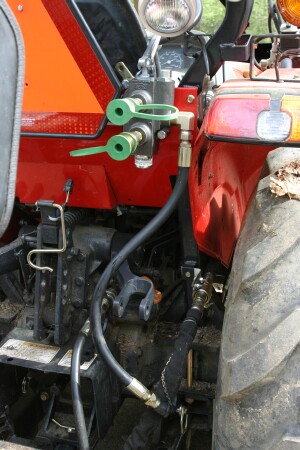
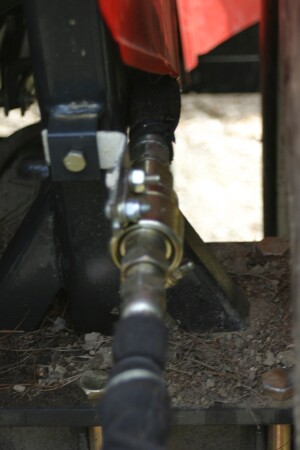
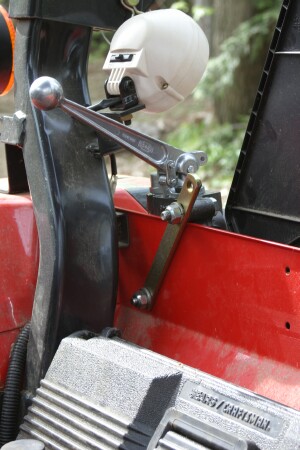
The first image shows the completed install, with the hose connected for normal three-point and remote operation; note the right-angle coupler orientation on the supply hose, and how the sump hose runs behind the trangle. The angle the image was taken from makes the new hose appear to be quite close to the three point lifting yoke; there is in fact plenty of clearance. The second image shows the backhoe hoses connected; the hose running to the valve inlet is simply left disconnected, just as it was in the original arrangement. Shown in the third image is the bracket I created using the TSC kit and a L angle cut to size. The last image shows how the valve handle sits; note the brace holding the valve (this came as part of the QD mounting kit) and the Sears "truck size" tool box which fits in the space behind the seat like a glove.
I see no reason why a similar arrangement would not work up front for a remote circuit there; the new valve could simply be inserted in series with the hose exiting the FEL valve out port. I'm thinking about adding a valve (mounted to the back of the FEL valve plate) for a
grapple; this would definitely require a metered lifting capable valve like the SBA2.

