Build Your Own Pole Barn

   / Build Your Own Pole Barn #1  

weldingisfun

Veteran Member
Joined
Dec 12, 2006
Messages
1,785
Location
West Bell County, Texas
Tractor
Mahindra 4500 4WD w/FEL, and Scotts S2048 lawn tractor
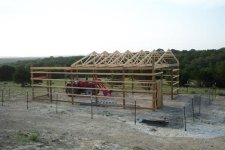
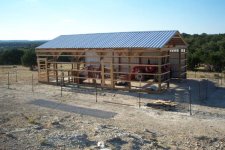
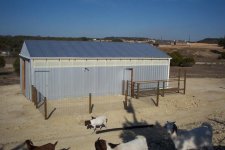
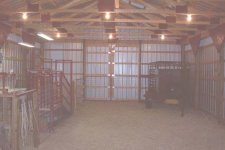
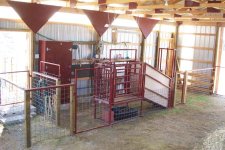
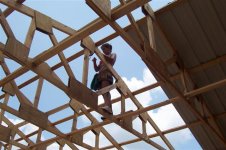
I have been following the posts of k6dyc, "It's too cold to build a barn...." and thinking just how fortunate I was with my pole barn, built this past summer. If anyone was in Central Texas between July and August you know it was anything but cold. The barn shown in the pictures was built with the help of my fantastic wife and one high school student over the period of two months. The building is 24' x 40', with 10' sliding doors on each end and two walk-thru doors. All of the doors were handmade, we built our own trusses and wired it too. The barn will be used for working the goat herd and storing hay and some equipment.
The reason I feel fortunate is there were no contractor problems, no liens, and no fear of a possible legal battle. Not to mention, it was fun and we all enjoy the satisfaction of a job well done.
 

Attachments

  • Pole Barn 1.jpg
    Pole Barn 1.jpg
    66.9 KB · Views: 1,031
  • Pole Barn 2.jpg
    Pole Barn 2.jpg
    54.3 KB · Views: 1,301
  • Pole Barn 3.jpg
    Pole Barn 3.jpg
    72.8 KB · Views: 836
  • Pole Barn 4.jpg
    Pole Barn 4.jpg
    50.5 KB · Views: 833
  • Pole Barn 5.jpg
    Pole Barn 5.jpg
    39.6 KB · Views: 756
  • Pole Barn 6.jpg
    Pole Barn 6.jpg
    65 KB · Views: 976
   / Build Your Own Pole Barn #2  
Congratulations on your barn. It looks very nice and I'm sure you appreciate the sweat equity you have into it!!!

I'm curious about your truss's. I've never seen them done that way and was wondering where you got the design? I've always been told, to do them the oposite of how you did, but it's not something I'm qualified to say one way or another.

Here's a picture of how I build them. Do you see what I mean about being oposite?

Thanks,
Eddie
 

Attachments

  • Steph standing on truss. Aug 2005.JPG
    Steph standing on truss. Aug 2005.JPG
    54.1 KB · Views: 990
   / Build Your Own Pole Barn
  • Thread Starter
#3  
Thanks. We do appreciate the "sweat equity" especially on the cold days we have had here lately. We think back to the temperatures we had this summer and warm right up again.
I bought a book, that I am unable to locate right now and I used plans from this website:
Free Framing and Utility Building Plans
Having never built a truss before, I went with available plans. You can see that I did add a vertical support in the center. The trusses you built have the same vertical. I just thought that would add more support and I put my bracing on both sides of each truss. The plans only called for putting them on one side.
It has stood up to the heavy winds and rain we have had this winter. I do ensure that the doors are closed when there is a chance of heavy winds. Never can be too safe. Don't want to see it flying off some windy Texas day.
 
   / Build Your Own Pole Barn #4  
Nice website, thanks.

I see that they build all there trusses that way, so I'm sure it must be engineered by somebody. It's fun to see different ways to build the same thing.

You really did a nice job on your barn!!

Eddie
 
   / Build Your Own Pole Barn #5  
Weldingisfun,

I too am planning on building my own Pole Barn this Spring and had found the website you posted while doing research via the web. Sounds like I'm probably following the same path you had done. Care to share insights on things you might have done differently if you had to do it all over again now that it's completed?

My biggest concern is in building the trusses. Did you by chance take any photo's along the way as you were building them? I'm sure that the last truss you built was much easier than the first, so any tips, tricks, or suggestions would certainly be welcomed.

Looking forward to getting started soon...

Jim
 
   / Build Your Own Pole Barn #6  
EddieWalker said:
Nice website, thanks.

I see that they build all there trusses that way, so I'm sure it must be engineered by somebody. It's fun to see different ways to build the same thing.

You really did a nice job on your barn!!

Eddie


Eddie,

What counts here are those triangles - very simplified excerpt from my engineering classes :D
 
   / Build Your Own Pole Barn #7  
EddieWalker said:
Congratulations on your barn. It looks very nice and I'm sure you appreciate the sweat equity you have into it!!!

I'm curious about your truss's. I've never seen them done that way and was wondering where you got the design? I've always been told, to do them the oposite of how you did, but it's not something I'm qualified to say one way or another.

Here's a picture of how I build them. Do you see what I mean about being oposite?

Thanks,
Eddie

Eddie your truss's look like what we build up north to manage the snow loads we normally see. Most end truss's are built with an overhang up here.
 
   / Build Your Own Pole Barn
  • Thread Starter
#8  
Megado said:
Weldingisfun,

I too am planning on building my own Pole Barn this Spring and had found the website you posted while doing research via the web. Sounds like I'm probably following the same path you had done. Care to share insights on things you might have done differently if you had to do it all over again now that it's completed?

My biggest concern is in building the trusses. Did you by chance take any photo's along the way as you were building them? I'm sure that the last truss you built was much easier than the first, so any tips, tricks, or suggestions would certainly be welcomed.

Looking forward to getting started soon...

Jim
Yes, the last truss was the easiest to build. As WayneB pointed out the end trusses are different that the interior. Unfortunately, we didn't take any pictures of the truss building operation. It wasn't as difficult as what we thought it would be. We very carefully built the first one paying very close attention to the dimensions of each piece. Once it was assembled, checked and rechecked, we made cardboard patterns of each angle cut. Since we built them on the concrete floor of another barn we were able to use a marking pen to draw around each critical point on the floor. Then as mass production began it was easy to check that every piece lined up correctly. All we had to do was check to see that the critical points lined up with the floor markings and before nailing it together. Building the first one probably took ten times longer that the last one.

What would I have done differently?

For one, I would have made sure that all of the ground sloped away from the barn. A neighbor put in the pad, but I didn't check it all that carefully. One of the reasons might be that it barely rained all summer around here. At least that is what I keep telling myself is the reason when the rains did return that there is seepage under the walls at a couple of points. Now that I know where it is happening it can be fixed with a little additonal FEL, BB and good old fashioned shovel work.

I would have started earlier in the year as you plan on doing. Believe me, working in the July and August heat was no picnic. However, since I teach school during the most pleasant months of the year that wasn't an option or I would have been limited to working the weekends only. I don't know about you but when I start a project, I want to stay with it. Too many things go wrong when you leave a job and come back to it a week or so later. At least, that is how it goes for me.

One more thing that may or may not be a consideration for you. I raise goats and they will climb on anything that doesn't move. I had my metal on a trailer for nearly three weeks before I was ready to start hanging it. Did I mention that goats will pee on anything that doesn't move? Handling some of that metal after it had been pee'd on and left to ferment and dry in the sun for weeks was not a pleasant experience. Keep your metal away from your animals if possible.

Have fun with your project. If you need any advise or have questions, put them on TBN. There are lots of knowledgable folks who will assist you. Don't be shy about asking and welcome to TBN, I saw you had just 7 postings. Thanks for contributing to my topic with one of them.
 

Tractor & Equipment Auctions

Bush Hog 5 ft mower (A36894)
Bush Hog 5 ft...
2018 CHEVY SILVERADO 3500HD UTILITY TRUCK VN:1GB4CYCG0JF188571 powered by Vortec 6.0L gas engine, (A37992)
2018 CHEVY...
2014 Polaris Ranger 800 EFI (A37330)
2014 Polaris...
2692 LANDHONOR HYD SKID STEER DIGGER (A35838)
2692 LANDHONOR HYD...
Taylor-Way 875 19' 3-Point Hydraulic Fold Field Cultivator (A37329)
Taylor-Way 875 19'...
2788 PALLET OF T POST (A35838)
2788 PALLET OF T...
 
Top