Building my tractor bridge across the creek

   / Building my tractor bridge across the creek #1  

deezler

Elite Member
Joined
Jan 30, 2012
Messages
3,577
Location
Southeast MI
Tractor
Cub Cadet 7305, Kioti CK3510seh TLB
Hi all,

Thought I would make a dedicated thread for my bridge project just in case anyone wants to follow along or search for it in the future.

We bought our 19 acres in 2012, sold off a couple parcels to get down to 10 acres, of which a little over 2 are on the other side of a modest creek. We've had various foot bridges in place across low sections of the creek banks over the years, but they always get blown downstream during the big flooding events, say when we get a flash 3-4" rain storm or during the spring snow melt. Even did manage to get my tractor across and back on a crude bridge for a couple years, but once my and my neighbors kids started to grow up and explore on their own, I deemed it unsafe and yanked it out. It was often underwater and the rusty metal made me cringe. Plus the logs-in-the-creek design eventually started to scour out around the supporting logs and was widening the creek in this low spot.

9u00hfG.jpg


bIcfBlR.jpg


Fall of next year, it was still intact, but its days were numbered. Those plywood sheets on top never stayed put, and are all lost and rotting downstream somewhere now.

Ylvx9dS.jpg


IMG_2990.jpg
 
Last edited:
   / Building my tractor bridge across the creek
  • Thread Starter
#2  
So, I had always wanted a proper, robust bridge design that could clear span across a higher section of the creek banks and hopefully never be impacted by seasonal flooding. The last time I rented an excavator for a weekend a couple years ago, I planned my location and cleared all the trees on the near side for an approach trail.

Slowly over the last couple years, I gathered my bridge materials. Telephone poles would do well for the main bridge beams, and eventually I had enough free cinder blocks to build abutment walls on each side of the bridge. Things finally fell into place when my parents decided to get rid of their treated wood deck and go with trex. My bridge decking would be free also? Score.

Of course pulling the nails out of nearly 100 long 2x6s earlier this spring wasn't much fun, but a few hard hours of work was definitely worth it. Especially given what covid-19 would do to lumber prices.

AUZD5lv.jpg
 
   / Building my tractor bridge across the creek
  • Thread Starter
#3  
Planning the bridge

Now it was time to plan the real bridge. Usually for a big project I will draw up some detailed plans, but honestly this design is just too simple to have really required it, and I already had all the free materials I would use, so why bother.

My son decided he was still going to make a plan, so we went out to do some surveying.

1f37rHa.jpg


5wccUhS.jpg


The key design points I had in mind:
- Must span far enough to get the bridge abutment walls located into firm, dry soil.
- Must have clear, straight approach paths on each side without major or large tree removal
- Must sit high enough to allow for dramatic seasonal flooding without washing out the abutment walls, or even getting the bottom of my telephone poles wet.
- And of course, be strong enough to get my tractor across even if carrying a full loader bucket and heaviest 3-pt implement on the rear (~5000-5200 lbs, est). And ideally my 2500HD pickup also, though I can't exactly figure out why I would need to do that just yet. :p

Usually the water level is low all summer long, staying a bit higher in the mid-fall to later spring timeframe.

A heavy rain even will often push it up near the top of the banks, like so:
Q8oh1fb.jpg


But a crazy rain, or frozen-soil thaw, can do this:

o2G7Wnr.jpg


rrItzjA.jpg


Keep an eye on that old tree stump right on the near creek bank - it would serve as my guide (in the left of the flood photos, and the one my son is standing on).
 
   / Building my tractor bridge across the creek
  • Thread Starter
#4  
First, a foot bridge

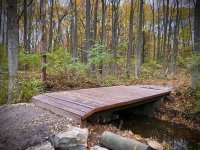
I realized it would be kind of hard to build a bridge abutment wall on the other side of the creek without being able to get over there. And to do all the surveying, staking, measuring, etc, we would need an easy way across and back that didn't involve constantly stepping down into the muddy creek bottom and climbing back out. A modest, adjacent foot bridge was called for.

wRCwAHR.jpg


221Ssfl.jpg


We set it right atop the ol' stump for stability and touch more elevation. I didn't want this one washing out down the creek before I could get the real bridge build going.

This was in mid-April, earlier this year. Covid had me working from home, and I needed to get my boy out of the house every day to keep us all more sane. We decided to fashion a little campfire spot just up the creek from the bridge crossing, too.

BrzTQSj.jpg


When starting to carry some loads of building materials back to the creek in May, I found my boy and the nieghbor's kid playing "throw your shoes up the river". His Keen hiking shoes have been through a LOT of abuse, lol.

KRczsMB.jpg


YY03Ln6.jpg
 
   / Building my tractor bridge across the creek
  • Thread Starter
#5  
Abutment wall time

Finally after the summer heat and bugs started to wane, it was time to get serious and get this project moving.

LOVcrvE.jpg


iKMJjBx.jpg


My father-in-law was a huge help to get the abutment walls constructed. We mortared the blocks together, drove rebar down through the block courses, and then hand mixed 10 bags of concrete to fill up the wall cavities. Pretty solid, but not nearly down to the full frost line here in Michigan, so we'll see if they move around at all. With nice sandy soil, I'm not expecting them to.

IsSss8E.jpg


xs8HNGQ.jpg


3 sections of rebar were left proud of the wall tops where the telephone poles would sit, to help keep them anchored. I decided to buy some treated 2x8s to cap the walls, which totally blew my project budget, haha.

4XZsdL8.jpg


Next up was pole time..... wasn't quite sure how to do that bit just yet.
 
   / Building my tractor bridge across the creek
  • Thread Starter
#6  
Pole time.

I was easily able to drag the poles the 1/8 miles or so back to the creek with a chain behind the tractor. But how to get these 1000lb beasts across the creek and onto the far side's abutment wall?

Unfortunately I do not have any pics of this step, since it was a little hectic.

First I used the front loader from the side, to shimmy back and forth and get the pole leading edges up onto and resting ont he near-side abutment wall.

My plan was then to blast through the low crossing (location of old metal ramp bridge) and then pull the poles all the way across using the chain again. Well, I promptly got my tractor stuck in the creek bottom. Again, sadly no pics of this awesome event. I was on my neighbor's side of the property line at this point, and had not asked permission to attempt a crossing. Bad deezler!

After a few minutes of thrashing around and getting deeper and deeper in the creek bottom, I remembered that I had a front loader with an agressive tooth bar on it, and gradually shoved my way backwards back up out of the creek. A very muddy tractor and torn up creek banks, but no real harm done. Yet the poles were still not across the creek span.

At this point I went to plan B, which should have been plan A all along. Setting the front loader bucket down atop the near end of the beam and chaining it up tight, I could not lift the poles outright, but I could shove them up and over the near side abutment wall top. Was quite easy, actually.

Et Voila:
1yqJfkC.jpg


We then rolled them around to find the flattest sides of each pole, took some measurements, and chainsaw-cut flats on the bottom of each pole to give them a stable footing, and equalize the heights of all 3 poles (they were from 9" to 13" in diameter). Finally we drilled blind holes in the bottom for the where they would sit on the rebar pins. Using a board as a nice long lever, we could lift one end of each pole and roll them onto the rebar pins.

EWXECUi.jpg


I was then ready to start the decking. Fun part!
 
   / Building my tractor bridge across the creek #7  
Re: Pole time.

Great thread...keep it coming. And how do you post your pictures in the page vs. a clickable thumbnail? Much better.
 
   / Building my tractor bridge across the creek
  • Thread Starter
#8  
Thanks. I'm hosting them on imgur.com, and just pasting the BB-code link when writing a post. I used to use photobucket... we all remember how that turned out, and they ruined all our favorite threads and DIYs. Imgur seems pretty great, very easy to use and haven't hit any bandwidth limits, yet. Maybe this thread will find some limits eventually. But I agree, I don't like having to click to enlarge thumbnails of directly uploaded pics here either.

Wasn't going to do a whole thread, since I have some pics in the tractors-and-wood thread. But then I realized how many pics I snapped of the whole process, and thought it could be helpful for someone else hoping to build something similar someday.

Lots more pics coming, although it will catch up to current day pretty soon. Then I'll have to stop playing on the computer and get back to work on it, haha.
 
   / Building my tractor bridge across the creek #9  
Thanks for posting this, need a small wide bridge and your ideas are effeminately inspiring, except for the mud bath and shoe throwing.:laughing:
 
   / Building my tractor bridge across the creek
  • Thread Starter
#10  
Starting the Decking

Decking the bridge was definitely a satisfying project in and of itself, but also rather time consuming.

I decided I would need to double-up the treated 2x6s for sufficient strength between the telephone poles (outer poles are right at 7' apart from each other, with the middle one close to the middle. Thus approx a 42" span between poles).

Instead of fastening the bottom layer to the poles first, and then following with the top layer, I decided to make my doubled-up deck assemblies beforehand. This way I could do it up at my workshop, select the board matching more carefully, and get deck screws into each assembly from both sides. My father in law is quite paranoid that my boards will hold water in between them and rot that much faster. He's probably right, but I needed the strength and didn't want to buy a ton of lumber to do it any other way. I'm less worried about retained water leading to premature rot than I am about carpenter ants. They found some of my boards as I stored them under tarps all summer long, and completely ate the guts out of a few of them. Voracious bast@rds.

FDa1ojz.jpg


Since the height of the deck above the dirt was so great, I decided to cut a slant on the front side for a short ramp. I'll still need one heck of a dirt & gravel ramp to get up there smoothly.

HvVY7NR.jpg


2lTBqVm.jpg


The ones that look like single layer 2x6s are still doubled, was just making use of some of the 8' long pieces I had for the bottom layer. Total bridge deck width is 112", or 9'4". Plenty wide and comfortable for my tractor, but may require some cautious driving in my truck.

At this point I simply could not resist a tractor weight test. If my design was not strong enough, I'd rather find out sooner than later. So I jammed her up there..... pretty nerve racking the first time, but it was a success! Really no bouncing or flexing detected at all. But with an all wood design, it will probably fail in a brittle and sudden fashion, it it ever comes to that. :eek:

HaNNj6i.jpg


Took me until the following weekend before I could finish the decking completely and drive all the way across. Carrying the fill dirt loads across to finish the far-side approach meant I was carrying an extra 800 lbs or so on the front axle/tires (or more, if you think about it unloading the rear end partially and transferring weight to the front too).

Jkp204N.jpg


NR0kq6x.jpg


Money shot:

uqdca6u.jpg


Still had some trim work to do.
 

Tractor & Equipment Auctions

2015 Ford F-150 Ext. Cab Pickup Truck (A44572)
2015 Ford F-150...
Excavator Concrete Drill, Bucket, and Hydro Thumb (A44502)
Excavator Concrete...
2008 Ford F-150 Ext. Cab Pickup Truck (A45336)
2008 Ford F-150...
20ft Shipping Container/ Tiny Home (A44391)
20ft Shipping...
2018 FREIGHTLINER CASCADIA TANDEM AXLE SLEEPER (A43004)
2018 FREIGHTLINER...
2022 Chevrolet Tahoe SUV (A44572)
2022 Chevrolet...
 
Top