Building subframe for YFL-240 + Refurbish for my YM240D

   / Building subframe for YFL-240 + Refurbish for my YM240D #1  

Jmlcolorado

Bronze Member
Joined
Apr 4, 2020
Messages
69
Tractor
Yanmar ym240
I picked up a loader that originally came on this machine. It was kind of a convoluted mess with all the parties involved.
The original owner still had the powder at his property. He had sold the tractor to a young boy next door.
The boys dad, however, owns an excavation company and the kid was quickly approaching driving age and had his heart set on a cummins truck. He began liquidating everything he had to save to the truck. That’s how I came about the tractor.
The previous owner did an extent job cleaning up this machine and making it nearly new again.
My only stipulation in buying the tractor was that he get the loader. The loader was 62.725% of the reason for buying a tractor to begin with.
Please don’t ask what the remaining 37.275% was because it’s complicated :)

About a month after I picked up he machine (covid mess didn’t help) I finally pushed the kid hard enough to get the loader.
This was purchased sight unseen and for $700. For the price, I couldn’t really let it slip away.
So I got the loader home, but it doesn’t have the subframe. Kind of a key component.
I tried to ask the boy, and his dad to reach back out to the neighbor to get the missing parts no no avail. I had already driven 2 hours 1 way, twice. Once to pick up the tractor. The next the loader.
I decided to cut my losses and just build one.
After lots of research looking at photos of how other loafers are mounted, I went to town.

This is a working thread. I started a couple weeks ago, and am back at it today. So this isn’t an all inclusive thread in one swoop. It will be updated as I make progress.

Last year, I bought 3 international school busses and made a dump truck out of one of them with a 1955 ford f600. That’s a whole other story in its own :)
I needed a gantry crane to lift the cab on and off the chassis while I fabricated mounts.

I bought a harbor freight crane for this as it was cost effective. The width, however wasn’t sufficient to fit the 8’ with chassis in between the rails so I promptly removed the original I beam, sourced a longer beam with a taller web to use.
So the original I beam got tossed into the scrap pile.
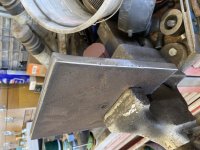
Turns out this smallish beam is a good size for the main support for the loader.

I cut the beam to length, then notched the center to clear the driveshaft.
I’ve seen mounts that go completely under the shaft, but I wanted to keep the clearance under the machine.
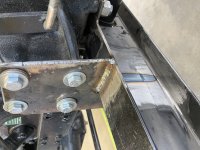
I am utilizing 4 mounting holes under the machine, as well as 4 on each side of the machine for a total of 12 bolts holding this beam to the machine.
I anticipate this to be more than adequate considering I haven’t seen any others that use all of the available mounting points.

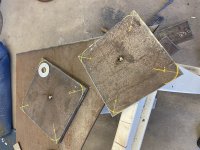
Last weekend I made templates and cut two plates to use the side holes. Today I plan to weld those to the beam, competing this section.

Next I will work on the front mounting section.

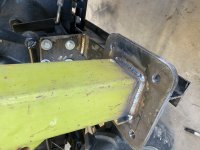
I do have the diagonal tube that goes from the main tower, down towards the front but nothing else.
I’ve seen a couple variations of this design. One utilizes a tub that is either welded or bolted to the main tower, and goes horizontally forward to some kind of bumper mounting situation.
Others just use the diagonal to the frame.

I think I will use this horizontal brace as it adds another triangle and structure to the machine, and more is better, right?! :)

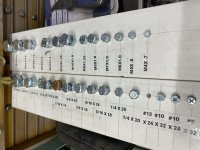
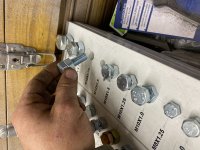
Here’s some photos. I’ll will update later as I make progress.


2A7C995D-CD8B-4DA7-B0C4-86E661782E8B.jpegA400A10C-C634-4988-8C46-1CDF77B44A2C.jpeg1F3646BD-A624-4F71-9655-32BB7E85D1C8.jpeg2D35F46D-8B76-4A9C-955E-24FDD9318E21.jpeg99A4BF07-9469-434F-BD3D-837F723A792C.jpeg2221F74E-3D8F-41DB-A242-D454D609815C.jpeg79A6425C-D304-4496-8AAA-EB73A48F509E.jpeg
 
   / Building subframe for YFL-240 + Refurbish for my YM240D #2  
I have a Yanmar 336d tractor with a factory loader. I think I have a factory manual also. Unsure how close in design etc. yours is to mine. I could take photos and get them to you but I will not get to the farm for nearly a week so that may be of little help to you.
I will be following your work/design with interest.
 
   / Building subframe for YFL-240 + Refurbish for my YM240D
  • Thread Starter
#3  
I have a Yanmar 336d tractor with a factory loader. I think I have a factory manual also. Unsure how close in design etc. yours is to mine. I could take photos and get them to you but I will not get to the farm for nearly a week so that may be of little help to you.
I will be following your work/design with interest.

I wouldn’t mind more photos of how the subframe is constructed. There’s very little out there and I’m working on just a handful of photos from other guys. It appears every loader is completely different so I’m always open to new insight.
 
   / Building subframe for YFL-240 + Refurbish for my YM240D
  • Thread Starter
#4  
I got the side brackets welded up partially to the main beam.
When I pull the main beam off the machine again, I値l weld the rest.
Doesn稚 make sense to do any overhead welding if I don稚 need to.

I shortened the main towers 5 1/2? The only reason I see them needing to be so high is for dump clearance on a truck. I have no need for that, and the towers being so high looked goofy to me.
Now they are the same height as the hood which looks better in my opinion.

I made 4 plates. Welded them together in pairs to clean them up, drill them; weld to the main towers and lower plates to the beam.

One plug weld in the middle will keep them together long enough to align everything and once I知 ready, I can just push on the tower to break them free. But then all the holes will be exactly in place even if my measurements were off.

Also, in light of working with a metric machine, I got tired of guessing thread pitch and count, so I made a couple thread check gauges. Both metric and standard.
I live 30 minutes 1 way from any hardware store, so it値l be useful to know what I知 shopping for now :)
 

Attachments

  • 534E0C5C-5BDC-45F3-8417-5DA78B9441B4.jpeg
    534E0C5C-5BDC-45F3-8417-5DA78B9441B4.jpeg
    4.3 MB · Views: 134
  • 49F84670-6517-4872-BD98-3A0729AA9277.jpeg
    49F84670-6517-4872-BD98-3A0729AA9277.jpeg
    2.7 MB · Views: 123
  • 154E6913-22DD-4830-BC7A-3E38A1D5EA05.jpeg
    154E6913-22DD-4830-BC7A-3E38A1D5EA05.jpeg
    2.9 MB · Views: 131
  • 1AC6173F-57AD-4F94-B511-257B4F65DB83.jpeg
    1AC6173F-57AD-4F94-B511-257B4F65DB83.jpeg
    3.5 MB · Views: 134
  • 3D370CAA-EE5F-4B7D-A51E-0B2856C36759.jpeg
    3D370CAA-EE5F-4B7D-A51E-0B2856C36759.jpeg
    3.2 MB · Views: 154
  • 7C37A8A8-6E30-43AC-AEEE-4D1F7208A968.jpeg
    7C37A8A8-6E30-43AC-AEEE-4D1F7208A968.jpeg
    3.4 MB · Views: 134
  • 3B479F58-BACE-4C3D-B3B3-FA321E696C3A.jpeg
    3B479F58-BACE-4C3D-B3B3-FA321E696C3A.jpeg
    3.5 MB · Views: 127
   / Building subframe for YFL-240 + Refurbish for my YM240D #5  
I will try to remember on the photos but it looks like you have it well in hand. You may be done before I can get the pictures to you. Looks like a beefy unit you are fabricating.
 
   / Building subframe for YFL-240 + Refurbish for my YM240D
  • Thread Starter
#6  
Got a little more done last night.
I pulled the main beam frame off to fully weld everything.
I must say, I think it might be a little overbuilt for what it is LOL.

It's quite ridged left to right, but is floppy front to back. That’s where that diagonal brace to the front comes in I suppose.
I installed the two bars that came with the loader. I didnt want to permanently install then with some fancy bracket, rather find where I think they should go and check clearances on everything.
I wasnt really sure where the main towers were originally placed on the machine forward to back, and one of the cross bars on the loader arm seemed awfully close to the bumper. I also wanted to make sure I had clearance for the hood to open.

Im glad I made this move. Where I thought the bars would land seemed good and very solid, but the steering knuckle conflicted with the left one. So they need to raise up, witch complicates the front bracket a bit.
Nature of the beast.

I’m still scratching my head on how to tie in the subframe to the rear.
Ive seen a number of sub frames just use bar stock to the rear. That just doesnt seem like enough to me. But I’m no engineer.
Also, where exactly to mount.
I could use the draw bar bracket. Or built some plate for around the axle.
I even saw one that basically bolted under the axle and the fender bolts went through it to lock the axle in. That one is appealing to me.

On to the photos!
 
   / Building subframe for YFL-240 + Refurbish for my YM240D
  • Thread Starter
#7  
466402B0-239B-4389-AF99-04F63C40B141.jpeg40F9E589-07C9-4659-A2EC-E3A2ECB93D6F.jpeg50D596D3-F98F-4C7B-B840-BDD411EE1113.jpeg556F8426-C982-4388-BD1F-AC3B2805AEC1.jpegE9332412-5B3E-4732-815B-E3F49B5792F3.jpegE0A0F36B-6B7F-42FF-AE2F-05EAF5ACC7A5.jpeg675DA700-6CAA-40CD-898B-8522D091245D.jpegDB6A0294-AC34-430E-BFB7-26EAC9B9EE13.jpegD54AACEC-4144-4565-A2DA-1C5268360F49.jpeg

No sure why the photos s isn稚 attach to the last post :confused:
 
   / Building subframe for YFL-240 + Refurbish for my YM240D #8  
You have made some great progress.
 
   / Building subframe for YFL-240 + Refurbish for my YM240D #9  


I have attached 11 photos of the factory Yanmar 336 loader and a sheet from their loader manual. Hopefully that will be of some assistance to you.
 
   / Building subframe for YFL-240 + Refurbish for my YM240D #10  
Photo 8 might be of the subframe for the Woods 750 backhoe.
 
   / Building subframe for YFL-240 + Refurbish for my YM240D #11  
Just so there is no confusion for those looking at the photos I sent. I also have a Woods 750 3 point hitch backhoe on the Yanmars. At first it was secured with some of the 3 point arms etc. I had some concerns about breaking the tractor so I at first added that all thread rod seen in photo 8 from mid frame to the back. My father in law added that and thought it enough. It may well be as he was a bright guy but I chickened out and bought the subframe that Woods or Yanmars suggested. Since it did not interfere with the all thread rod I just left that. The 3 point arms etc. are removed but I have them in case I ever would remove the backhoe.
Times change, I got the tractor and loader and a grader blade in 1989 with under 900 hours for $3750 and the loader in 1990 (it was fairly new) for under $1500 I think.
jklColorado has talent and is fabricating a solid loader.
 
   / Building subframe for YFL-240 + Refurbish for my YM240D #12  
At that time the price was very fair for that package deal, I would have bought it too. From what I have read and seen from jkColorado's posts, yes he does appear to be very talented and I have no doubt his loader will be a solid build.
 
   / Building subframe for YFL-240 + Refurbish for my YM240D
  • Thread Starter
#13  
After awhile I got my loader valve from Hoye, and more importantly, a little time to mess around with it.
There was no clear position the original valve was installed on the tower, so I have the opportunity to place it where I feel most comfortable.

I eyeballed where I felt it should go, then made a plate to bolt it to. I just used some scrap 2 box tubing. I beveled the end of it just to make it look less home brewed.

The placement felt great. I had easy operation in all positions with my arm resting on the rear fender.
However, once installed and bolted down tight, I found the 吐loat function was in a weird place. Joystick far left would activate float.
Whoops.
I didn稚 feel this without the valve bolted down because there is a substantial detent that I couldn稚 get into without it locked down solid.
*****sigh****
I personally liked this position as it allowed the hydraulic lines to exit out the top making a nice east loop to the steel lines on the loader arm.
The way it痴 SUPPOSED to be forces the hydraulic lines to exit towards the engine.
Without completely starting over on the mounting arm, the only way I can remedy this is to get 90* adapters.
Looking on Hoye痴 website for the adapters I purchased, it states 菟ort from loader to -6 JIC? This isn稚 much help.
I知 guessing the proper term is 3/4 ORB to -6 jic elbow.

I知 learning hydraulics and all the nomenclature that goes along with it. Always frustrating when there are so many options.

Oh well.

I also removed all the short hoses from steel lines to the cylinders so I can have them rebuilt.
I also want to have all the cylinders rebuilt. They all seem okay, no leaks and no rust or pitting but I壇 prefer to just have them in new shape.
Anyone have any idea what it typically cost to rebuild these cylinders?


895AF501-6A74-4ED4-926E-0F48F9811EBF.jpeg5679E4F9-A7CD-4682-8626-D96721C9416A.jpegCD4E15E6-50CF-49B3-81D5-C1B04DC7EC39.jpeg41B959AB-865A-45D8-936D-DEE2AB0B5139.jpeg2B405502-DE55-4DBE-B7DF-D37312BA62B7.jpegEB04287C-52E2-4039-8692-683428ADD643.jpeg4CEBAA1A-9DC0-4AEC-B7A5-3BA0FEB390B2.jpeg73697533-396D-4FB4-9E48-3312AD9BE469.jpegBFE02377-842C-42E6-991C-3A354DE2A2D2.jpeg42FD75E3-6472-4BD6-BF1C-BCF3D152AB3B.jpeg
 
   / Building subframe for YFL-240 + Refurbish for my YM240D
  • Thread Starter
#14  
Welp, it痴 finally operational.
I still need to redo the front diagonal bracing to raise them up a bit. Right now the steering knuckle hits the brace at full lock.
And also need to fabricate the rear brace to the axle.
But on my way into work this week, I stopped by the hydraulic shop and had them build me all new hoses. Then a couple more trips to get adapters and fittings to get them all hooked up.
Man that痴 a chunk of change for 14 hoses.

Had to get creative on the elbows going into the valve because they pack them so tight together you can turn them without them hitting the ones next to it. *sigh

But tonight after picking up the last two adapters today and having the supply and return lines made, I hooked it all up, fired up the machine and wouldn稚 ya know it, it lifts and curls!
I couldn稚 be happier!
This is going to make work around the house and shop SOOOOO much easier.


It痴 certainly not fast. Maybe a higher flowing pump would remedy that?

Also need to build a bucket level gauge. I can稚 see the tip of the bucket to know when it痴 flat to the ground.
I知 used to skid steers where you can see the cutting edge of the buckets.

Considering I致e never worked with hydraulics before, I didn稚 have to remake any hoses (for not knowing the technical names and sizes of each fitting), AND nothing leaks!
I知 glad I decided to tear this all apart. Every single fitting had Teflon thread tape on them :(
Got all that cleared out.

I also figured I would run these cylinders for a bit to see if they actually need rebuilt.
At this point, it doesn稚 appear they do. No leaks from them either so I値l just roll with them.
If I don稚 include the cost of the tractor, only the cost of the loader, I知 about $800 all in with the loader, all new hoses, new valve and using scrap out of my pile to hook it up.
I can稚 complain much about that for the use it値l see.


9A5580D5-A36B-430F-AC8B-CB08CA97FDC8.jpeg54B6118C-07D1-4C70-897C-66D56E3392DE.jpeg1EFB6B1E-D059-4F71-AA7E-97D63C300FAB.jpeg733740D8-BBB7-4A97-90F4-CF60395F1E4D.jpeg87B20A2A-A7F4-4DAC-8443-027FB484C933.jpegF0854E14-955F-46CB-98F6-7F22F608368C.jpegB4342A49-3193-46CD-A70C-5CFC2081CB99.jpeg
 
   / Building subframe for YFL-240 + Refurbish for my YM240D
  • Thread Starter
#16  
   / Building subframe for YFL-240 + Refurbish for my YM240D
  • Thread Starter
#17  
On another note, i apologize about the weird symbols and stuff in my posts.
I wrote the whole thing up, the copy it, then work on loading photos. By the time I come back to the page, everything I wrote is gone so
I paste it back with the photos inline.
When it posts it has all that weird crap anywhere they’re is a normal punctuation.
Stupid phones and forum engines
 
   / Building subframe for YFL-240 + Refurbish for my YM240D #18  
Very nice work!
 
   / Building subframe for YFL-240 + Refurbish for my YM240D #19  
On another note, i apologize about the weird symbols and stuff in my posts.
I wrote the whole thing up, the copy it, then work on loading photos. By the time I come back to the page, everything I wrote is gone so
I paste it back with the photos inline.
When it posts it has all that weird crap anywhere they’re is a normal punctuation.
Stupid phones and forum engines

I have not tried this in years so it may not be in place any longer.
Years ago in a different period of life, I had to write up reports and transfer them along with graphs, tables and excerpts from spreadsheets to a ‘server’ based system. I worked from a different location from where the server was located so I prepared my reports on my computer. Again years ago in the days of different operating systems sometimes even within the same brand if computer. (This was pre windows and very early windows days—nothing like today’s windows). All of that to set up what we worked with then, anyway there was a buried option to save files in an ascii format. It removed the special characters used by different programs to provide punctuation and other things. Somethings still needed to be edited after the transfer, but mostly it would transfer without crazy words. I quickly learned to save 2 copies of my final report. One normal for the program and one that would transfer.
 
   / Building subframe for YFL-240 + Refurbish for my YM240D
  • Thread Starter
#20  
I have not tried this in years so it may not be in place any longer.
Years ago in a different period of life, I had to write up reports and transfer them along with graphs, tables and excerpts from spreadsheets to a ‘server’ based system. I worked from a different location from where the server was located so I prepared my reports on my computer. Again years ago in the days of different operating systems sometimes even within the same brand if computer. (This was pre windows and very early windows days—nothing like today’s windows). All of that to set up what we worked with then, anyway there was a buried option to save files in an ascii format. It removed the special characters used by different programs to provide punctuation and other things. Somethings still needed to be edited after the transfer, but mostly it would transfer without crazy words. I quickly learned to save 2 copies of my final report. One normal for the program and one that would transfer.


A lot has changed since DOS :)
 

Marketplace Items

2013 Ford F-250 Pickup Truck (A55973)
2013 Ford F-250...
2016 INTERNATIONAL PROSTAR TANDEM AXLE DAY CAB (A59904)
2016 INTERNATIONAL...
*Selling at Royal Auction Tampa, FL Location* (A59228)
*Selling at Royal...
2014 Kia Sedona Van (A59231)
2014 Kia Sedona...
2015 Chevrolet Tahoe SUV (A59231)
2015 Chevrolet...
207280 (A52708)
207280 (A52708)
 
Top