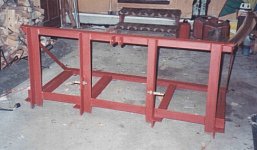
Carryall & 3pt geometry question

   / Carryall & 3pt geometry question #11  
i hope you will poste some pictures ...good luck
 
   / Carryall & 3pt geometry question #12  
I'll take pictures tomorrow.

Patrick is right about not wanting to use the remote for the hydraulic top link all the time. I use it when I want top link control, such as with a box blade. I take it off sometimes, when mowing or sometimes if I'm using a sprayer. If you don't throw away your standard top link you can use it when you need the remote for something elase. Swapping takes about a minute.

The top link is a converted cylinder. New cost for the cylindeer was $94. I welded a nut with rod end to the cylindr rod, and built an adapter for the cylinder end.

The hydraulic connections consisted of two $12 3' hoses and two $6 QD fitting that fit my remote ports.

Some people can spend $500 or more on top n tilt. My top link cost about $150 and can later be used with a TNT valve.

Before you build a carry all, check the replies to my post
POST YOUR PICTURES OF FORKS? in this build it yourself forum. I think forks give the best of bale handling, carry all, fork lift, and can easily be adapted for brush use or a rapple.

You have a lot to learn but with reading these posts it will come quickly. Except one, there are almost no books about this stuff. You found the best place to start.

Pictures to come

JRPoux
 
   / Carryall & 3pt geometry question #13  
A picture of a hydraulic top link. If someone really wants to build one I can take it off and take close up pictures of the ends.
 

Attachments

  • 53-143348-toplink.jpg
    53-143348-toplink.jpg
    10.1 KB · Views: 480
   / Carryall & 3pt geometry question #15  
Here is a pic. To make the top link:

1. Get a new cylinder. I think mine might be 3" bore x 8" stroke. I have a bigger tractor M6800 so you might want a 2 1/2 or 2" cylinder.

2. Unscrew and discard the end off the cylinder rod. Take the cylinder to a good nut and bolt house and order a nut to fit the rod. Weld a 7/8" (cat I) spherical rod end to the nut. Weld the nut to the rod. If you don't weld it, it will loosen.

3. Remove the pin from the cylinder end. Fit (cut with a torch and drill) a piece of thick plate such that when this pin is reinstalled, the plate will only have slight clearance between the plate and the contact points on the cylinder. The force on the cylinder ends must be exactly in line with the centerline of the cylinder bore, so you don't want the plate to flop up and down. I cut a plywood pattern such that with a hole in the pattern that fits the pin, It just touched the cylinder end when the pin is installed. Transfer the pattern shape to the plate.

4. Weld another rod end to the adapter plate.

5. Once you are happy with the rod movement compared to the remote lever movement, mark the hose ends and coupler ends with colored tie wraps. Mine are red and blue. When I p[lug in my hoses color coded, the cylinder always works the same.

6. With hydraulic top link installed, lift the attachment to highest and lowest position and with cylinder in and out to make sure at no place does the cylinder or rod end hit the implement frame. I found today that mine does, so it will need a grinder adjustment.

Good luck and enjoy

JRPoux
 

Attachments

  • 53-143574-toplink.jpg
    53-143574-toplink.jpg
    10.1 KB · Views: 450
   / Carryall & 3pt geometry question #16  
I'm not sure 7/8 is the right size. Measure your top link pin size.
 
   / Carryall & 3pt geometry question #17  
Wrong pic. Try this one:
 

Attachments

  • 53-143577-KUBOTAtoplink.jpg
    53-143577-KUBOTAtoplink.jpg
    43.2 KB · Views: 439
   / Carryall & 3pt geometry question #18  
Here's a picture of mine. I unscrewed the rod end then welded the ball to it. Couldn't take the other end off, so i just welded the ball to the pin, then welded the pin to the cylinder to prevent it from flopping around. I ran my hoses to the FEL valve that came with my tractor ( I didn't get an FEL - yeah, I know, how stupid could I get? /w3tcompact/icons/laugh.gif). Because I didn't need to buy the valve, this set-up ran me a little under $150.

This works really well. My only problem was the weld was good enough, so I have to have my neighbor weld it... he's practically a pro at welding.
 

Attachments

  • 53-144659-linkBefore_after.jpg
    53-144659-linkBefore_after.jpg
    130.8 KB · Views: 399
   / Carryall & 3pt geometry question #19  
Do both ends need to be a swivel? I've seen some commercially made hydraulic top links that have one end a standard pin through a clevis and the other end a swivel ball. I'm thinking of making mine that way.
 
   / Carryall & 3pt geometry question #20  
Both ends need to swivel, because when you tilt the attachment you get some strange angles out of your top link in both the hortizonal and verticle planes. Also be sure that the tractor end has sufficeint clearance of the cylinder from the top link attachment point. I missed this measurement and ripped the ball out of its socket when I attempted a strange tilt of box blade when I also had the tilt at an extreme angle. T-N-T is greatest thing since FEL.
 

Tractor & Equipment Auctions

Assorted Lengths of Walnut Lumber (A49339)
Assorted Lengths...
NEW Wolverine 3PT Hitch Receiver (A48289)
NEW Wolverine 3PT...
2015 Freightliner 122SD T/A Wet Kit Day Cab Truck Tractor (A46683)
2015 Freightliner...
2020 John Deere 333G Track Skid Steer (A46502)
2020 John Deere...
RockawayRA-7415 Super Duty Landscape Attachment (A43476)
RockawayRA-7415...
Kubota SVL97-2 High Flow Skid Steer  Cab A/C, Rear Camera, Quick Attach! (A48561)
Kubota SVL97-2...
 
Top