KMA
Gold Member
I thought I'd share a small project I did over the weekend. It cost me just under $20 in materials if you don't count the tools, two bolts and two short pieces of steel I already had laying around. :thumbsup:
Some history: I have the 48" light materials bucket for my PT, which is great for moving large amounts of mulch around my yard. My wife and I have a good system where a large delivery is dumped away from the house, and then I make runs and strategically place piles around our landscaping while she levels it. She doesn't even need any tools, just gloves. Anyway, I'm digressing... The LMT bucket isn't made for digging down into the earth. In fact, the long straight edge coupled with the hard pan and smallish size of my PT makes it pretty difficult. I've been contemplating getting a toothed bucket but I wouldn't use it enough to justify the additional expense or the extra room to store it. That all being said, a bolt on tooth bar seemed like a good compromise. The cheaper ones on Ebay, etc start around $300 shipped. The downside of a typical tooth bar is that it's more difficult to level/grade an area by driving backwards and angling the bucket in float so the flat edge rides along the surface. But, since they are removable it wasn't a show stopper. In my searching, I stumbled across the Piranha tooth bars, which were well reviewed and looked like a nice option for smaller tractors. It seemed like a good in-between solution and had the additional benefit of being able to chop through brush with it's sharp teeth. They are reasonably priced too, about $300 or so shipped.
I was set on buying the Piranha, when I decided to see if I could make one instead. I went to local metal scrap yard that recycles and sells steel. I picked up a 48" x 5" x 3/8" flat bar for $19.44. They actually cut it to be around 52", so I used the extra length for the brackets, but more on that later. Since I was only $20 in the hole at that point, I decided to swing by the local HF and see what tools I could buy to make the job a bit easier. (I'm a tinkerer at best, and I usually don't need higher end tools so HF works out for me quite often.) I ended up getting their portable band saw on sale with a 25% off coupon for $65 ish I think. I stopped by Lowes which is right next door and grabbed a pack of 3 14/18 tpi bi-metal blades (~$18) since the HF saw comes with a wood blade. The name brand blades at Lowes/HD are better than the HF ones, plus they are actually a few bucks cheaper. I already had my <$100 HF 90 amp welder (2 years old), and <$20 4 1/2 angle grinder (12 years old), so I was done after buying the saw.
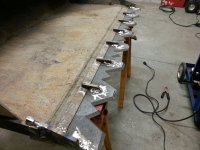
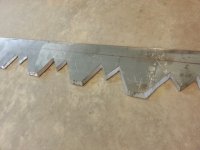
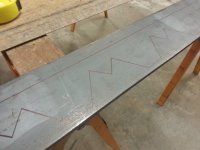
Looking at pictures on the web, I drew up my outlines for the cuts on the steel bar. I won't go into all the measurements since they would depend on your bucket, plus I don't remember them since I figured it out on the fly. Cutting the pieces out took a few hours. The band saw is intentionally slow, which makes it easy to control. It wasn't unwieldy or terribly heavy either which was nice. I just clamped the bar down, rolled up my stool, and started cutting. I used the angle grinder for small fixes, but mostly to take the edge off slightly so it wouldn't dull as quickly in the dirt/rocks. Plus it's safer that way since it's pretty darn sharp after the initial cuts (I caught my thumb on one of the smaller inside teeth). I saved the chunks of metal cut away, and used the larger ones to make the little "clampy" bits along the top of the tooth bar. These hold the bar in place and keep it from moving when digging into the dirt. I used the 4 1/2" angle grinder with a cut off wheel for this part. I made a template piece and checked it over and over on against the tooth bar/bucket for fitment. I repeated this for all six of them. I made sure that they contacted the bar and the bucket correctly, so when they were welded in place it would make a perfect fit. This brings up and good point... my bucket is actually made slightly wrong, such that the front edge bows upwards a bit and the whole thing is kind of lopsided. You can't really tell by looking at it, but if you place it on a flat surface you notice it. By clamping the bar to the bucket and custom making all the pieces, I was able to make it "keyed" to fit.
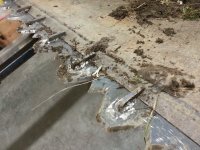
After getting all the pieces cut, I tack welded them in place and then welded them the rest of the way. My little HF welder is slightly under powered for this job... this, coupled with my lack of ability, resulted in the welds not being the nicest but I felt I was getting good penetration. I'm typically able to get a decent looking weld about 1/3 of the time, but they all seemed strong enough. I knew I would just knock them down with the grinder when done. My confidence wavered once I ran out of Lincoln 0.035 wire and had to shift over to my emergency backup (the OE HF 0.030 wire). :thumbdown: That stuff is not good and stutters/pauses while feeding. If I wasn't so close to finishing, I would have waited and bought more but I need to get it done. Anyway, I pushed through it and those welds were particularly ugly. Oh well... they seem to be holding.
After getting it mounted up and mostly done, I made the brackets that allow it to be bolted in place. I had two small chunks of 3/8" steel with holes predrilled in them that I used along with the extra pieces resulting from the additional steel bar length. The first section of the bracket goes from the tooth bar up to the side edge of the bucket and is angled such that it butts up against it. I figured this would add to the tooth bar's ability to withstand impact from the front. I welded the second predrilled section to the first, parallel to the bucket's floor. I decided to have the bracket go on the outside... the large welds inside the bucket along the bottom/side edge were kind of in the way, plus it worked out better with the way I cut the first sections. Finally, I drilled some holes and added the bolts.
The really cool thing about custom fitting the design to the bucket itself is that when I take it off and re-install it, the holes on the side line up perfectly and there is zero play along the edge. I still need to add a coat of paint, but I couldn't wait to take it outside and see if I could break it. I dug into some earth and noticed it seemed much better than without the tooth bar. It's no miracle worker... I'm still limited by the size of the machine, but an improvement nonetheless. I also found some thick brush with about 1" trunks and repeatedly rammed my tractor into them cutting them away from their roots. It's a cool feature, but I already have a brush cutter attachment that I use for this type of work. The teeth do look kind of intimidating though. :mischievous:
Even including the price of most of the tools used, it's still much lower than the cost of the commercial tooth bar. I'd say it took me around 6 hours to complete. Let me know what you guys think.
Some history: I have the 48" light materials bucket for my PT, which is great for moving large amounts of mulch around my yard. My wife and I have a good system where a large delivery is dumped away from the house, and then I make runs and strategically place piles around our landscaping while she levels it. She doesn't even need any tools, just gloves. Anyway, I'm digressing... The LMT bucket isn't made for digging down into the earth. In fact, the long straight edge coupled with the hard pan and smallish size of my PT makes it pretty difficult. I've been contemplating getting a toothed bucket but I wouldn't use it enough to justify the additional expense or the extra room to store it. That all being said, a bolt on tooth bar seemed like a good compromise. The cheaper ones on Ebay, etc start around $300 shipped. The downside of a typical tooth bar is that it's more difficult to level/grade an area by driving backwards and angling the bucket in float so the flat edge rides along the surface. But, since they are removable it wasn't a show stopper. In my searching, I stumbled across the Piranha tooth bars, which were well reviewed and looked like a nice option for smaller tractors. It seemed like a good in-between solution and had the additional benefit of being able to chop through brush with it's sharp teeth. They are reasonably priced too, about $300 or so shipped.
I was set on buying the Piranha, when I decided to see if I could make one instead. I went to local metal scrap yard that recycles and sells steel. I picked up a 48" x 5" x 3/8" flat bar for $19.44. They actually cut it to be around 52", so I used the extra length for the brackets, but more on that later. Since I was only $20 in the hole at that point, I decided to swing by the local HF and see what tools I could buy to make the job a bit easier. (I'm a tinkerer at best, and I usually don't need higher end tools so HF works out for me quite often.) I ended up getting their portable band saw on sale with a 25% off coupon for $65 ish I think. I stopped by Lowes which is right next door and grabbed a pack of 3 14/18 tpi bi-metal blades (~$18) since the HF saw comes with a wood blade. The name brand blades at Lowes/HD are better than the HF ones, plus they are actually a few bucks cheaper. I already had my <$100 HF 90 amp welder (2 years old), and <$20 4 1/2 angle grinder (12 years old), so I was done after buying the saw.
Looking at pictures on the web, I drew up my outlines for the cuts on the steel bar. I won't go into all the measurements since they would depend on your bucket, plus I don't remember them since I figured it out on the fly.
Cutting the pieces out took a few hours. The band saw is intentionally slow, which makes it easy to control. It wasn't unwieldy or terribly heavy either which was nice. I just clamped the bar down, rolled up my stool, and started cutting. I used the angle grinder for small fixes, but mostly to take the edge off slightly so it wouldn't dull as quickly in the dirt/rocks. Plus it's safer that way since it's pretty darn sharp after the initial cuts (I caught my thumb on one of the smaller inside teeth). I saved the chunks of metal cut away, and used the larger ones to make the little "clampy" bits along the top of the tooth bar. These hold the bar in place and keep it from moving when digging into the dirt. I used the 4 1/2" angle grinder with a cut off wheel for this part. I made a template piece and checked it over and over on against the tooth bar/bucket for fitment. I repeated this for all six of them. I made sure that they contacted the bar and the bucket correctly, so when they were welded in place it would make a perfect fit. This brings up and good point... my bucket is actually made slightly wrong, such that the front edge bows upwards a bit and the whole thing is kind of lopsided. You can't really tell by looking at it, but if you place it on a flat surface you notice it. By clamping the bar to the bucket and custom making all the pieces, I was able to make it "keyed" to fit.After getting all the pieces cut, I tack welded them in place and then welded them the rest of the way. My little HF welder is slightly under powered for this job... this, coupled with my lack of ability, resulted in the welds not being the nicest but I felt I was getting good penetration. I'm typically able to get a decent looking weld about 1/3 of the time, but they all seemed strong enough. I knew I would just knock them down with the grinder when done. My confidence wavered once I ran out of Lincoln 0.035 wire and had to shift over to my emergency backup (the OE HF 0.030 wire). :thumbdown: That stuff is not good and stutters/pauses while feeding. If I wasn't so close to finishing, I would have waited and bought more but I need to get it done. Anyway, I pushed through it and those welds were particularly ugly.
Oh well... they seem to be holding.After getting it mounted up and mostly done, I made the brackets that allow it to be bolted in place. I had two small chunks of 3/8" steel with holes predrilled in them that I used along with the extra pieces resulting from the additional steel bar length. The first section of the bracket goes from the tooth bar up to the side edge of the bucket and is angled such that it butts up against it. I figured this would add to the tooth bar's ability to withstand impact from the front. I welded the second predrilled section to the first, parallel to the bucket's floor. I decided to have the bracket go on the outside... the large welds inside the bucket along the bottom/side edge were kind of in the way, plus it worked out better with the way I cut the first sections. Finally, I drilled some holes and added the bolts.
The really cool thing about custom fitting the design to the bucket itself is that when I take it off and re-install it, the holes on the side line up perfectly and there is zero play along the edge. I still need to add a coat of paint, but I couldn't wait to take it outside and see if I could break it.
I dug into some earth and noticed it seemed much better than without the tooth bar. It's no miracle worker... I'm still limited by the size of the machine, but an improvement nonetheless. I also found some thick brush with about 1" trunks and repeatedly rammed my tractor into them cutting them away from their roots. It's a cool feature, but I already have a brush cutter attachment that I use for this type of work. The teeth do look kind of intimidating though. :mischievous:Even including the price of most of the tools used, it's still much lower than the cost of the commercial tooth bar. I'd say it took me around 6 hours to complete. Let me know what you guys think.
Attachments


Last edited:

