ncoonen
New member
I just finished installing the CKA111 dual rear remote kit on my 2020 Kioti CK3510H and want to put down a few notes to help the next guy who tackles this kit. It isn't a difficult installation but it is tricky in spots and is made much more challenging by the poor instructions that come with the kit. I found the parts in the kit to be top quality and well labeled and everything fit where it was supposed to go. Some of these things may seem obvious but they weren't to me, an experienced mechanic but new to hydraulic control systems. Here goes:
...ned.
- I have read that people have installed the rear remotes without removing the right rear tire. I started with that tire on but soon removed it in order to better visualize pipe routing and to see the loader valve connections. If you understand the routing and have small hands, you *might* be able to get through the job with that tire in place. Other things that I removed (not in the instructions) include: loader control stick, knob for 3-point control, plastic trim piece around the 3-point control that includes the cup holder.
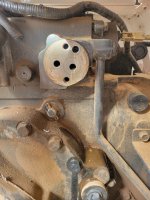
- The remote valve block is plumbed between the tractor hydraulic port and the loader valve. I expected it to be installed to the loader valve power beyond so I was initially confused by the instructions which do not mention this fact.
- The exploded parts diagram and parts list of the instructions are by far the most useful pages. I found the part numbers there to be accurate which is not true in the "step by step" instructions.
- Do not bolt down the remote valve body until you have figured out and finger tighten the connections for the hydraulic pressure feed, the power beyond (to the loader valve), and the drain line. These three connections are the most difficult to manage. Note that the drain line connection will vary based on the serial number of your tractor. My 2020 CK3510H fell into the "early production" requiring a slightly more complex connection. Be sure to figure this out early and plan your steps accordingly.
- Attach the quick connects to the two brackets securely before mounting the brackets to your tractor's top link bracket. Leave the mounting bolts slightly loose until you have the pipes from the valve body in place and at least finger tight. I was impressed by the precision of these very rigid pipes in that they all fit were they should and only needed a little wiggling to get seated correctly.
- Remove the seat, the right rear tire, and other small bits mentioned above.
- Lay out the parts on a table and figure out which valve drain strategy you need to install based on your VIN.
- Connect the remote valve input pipe to the tractor port, the power beyond pipe from the new valve to the loader valve, and the new valve drain line where it must go.
- Bolt down the valve and be sure the three lines from the previous step are securely connected. Fixing a leak on any of these three will be difficult later on.
- Loosely attach the quick connects to your tractor and run the four pipes from the valve body. Tighten all lines, then tighten the QC brackets.
- Install all control levers, handles, trim piece, seat, right rear tire.
- Check for leaks and have a well deserved frosty malt beverage.
...ned.