CMI dump modification

   / CMI dump modification #1  

Gittyup

Elite Member
Joined
Oct 4, 2007
Messages
3,159
Location
Mid Atlantic
Tractor
Kioti CK25 Shuttle Shift, loaded tires, JD X739
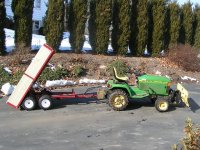
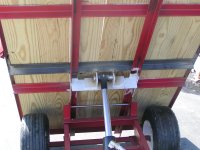
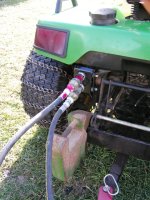
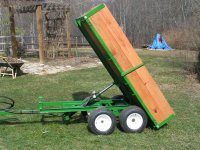
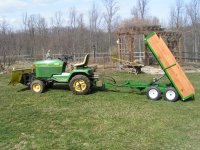
Here is another Country Manfacturing Inc. tandem trailer with a hydraulic dump modification. When I designed the cylinder plumbing, I wanted to use the dump trailer to connect to the both my John Deere 425 garden tractor as well as my Kioti CK25. The CK already had 1/2" rear remotes for my backhoe. So the trailer got 3/8" hose adapted up to 1/2" Male QC's. The JD hydraulics patch is 1/4" QC. So these were adapted up to 1/2" Female QC's, just like on the Kioti.

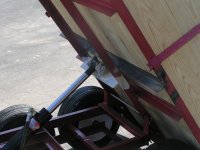
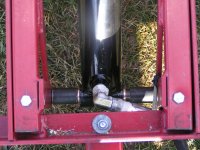
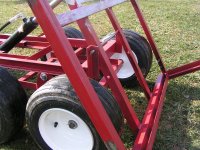
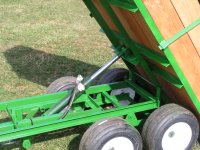
Putting a cylinder on the stock CMI trailer is tough, when considering that I want it to work with the relatively low pressure of the JD (1000 PSI). I needed as much vertical angle as possible, and also wanted it as far forward as was practical. But, the tongue extends all the way to where I have mounted the bottom of my cylinder. I tried and tried to put the cylinder more foward, but because of the tongue, I couldn't get a steep enough angle. There is also very little clearance. I'm not sure one could get a cylinder under there bigger than 2.5". I used 2" x 18" x 1.25". I thought seriously about raising the dump bed height above the base so that I could get more angle. Then I just surrendered and modified the lame jack dump that I had wrongly bought.

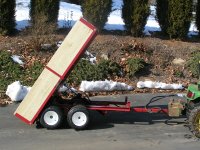
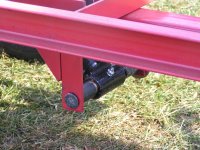
The trailer is the 6 foot version, which I bought thinking it would dump more steeply than the 7 footer. I ended up actually moving the pivot point forward to give me as much rear hang over as possible. I simply drilled 2 new holes. This will help the JD work more effectively.

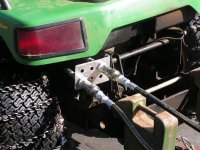
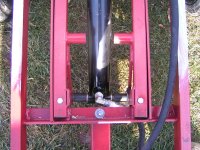
This is my first every welding. Not so pretty, but I think strong enough. It was fun. I built the pivot brackets using 2.5" angle 1/4" thick. Then I added an addition crossmember to help make it stronger and more rigid. I added clipst to the front of the trialer to hold the hose if not using the hydraulic hookup. I still have to prime and paint. But is now fully functional.

Should serve me well.
 

Attachments

  • PICT0001-1.jpg
    PICT0001-1.jpg
    68.1 KB · Views: 1,249
  • PICT0003-3.jpg
    PICT0003-3.jpg
    37.8 KB · Views: 953
  • PICT0004-1.jpg
    PICT0004-1.jpg
    49.6 KB · Views: 891
   / CMI dump modification #2  
Nice job on the trailer! That looks like factory.

I wonder how much it will lift... :cool:
 
   / CMI dump modification
  • Thread Starter
#3  
Thanks, Dmace, for the kind words. But, hardly like factory. Strong enough, though, I think. This was also the first time I had designed and built hydraulic hoses and couplers. Because it is plumbing, it's just like plumbing. Hoy!

Calculated vertical push for the angle applied at 1000 psi (JD) is about 800 lbs, at 2500 PSI (Kioti) it's about 2000 lbs. Full force of the cylinder at 1000 PSI is around 2900 lbs. That is why the angle is so critical. For this trailer to get more angle, you'd have to either lower the cylinder to the point that it would be vulnerable to ground contact, or raise the dump bed higher above the frame. I thought about a shorter cylinder. Could get a steeper angle, but not as much travel. I wanted it to dump very steeply, else what's the point.

I didn't want to put anything dirty in it just yet, because I'm going to paint and stain first. So, I stood on the front (worst case) of the trailer while trying to lift with the JD, no other weight on the bed. This is about 3.5 feet in front of the lift point. It wouldn't lift me. I moved down the bed 1 foot and it lifted me easily. I weigh about 210 lbs. My neighbor, who weighs about 180, was easily lifted when he stood on the front. I'm hoping, that with a more realistically distributed load, with a good bit of weight out back, that it will work effectively. I'll have to watch and not put too big a load on it. I haven't tried it yet with the CK. But, I suspect it will be no problem at all. The trailer is rated to 1 ton. I can't imagine pulling much more than that with my garden tractor.

I'll say one thing: it's fast. Lifts to full dump in about 3 seconds.
 
   / CMI dump modification #4  
That's exactly the thing I want to do with my BX24! I will be building and designing a trailer from scratch though so I don't have to work with whats there like you had to. I think you did a darn good job with what you had to work with.

One question I have is what kind of hydraulic valve did you use and where did you get it???

Thanks,

Craig
 
   / CMI dump modification
  • Thread Starter
#5  
My tractors both have hydraulic valves built in with remote patch panels. So, I didn't need a valve. I guess I could've used one on the Deere. But, if my dozer blade is using the remotes, I simply disconnect at the remotes and hook up the trailer. I have no power angle on the dozer blade when the trailer is connected. On your BX, I'd bet that Kubota sells a rear remote kit for it, if you don't already have one.

I bought the cylinder online from Dalton Hydraulics, and all the hoses and connectors from SurplusCenter.com. I thought about just installing it as a one way cylinder. But, the gravity down would have been too slow.
 
   / CMI dump modification #6  
I like it. Looks good to me. I'm wondering how you did the cylinder mount. I am going to build one of these and am wondering how you mounted the cylinder. Can I bother you for a pic?
 
   / CMI dump modification
  • Thread Starter
#7  
Wayne,

The top mount, I think you can see, mostly. It's 2.5" angle, 1/4" thick facing the rear with two pivot points cut from the same 2.4" angle welded to its backside. That assembly was then welded to the 2 longitudinal members of the trailer. I then added an extra crossmember, and tacked it to the pivot bracket outsides.

I should have taken some pics of the bottom connection, and I will when I can get some daylight. But, basically, I used the brackets that came with the crappy manual jack lift that CMI sells. I cut them off and redrilled to get them as far forward as possible. I used the 3/4" pivot pin that also came with the jack solution. The cylinder, however, has 1" cross tubes. So I installed a brass sleeve bushing. To keep the cylinder from getting too off-center on the long bottom rod, and to make sure the bushing stayed in place, I added 2 short pieces of plain 3/4" pipe.

If I were making my own bottom bracket from scratch, instead of being lazy like I did by using what I already had, I would have used heavier material with welded on pipes that centered the cylinder.

A 16" stroke would work better, for the location that I chose, and a 2.5" cylinder might just barely fit. The bigger diameter would add more power, and the shorter length would maximize the angle. You'd give up few degrees of dump. But, it would still be plenty steep.

I don't understand why CMI doesn't offer this as an option, perhaps even raising the bed and inch or two, or optimizing the bed pivot point. My retail cost for trailer and hydraulics is about $600. CMI could sell one heck of a trailer for about $900 and make a killing. Closest competitors that I have seen are $1500 and up. CMI doesn't even sell it for their 2 ton trailer. I guess they figure if you can't get a 4" x 24" cylinder under there, it ain't worth the trouble.
 
   / CMI dump modification
  • Thread Starter
#8  
Forgot. I also don't like the aluminum bracket I used on the JD. Flexes too much. I'm going to remake it out of some beefy steel.

Here are a couple of other pics that I have handy.
 

Attachments

  • PICT0002.JPG
    PICT0002.JPG
    258.2 KB · Views: 597
  • PICT0006.JPG
    PICT0006.JPG
    223.6 KB · Views: 516
   / CMI dump modification #9  
Actually, I was looking for the bottom mount. Funny, I was thinking bottom mount, but I forgot to type it. Sorry, I have 2 brain cells left and sometimes they don't speak to each other.
 
   / CMI dump modification
  • Thread Starter
#10  
Finally got some daylight to finish and take some photos showing the bottom pivot. As I said before, I used the brackets and rod that came with the manual jack lift kit. You can see the brass spacer bushing (3/4" ID, 1" OD), and the pipe spacers (1" sch. 40). I left 1/4" of play between the spacers. Tight fit of brass bushing made it a PITA to assemble, and probably even harder to take apart.

Pic 17-1 shows where I moved the pivot holes forward.

Last pic of new steel bracket for the JD425 patch panel. Much stronger and nicer looking (except for my marker paint) than the aluminum one.

Plan to paint the whole trailer JD green, stain the boards, and add a heavy duty linoleum liner to floor. I would rather use polypropylene or something. But, I already have the flooring, and it is very heavy weight.
 

Attachments

  • PICT0012-1.JPG
    PICT0012-1.JPG
    276.1 KB · Views: 466
  • PICT0011-1.JPG
    PICT0011-1.JPG
    255.9 KB · Views: 413
  • PICT0015-1.JPG
    PICT0015-1.JPG
    285.1 KB · Views: 406
  • PICT0017-1.JPG
    PICT0017-1.JPG
    257.1 KB · Views: 405
  • PICT0023-1.JPG
    PICT0023-1.JPG
    179.2 KB · Views: 463
 
Top