You are using an out of date browser. It may not display this or other websites correctly.
You should upgrade or use an alternative browser.
You should upgrade or use an alternative browser.
concrete walkway project
- Thread starter jmt1271
- Start date
- Views: 4159
/ concrete walkway project
#11
sandman2234
Super Member
- Joined
- Dec 4, 2005
- Messages
- 6,052
- Location
- Jacksonville, Florida
- Tractor
- JD2555 and a few Allis Chalmers and now one Kubota
I worked for a company that made the precast slabs of the Pensacola wastewater treatment plant just west of downtown, over 30 years ago. They were exposed aggragate and we used a retarding spray to keep the concrete from setting up. However, almost everything we poured the aggragate was exposed on the bottom, and we lifted it out of the forms and erected it on the building. Been too long for me to be of much help, plus the overall process is different.
I have always liked the exposed aggregate concrete, and now that Pensacola is trying to move that plant away from the bay, I bet they skip that part.
David from jax
I have always liked the exposed aggregate concrete, and now that Pensacola is trying to move that plant away from the bay, I bet they skip that part.
David from jax
MarkV
Super Member
- Joined
- Apr 7, 2000
- Messages
- 5,636
- Location
- Cedartown, Ga and N. Ga mountains
- Tractor
- 1998 Kubota B21, 2005 Kubota L39
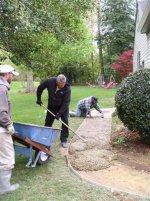
I am glad you will have some help with the pour. Three yards on a fifty foot run will be more work to keep up with than expected if you are new to concrete work. I would suggest at least four hardy workers. It will really help if the concrete truck can get close enough to shoot the concrete on the whole run instead of moving it by wheel barrow or tractor FEL. That takes time and with exposed aggregate timing is important.
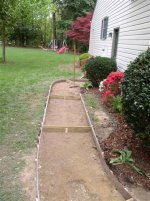
When setting your forms remove all vegetation where the concrete will be poured and see that any fill material used is well compacted. Some variation in depth is alright and on sidewalks most 4” pours are closer to 31/2” so 1x4’s can be used as forms. The curved sections are normally formed with masonite as mentioned above. Use plenty of stakes to hold the forms in place against the weight of the concrete. Also make sure the stakes are set below the top of the form so they will be clear when screeding the concrete level. I would use rebar or the 6x6 concrete wire to prevent cracking. It is important to get the rebar or wire to the middle of the concrete when it is poured. Just before the pour the forms should be coated with a release agent so the forms do not stick to the concrete. There are many commercial release agents but diesel fuel and a pump sprayer works pretty well.
Start the pour at the farthest point from the truck. Pour and rough the mud to the tops of the forms. Screed the mud with a straight 2x4 across the top of the forms by doing a sawing motion with the screed board and filling any voids. Have someone ready to start floating the screeded area while the others work the next section of the pour. It would help to rent a Bull Float for this part (Wide trowel on a long handle) although it can be done by hand with on four foot wide walk with a hand float.
I my opinion this will be the critical part of the pour for you. The floating process is to bring the “cream” or Portland part of the mix to the surface while forcing the aggregate down below the surface. You need the cream on the top to hold your decorative aggregate and the rough aggregate has to be down so it will not be exposed on the finish surface. Timing is everything. The mud can’t be to soupy when you start floating or it will not force the aggregate down into the mix. It also can not be to stiff or it will not bring up the cream. The timing can vary greatly depending on the mix and weather conditions. I’d suggest you work like mad men to get the concrete in the forms so all hands will be available when the concrete is ready to work.
Once floated with the cream on top and the rough aggregate forced into the mix it is time to broadcast your decorative aggregate. Put it on nice and even, then refloat everything to force it into the mix. If everything has gone well to this point you will probably have time for a beer. You are now waiting for the concrete to set up enough to start using a steel trowel for your finishing. You want to trowel to a smooth finish where you can barely see if at all the decorative aggregate. Once the mix has set up pretty well you will use a garden hose with a fine spray fitting to MIST the concrete exposing your decorative aggregate. You only want to wash enough concrete off to expose about a ¼ of the decorative aggregate. If you expose much more than that it will come loose from the surface in year to come. After several days of curing you can wash the walk down with a light solution of Miratic acid to clean the remaining gray film on the aggregate.
I would also suggest you go see the concrete supplier and explain your project to them. They can offer suggestions and supply a mix that will be the most forgiving for what you are doing.
Good luck,
MarkV
PS. We will want photos of the finished project.
Mark-
Thanks a LOT for that well articulated response. I appreciate it. I have done basically exactly what you described. I have the forms(2X4) set and staked every 1 to 2 feet. The stakes are below the tops of the forms. I used masonite for the radiused corners. The depth varies between 3 and 6-7 inches. I am waiting on weather to pour. Again, thanks alot for taking the time to reply as well as you did.
Thanks a LOT for that well articulated response. I appreciate it. I have done basically exactly what you described. I have the forms(2X4) set and staked every 1 to 2 feet. The stakes are below the tops of the forms. I used masonite for the radiused corners. The depth varies between 3 and 6-7 inches. I am waiting on weather to pour. Again, thanks alot for taking the time to reply as well as you did.
shaley
Platinum Member
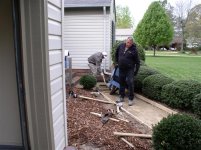
These guys don't even use a screed board they just fill the section and hand trowel. The key to cracking is the hydration rate or curing rate. I cover mine in plastic for 7 days and keep it wet. Very slow cure.
Attachments
MarkV
Super Member
- Joined
- Apr 7, 2000
- Messages
- 5,636
- Location
- Cedartown, Ga and N. Ga mountains
- Tractor
- 1998 Kubota B21, 2005 Kubota L39
jmt1271 said:Mark-
Thanks a LOT for that well articulated response. I appreciate it. I have done basically exactly what you described. I have the forms(2X4) set and staked every 1 to 2 feet. The stakes are below the tops of the forms. I used masonite for the radiused corners. The depth varies between 3 and 6-7 inches. I am waiting on weather to pour. Again, thanks alot for taking the time to reply as well as you did.
Glad I could help some. Sounds like you are off to a good start. On your areas that are too deep sand is much cheaper than concrete.
MarkV


