dfkrug
Super Member
- Joined
- Feb 3, 2004
- Messages
- 7,526
- Location
- Santa Cruz Mtns, CA
- Tractor
- 05 Kioti CK30HST w/ Prairie Dog backhoe, XN08 mini-X
This thread will describe what I went through in the design and build process
for a hydraulicly operated thumb for my Prairie Dog backhoe attachment.
Those who have seen my previous DIY thumb postings will note the many
similarities to my Fixed Mechanical Backhoe Thumb (1st and 2nd generations),
and my Articulated Mechanical Backhoe Thumb. Here is the link:
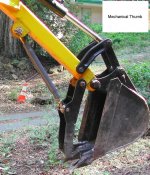
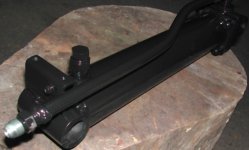
http://www.tractorbynet.com/forums/build-yourself/94333-another-backhoe-mechanical-thumb-fixed.html (Photo 1 is the fixed Gen 2 thumb.)
I did use a modified version of my Generation 2 thumb, but going hydraulic
meant substantial and laborious changes. Over the last several months, I
have been experimenting with cylinders and valves to achieve my design
goals. This hydraulic thumb is all new, and not a conversion of one of my
mechanical thumbs. I have recently completed the project and it works
great. Over the next few days, I will post 18 pix and share the process I
went through.
Two of my design goals were to be able to completely retract the thumb
when not in use, and to be able to grasp objects with more "dexterity" than
a fixed thumb. Both activities had to be performed from the operator's seat.
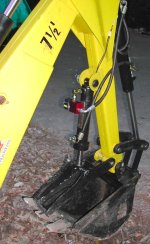
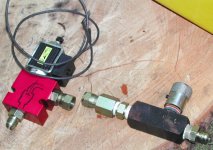
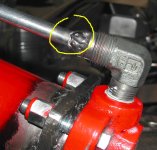
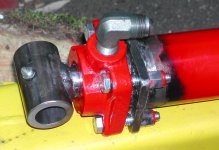
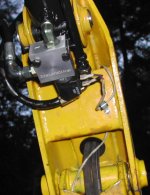
First, the experiments. As a mock-up, I took a 2x8 cylinder I had and
substituted it for the toplink I use for the mechanical thumb brace (2nd
photo). I connected this cylinder in parallel with the curl cylinder so
they operated simultaneously when the curl circuit is activated. This
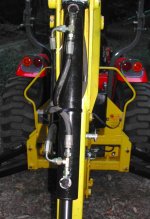
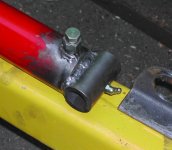
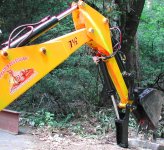
functionality was very effective in grasping rocks and logs since equal hyd
pressure goes to both cyls. (3rd photo) I moved a lot of rocks and
logs with this setup.
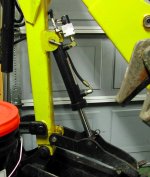
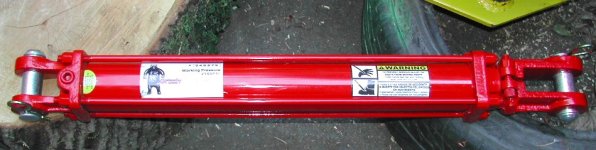
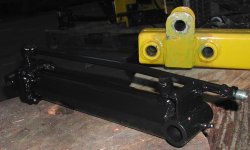
My force calculations and thumb geometry showed that my 2" cylinder
would apply slightly greater force than the bucket at its maximum force
position. At full thumb extension, the bkt force became slightly larger as
the 2 moment arm lengths changed. A 2" cylinder would be best. The
stroke would need to be 11 inches to achieve the desired travel.
for a hydraulicly operated thumb for my Prairie Dog backhoe attachment.
Those who have seen my previous DIY thumb postings will note the many
similarities to my Fixed Mechanical Backhoe Thumb (1st and 2nd generations),
and my Articulated Mechanical Backhoe Thumb. Here is the link:
http://www.tractorbynet.com/forums/build-yourself/94333-another-backhoe-mechanical-thumb-fixed.html (Photo 1 is the fixed Gen 2 thumb.)
I did use a modified version of my Generation 2 thumb, but going hydraulic
meant substantial and laborious changes. Over the last several months, I
have been experimenting with cylinders and valves to achieve my design
goals. This hydraulic thumb is all new, and not a conversion of one of my
mechanical thumbs. I have recently completed the project and it works
great. Over the next few days, I will post 18 pix and share the process I
went through.
Two of my design goals were to be able to completely retract the thumb
when not in use, and to be able to grasp objects with more "dexterity" than
a fixed thumb. Both activities had to be performed from the operator's seat.
First, the experiments. As a mock-up, I took a 2x8 cylinder I had and
substituted it for the toplink I use for the mechanical thumb brace (2nd
photo). I connected this cylinder in parallel with the curl cylinder so
they operated simultaneously when the curl circuit is activated. This
functionality was very effective in grasping rocks and logs since equal hyd
pressure goes to both cyls. (3rd photo) I moved a lot of rocks and
logs with this setup.
My force calculations and thumb geometry showed that my 2" cylinder
would apply slightly greater force than the bucket at its maximum force
position. At full thumb extension, the bkt force became slightly larger as
the 2 moment arm lengths changed. A 2" cylinder would be best. The
stroke would need to be 11 inches to achieve the desired travel.