Detaching a brush hog from cat1 3point hitch

   / Detaching a brush hog from cat1 3point hitch #11  
Hopefully we don't see a post a couple weeks from now asking how to reattach the BH if Dave's advice was followed... of course it would be a good reason to get a welder. /forums/images/graemlins/grin.gif
 
   / Detaching a brush hog from cat1 3point hitch #12  
Actually, removing the brush hog should be a snap, require little, if any muscle most of the time, and impress your neighbor.

First, remove the PTO shaft, as described in an earlier post. Collapse the shaft and let it rest on the front edge of the deck.

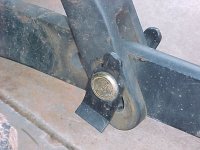
Second, remove the toplink pin. When the brush hog is sitting at rest, there is a "sweet spot" in the length of the toplink where there is no pressure on the pin. Usually, you are very close to being there when the unit is sitting flat on the ground. However, the toplink can be too long or too short for the purpose of easily removing the pin. For example, when lowering the brush hog to the ground, if the tailwheel touches down much before the front of the deck, the toplink is too long, ie pushing on it's attachment point. If the toplink is short, the front of the deck will touch ground before the tailwheel and be pulling as the tailwheel comes to the ground. Does that make sense? So, the toplink may need to be lengthened or shortened a bit to remove the pin easily. As you approach the "sweet spot", turning the adjustment rod gets easier, and you can actually see the toplink pin shift a little from front to back (while lengthening) or back to front (shortening) as you reach the "sweet spot". No sweat. Now you've got the toplink undone. By the way, my use of "too long" and "too short" only applies to removing the toplink pin, and not to proper toplink adjustment for use of the implement when cutting.

Next, is the part that's hardest for most folks, but is really easiest of all...removing the lift arms from the implement lift pins. For this part you may need a little WD40, but little else. You will let physics work for you and really impress your neighbor. TRACTOR PHYSICS 101- When backing, the 3PH lift arms want to spread apart and come off of the lift pins. The opposite is also true. When mounting the implement...driving forward wants to bring the lft arms closer together, ie they'll slide onto the lift pins. That's a topic for another day. Lower the 3PH all the way down. Then, spray a little WD40 on the lift arm balls and lift pins. If there is a rubber/bungee cord connecting the two lift arms, remove it temporarily. Pull the lynch pins. Back the tractor an inch at a time (With my hydrostat trannie, I do this while standing beside the tractor), and the lift arms will slide right off (no hammer, no kicks, no muss, no fuss), easy as can be...very impressive to female neighbors.

I'm sorry this post is so long, but this 3PH mount/dismount thing requires some explanation to make it the simple chore it should be. A little practice, a little finesse, and you'll be a pro.

Good luck with your neighbor's tractor! /forums/images/graemlins/grin.gif

OkieG
 
   / Detaching a brush hog from cat1 3point hitch #13  
Good description from OkieG

I would add that there also is a way to find the "sweetspot" where both lift arms are 'loose', by adjusting the lift arm that has the height adjustment (usually the right one) when the rotary cutter is at rest on the blocks.

Now, TBURNSK, introduce your 'neighbor' to the quick attach I-match and really impress her. Except for connecting the PTO, it is back in, raise (or lower), and 'go'.
 
   / Detaching a brush hog from cat1 3point hitch #14  
The terminology I use below to describe the arms in the 3PH system are just what I use and may not be standard terminology.

Another caveat to consider is whether the side links are "locked" to the lift arms, or if they allow a little lateral float. The side links (vertical arms that connect the lift arms to the hyd. 3PH lift links) may be, and probably are slotted where they connect to the lift arms (the arms that connect to the implement). The slot allows some lateral "float" and makes attaching/detaching (a/d) implements much easier (that's an understatement).

442804-MVC-038F.JPG


The picture shows the side link joining the lift arm. You can just barely see the slot extending above and below the pin (part of the lock is in the way). The little pieces of metal flanking the side link are a lock. The tabs on the lock are "out" which allows float. If the tabs were turned in, the lift arm could not move up and down in the slot and would be locked in place. This feature may be useful for some activities, but the tabs should always be unlocked for a/d implements. This "lock" topic was just an afterthought, but it's something you may want to check on your neighbor's tractor before struggling.

Beenthere's comment makes good sense to me, but there may well be enough play in the slots so adjusting the side links to ease a/d implements happens rarely. With no implement attached, lower the 3PH all the way. With the tractor on a flat surface, use a ruler to adjust one or both side links so the lift arm balls are at the same height. Now, the 3PH is adjusted level with the tractor. With any luck, you may not have to readjust the side links for a long time.

OkieG
 

Attachments

  • 442804-MVC-038F.JPG
    442804-MVC-038F.JPG
    60.6 KB · Views: 148
   / Detaching a brush hog from cat1 3point hitch #15  
I'm glad someone else asked the question. I didn't even know I had a problem - I just bang on whatever's stuck until it comes loose. The lifespan of my 3PH will surely increase when I introduce some finesse and WD-40 to my technique. But I may need another outlet for stress relief.
 
   / Detaching a brush hog from cat1 3point hitch #16  
Another possibility, especially with new machines, is that there may be turnbuckles used and attached to lower arms to prevent sway.

If so, they will have some sort of handle that allows you to turn them.

I had this on my new Mahindra and found myself having to adjust them to remove the tiller. First to one side, remove one arm, then the other.

They work quite nicely to prevent sway, but require an extra step for removal and attachment. As I mentioned in a different post, I have very little clearance between these and the inside of the tires. Without, it would be disasterous.

I bought a quickhitch, but haven't attached it yet. I'm a roadwarrior and in a hotel, aching to get back to the green, green grasses of home in a few days to try out the quickhitch.

From everything I've read and seen, a quickhitch is definitely the way to go. Never used one, always kept a hammer in a chain loop on the upper bar attachment on the old MF /forums/images/graemlins/grin.gif I chose one from TSC that has release handles on top that can be accessed from the seat. Hope it works out.

Good luck.

-JC
 
   / Detaching a brush hog from cat1 3point hitch #17  
Thank you OkieG for the lesson in Tractor Physics 101! Your post made it clear to me what I had been doing wrong when rasslin' with the 3pt. Thank God for WD-40 and TBN!!!
 
   / Detaching a brush hog from cat1 3point hitch #18  
I just got a new JD4310 with a MX5 mower (3 pt hitch). I had a devil of a time getting the lift arms on (and as bad a time getting them off at the end of the day). Then, I noticed that when the lift arms were painted, the lift arm balls were caught in the overspray and they were painted black also. The black paint on the balls was "gumming up" in the socket, and wouldn't allow them to rotate. Since they couldn't rotate, they wouldn't easily slide on or off.

I coated the lift arm balls with WD-40 and "worked" them all directions. Gradually, the paint wore off, and they now rotate easily. What a difference when attaching the mower.

This info might save a TBNer a little consternation.
 
   / Detaching a brush hog from cat1 3point hitch #19  
Get a set of these and never worry about those little balls again. It makes hooking and unhooking a breeze /forums/images/graemlins/grin.gif
 
   / Detaching a brush hog from cat1 3point hitch #20  
</font><font color="blue" class="small">( Get a set of these and never worry about those little balls again. It makes hooking and unhooking a breeze /forums/images/graemlins/grin.gif )</font>

Yep, works very well indeed. Your post reminded me to order some more of their bent washers for the pin ends. /forums/images/graemlins/grin.gif


Tractor & Equipment Auctions

sod roller (A52377)
sod roller (A52377)
2025 K2215 UNUSED Portable Restroom and Shower (A53117)
2025 K2215 UNUSED...
1999 MORBARK 3800 WOOD HOG GRINDER (A53426)
1999 MORBARK 3800...
2019 Ford F-150 XL (A50123)
2019 Ford F-150 XL...
Craftsman 917.257632 42in Riding Mower (A51694)
Craftsman...
2019 Polaris Ranger 900XP 4x4 Utility Cart (A51691)
2019 Polaris...
 
Top