zmansmac
Gold Member
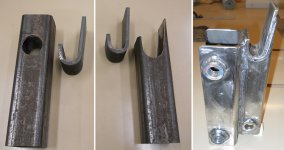
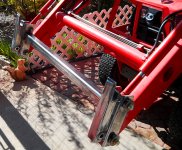
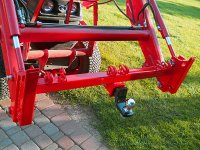
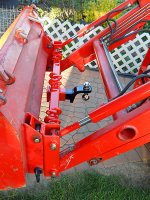
One of the great things I like about browsing the TractorByNet forums is seeing all the great ideas that members have. My latest build, like many others, took it's inspiration from another member's project. In this case I have to thank 600rider. The difference was that 600rider apparently has access to heavy metal working equipment to build his version of a loader quick attach. My equipment is more limited: drill press, small horizontal band saw, compact bender and hand held grinders. I used 2 inch square tube for the quick attach part and 3 inch tube, with the seam side cut off, for the part that attaches to the loader. The first picture shows the progression of this fabrication. I then used 2 inch square tube, 3/16 wall, to connect the two ends together. The first attachment to my loader is shown in the 2nd picture. I knew this would make the overall weight a little more, but it allowed me to easily mount a hitch receiver and hooks to the assembly (picture 3). An added benefit is that I can "stow" the hitch backwards on the quick attach when the bucket or another implement is attached (picture 4). The assembly, without pins, weighs 35 pounds.
JohnZ
B7500
JohnZ
B7500
Attachments
Last edited:
")
