Drag grader project

   / Drag grader project #1  

orezok

Elite Member
Joined
Jan 30, 2004
Messages
3,225
Location
Mojave Desert, CA
Tractor
Kubota B7800
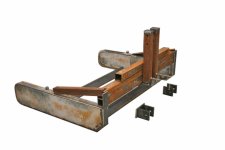
I underway with my drag grader project. The side rails are made from some old seats from a school food service lunch table. They're 10 ga and I welded them together to form a hollow cavity. I added a 1/4"x3" wear rail on the bottom. They are designed to hold water for additional ballast, 100# by actual measure. The cross rail and uprights are 3x3x3/16" square tube. The "cutters" are 4x4x3/8" angle which I will triangulate with a 1/4x6" plate. Total weight will be about 440# dry, 550# wet. The reason for the ballast is that the dirt out here in the desert on the roads is so hard that it's impossible to drive a steel stake into it. Some places I have to use a single ripper on the box blade to cut it.

The assembly is just dry fitted to review my continued options. I still have to add some additional cross braces but that will happen later.

I plan to make the cutters adjustable from 0" to 1"below the rails.

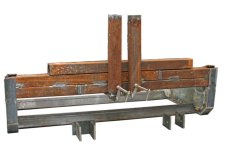
Give me your thoughts on whether I should place the cutters perpendicular to the rails or on a 5 to 10 degree angle. Our local dirt roads do not have a crown as most are lower than the shoulders. During rains (which we only see a couple of times a year), they actually become drainage swales. Fortunately, even during heavy rains, you can drive on them due to the nature of the soil.

I've never actually seen one of these and am working from pictures.

I'm open to any suggestions.
 

Attachments

  • Grader-1.jpg
    Grader-1.jpg
    55.8 KB · Views: 584
  • Grader-2.jpg
    Grader-2.jpg
    73.6 KB · Views: 710
  • Grader-3.jpg
    Grader-3.jpg
    83.9 KB · Views: 500
   / Drag grader project #2  
My thoughts would be to have the teeth on a a angle,this way they will dig and lift the dirt instead of pushing it.
 
   / Drag grader project #3  
I recently built one 8' wide with straight blades. Works great, a very beneficial tool to have.

From my experience you need about 100 lbs/ft of width, mine is about 120 lbs/ft at 950 lbs. The 4x4x3/8 angle should work well to mount the grader blades to, just be sure to do a mockup assembly to address clearance of the blade bolts.

I have my blades set about 1/8" below the wear skids now but started out with 1/2" this cut too much all the time so I reduced it.


Steve
 
   / Drag grader project #4  
Looking at the pics, why not make use of the stack of tubing structurally as a frame instead of just stacking it up?
 
   / Drag grader project #5  
When I made mine I put the blades at a similar angle. But it wasn't enough to move much dirt across.
I like to grade after a rain. The road is so much easier to work with when it is damp. It grades nice and then packs back down nice. If you can get out and grade after one of those couples of rains don't grade when there are puddles. The potholes turn into soup bowls and the muck splashes right back out.
 
   / Drag grader project #6  
As in all design, triangles are your friends. As this thing rides over high spots, it's whole weight will be setting on the rear, and pushing downward on the lower pivot points where it attaches to the lower 3PH arms. This concentrates the forces at the top post where it attaches to the toplink and try and bend this top post to the rear. When you lift it for transit, just the opposite happens with all the weight on the 3PH arms, the rear of the grader will want to bend downward/bend the tower forward. I think some form of strut from the top of the towers down to the rear of the grader is in order. Below is a pic of how I did mine.

I need to fill the sidewalls on mine, as it is a little light, but still very effective. If you don't always want a crown, I would put the blades straight as once they are at an angle, you are stuck with shifting the material to the side. On an as desired basis, If you want material moved to one side or the other, you can put a large link chain across diagonally from one end of the front blade, the the other end of the rear. This will shift the material to the side as it passes thru the grader. You can also put a loop of chain from the ends of the front blade. A loop of chain will direct the loose material to the center of the box as it passes thru the grader. I intend on adding some weld on hooks just above the blade ends on mine to make rigging this easier.

I put the front cutter about 3/4" below the side rails, and the rear blade is flush with the side rails. This has worked real well for me. I made my cutters the same way out of angle and flat strap, with a weld bead front edge. This worked great with the edge holding up good, and the blade triangles able to roll basketball sized rocks out of the ground without deforming. The toplink allows VERY precise control of how much gets cut. I can go from full cut to no cut in about 3 turns of the toplink...

graderside.jpg
 
   / Drag grader project #8  
Is there an advantage or disadvantage of distances between the cutters?

On some planes there is only 6 inches between the cutters on Ronmar's there seems to be 2 feet of distance.

Plus if the plane were longer would this help to level land? Say if the plane itself were 10 feet long?
 
   / Drag grader project #9  
Distances are not real critical but spread further apart gives them the ability to carry more dirt with them.

I built my skids 5' long and the blades are 8' wide. You can run in fields in both directions to plane them flat.

A friend I work with is planning on a new 7000 series tractor and were thinking about building one 14' wide by 7' depth and about 1800 lbs.


Steve
 
   / Drag grader project #10  
Distances are not real critical but spread further apart gives them the ability to carry more dirt with them.

I built my skids 5' long and the blades are 8' wide. You can run in fields in both directions to plane them flat.

A friend I work with is planning on a new 7000 series tractor and were thinking about building one 14' wide by 7' depth and about 1800 lbs.


Steve

The larger distance between blades also gives the material time and room to spread out to flow more evenly over the second blade. More material in betwen the blades also fills potholes/depressions cleaner. Mine does double duty. There is a swing down gate over the rear blade. With this down, the grader fills and moves material like a box blade, so I made mine this long also for that purpose.
 

Tractor & Equipment Auctions

80in HD Tooth Bucket with Side Cutters ONE PER LOT (A52128)
80in HD Tooth...
2019 CATERPILLAR 326FL EXCAVATOR (A51242)
2019 CATERPILLAR...
2016 FORD F-350 XL SUPER DUTY CREW CAB FLATBED (A51243)
2016 FORD F-350 XL...
J and L Cargo Express Shadowmaster Enclosed Trailer (A52128)
J and L Cargo...
CFG MH12RX Mini Excavator (A49461)
CFG MH12RX Mini...
International 133 6 Row Cultivator (A50514)
International 133...
 
Top