dwilliams35
Member
- Joined
- Jul 4, 2009
- Messages
- 39
For starters, no remarks about the welding: I can do better, I assure you. I spared no shortcuts here, never cleaned the weld areas, nothing: just threw it together.
With that disclaimer out of the way, here goes:
I've been slowly building up a pecan orchard here, and have been watering the young trees with a 275 gallon tote of water on a trailer with drip emitters: not too bad, but I've been wanting to get the "real" drip irrigation in on them. The cost of a trencher wasn't prohibitive, but it always just got me hot how much it was going to cost to put all this in, most of it in trencher rental, to say nothing of time.. I started thinking about how to do this after seeing a similar rig put in phone cable, then after I built it I finally found a few almost identical rigs on the internet somewhere..
I finally tried it out yesterday, just laid out some tubing and had a friend feed it into the "chute": I wanted proof of concept, so to speak, before I went through the trouble of fabricating a reel that can handle the big rolls of this tubing and make it a one-man operation.. I had just run it through the ground a week before, and the longer grass was "balling up" ahead of the plow: I just ran the riding mower one pass down the line in question and solved that. I guess there's several methods to get around that, but I'm not going to worry about it at the moment..
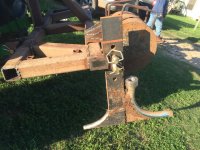
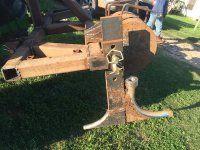
The first time through, it was crawling out of the ground pretty readily, and I could get it to get back in the ground just by standing on it: thus the weights. I happened to have a few 14" OD x 3" drops laying behind the shop just begging to be weights, so that should be about 390 lbs. there.
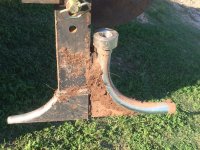
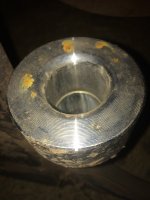
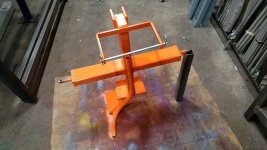
The "tube" is just an electrical 1-1/4" 90°, I made the fitting on top on the lathe, just to get the smooth radius where the tubing enters. The "plow" is 1-1/4" plate cut to shape and ground, the leg is 1" x 4" flat bar. There's a piece of 1/2" plate between the leg and the tube behind all that dirt. I'm probably going to slap a 12" or so nipple on the end of the 90 to raise the "entrance" end up a little higher above the ground than it is..
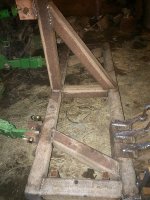
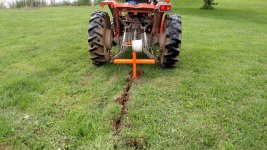
Needed something to hang it all on, of course: it does try to pull the tractor sideways being on one corner like that, but I just wanted to get as close to the trees which had already been planted as I could. I may put another mount in the center before this is all over with for when I'm just running it across the pasture before a line of trees is planted.
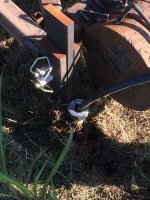
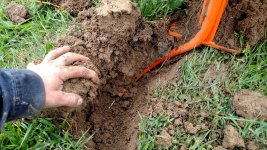
Finally running: It puts the tubing about 6" underground currently: I need to drill some more adjustment holes to run it deeper if needed. The frost line here is about six inches above the ground, so that's not really an issue.
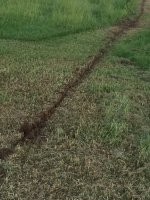
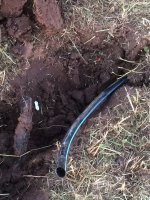
Just drive the tractor tire back over it to squash the dirt back down, and you're done...
http://youtu.be/4Mk4gmOOC4A
Now on to figuring out the hose reel..
With that disclaimer out of the way, here goes:
I've been slowly building up a pecan orchard here, and have been watering the young trees with a 275 gallon tote of water on a trailer with drip emitters: not too bad, but I've been wanting to get the "real" drip irrigation in on them. The cost of a trencher wasn't prohibitive, but it always just got me hot how much it was going to cost to put all this in, most of it in trencher rental, to say nothing of time.. I started thinking about how to do this after seeing a similar rig put in phone cable, then after I built it I finally found a few almost identical rigs on the internet somewhere..
I finally tried it out yesterday, just laid out some tubing and had a friend feed it into the "chute": I wanted proof of concept, so to speak, before I went through the trouble of fabricating a reel that can handle the big rolls of this tubing and make it a one-man operation.. I had just run it through the ground a week before, and the longer grass was "balling up" ahead of the plow: I just ran the riding mower one pass down the line in question and solved that. I guess there's several methods to get around that, but I'm not going to worry about it at the moment..

The first time through, it was crawling out of the ground pretty readily, and I could get it to get back in the ground just by standing on it: thus the weights. I happened to have a few 14" OD x 3" drops laying behind the shop just begging to be weights, so that should be about 390 lbs. there.


The "tube" is just an electrical 1-1/4" 90°, I made the fitting on top on the lathe, just to get the smooth radius where the tubing enters. The "plow" is 1-1/4" plate cut to shape and ground, the leg is 1" x 4" flat bar. There's a piece of 1/2" plate between the leg and the tube behind all that dirt. I'm probably going to slap a 12" or so nipple on the end of the 90 to raise the "entrance" end up a little higher above the ground than it is..

Needed something to hang it all on, of course: it does try to pull the tractor sideways being on one corner like that, but I just wanted to get as close to the trees which had already been planted as I could. I may put another mount in the center before this is all over with for when I'm just running it across the pasture before a line of trees is planted.

Finally running: It puts the tubing about 6" underground currently: I need to drill some more adjustment holes to run it deeper if needed. The frost line here is about six inches above the ground, so that's not really an issue.


Just drive the tractor tire back over it to squash the dirt back down, and you're done...
http://youtu.be/4Mk4gmOOC4A
Now on to figuring out the hose reel..
Attachments
Last edited:
