FEL Mount Cracks

   / FEL Mount Cracks #11  
Dont panic,,, take it easy. It probably didnt get that far in a day or 2. But it aint gonna fix itself.
 

Attachments

  • 7018 vert 2p.JPG
    7018 vert 2p.JPG
    123.9 KB · Views: 161
   / FEL Mount Cracks #12  
On this kind of joint the rod doesnt have much to do with penetration, not really. Yes, the 10 and 11 dig a little but mauinly they freeze fast to allow for control in a joint properly designed to allow for penetration.
The arc is more aggressive, it does cut thru crud a little easier but 7018 is so much better on dirty steel as the flux is so haevy it carries away so much more contamination and the pool so much less violent and slower freezing it lets the crud float out. Second pic was meant to show how agressive it can be, right on the verge of melting thru the 1/4 in a T and able to restack it.
6011 ob vert.JPG
6010 hob up.JPG
 
   / FEL Mount Cracks #13  
Agree....6010/11 are great digging rods to get full depth.

These cracks are the whole reason factories throw weldments into the oven to stress relieve after welding.
I've had do a bit of loader repair myself. The factory loader on the farms PUMA 125
was not built as sturdy as it should have been. It has been repaired numerous times
and it's main job has been digging feed out of ag bags, it has also been used for back blading
some roads ways and mud.
The subframe hasn't given any issues but the main loader joint at the rear attachment point has pulled
out and been repaired and beefed, the pin ends have been pulled off the bucket cylinders and the
bucket cylinder mounts have pulled out of the frame, got some pictures of that repair; all 6011 on an AC welder
 

Attachments

  • loader 2A.jpg
    loader 2A.jpg
    997.7 KB · Views: 183
  • loader 3A.jpg
    loader 3A.jpg
    1.1 MB · Views: 173
  • loader 5A.jpg
    loader 5A.jpg
    1.2 MB · Views: 154
  • loader 6A.jpg
    loader 6A.jpg
    1.1 MB · Views: 159
  • loader 7A.jpg
    loader 7A.jpg
    1.1 MB · Views: 147
  • loader 10A.jpg
    loader 10A.jpg
    1.2 MB · Views: 145
  • loader 14A.jpg
    loader 14A.jpg
    769.5 KB · Views: 151
  • loader 19A.jpg
    loader 19A.jpg
    910.6 KB · Views: 149
  • loader 21A.jpg
    loader 21A.jpg
    989.6 KB · Views: 149
  • loader 23A.jpg
    loader 23A.jpg
    1 MB · Views: 174
Last edited:
   / FEL Mount Cracks #14  
I'm in the camp that says that no matter your skill level, you should give it a go. Get a few hard disks for your grinder, V out the cracks, hit the root pass with 6010 and everything else too. Grind that root pass a bit until smooth, and rinse and repeat until flush with the surface.

If your welding stinks, then grind the poor weld out and try it again, hopefully improving. Stringer welds are stronger so don't do any weaving even if as a top finish, the weave looks better.

 
Last edited:
   / FEL Mount Cracks
  • Thread Starter
#15  
Thanks to all for the ideas, encouragement, photos and links! I a trying to weld it myself and am learning a lot in the process. In honor of Halloween... my results are pretty scary but I'll keep grinding away at it.

Thanks again.
 
   / FEL Mount Cracks #16  
REMEMBER IF WELDING ON A PIECE THAT IS ATTACHED TO THE TRACTOR ( OR ANY MACHINE) KEEP YOUR GROUND LEAD CLOSE TO THE WORK LEAD. DON'T--DON'T-- WELD WITH THE LEADS ON OPPOSITE SIDES OF A BERING OR PARTS THAT MOVE. KEEP THEM CLOSE.
 
   / FEL Mount Cracks #17  
Thanks for the ideas! Here's a photo showing the mount and cracks. The mount is now off the tractor.

The crack in the 1/2" plate is pretty easily accessible on both sides for grinding and welding.

The crack in the 5/8" plate is hidden in the photo on the opposite side of the mount and is in a location that the grinder can't get to. I'm currently using hand files and Dremel to try and clean the paint from this area. Cutting a groove in this area will be difficult.

Thanks again.
My guess is the "2" crack in 1/2" plate occurred because the materials were not stress relieved after the first welding at the factory. A "professional" welder will know how to stress relieve the parts and prevent future problems. Improperly relieved parts can pop a crack just setting on a bench after welding. (cold bench, hot parts, uneven cooling) It is amazing.
 
   / FEL Mount Cracks #18  
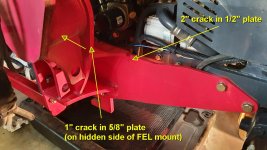
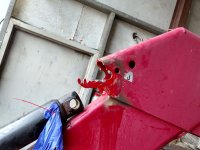
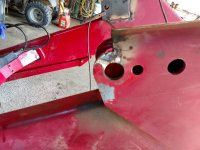
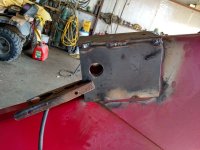
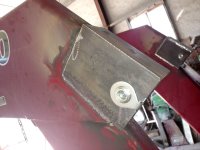
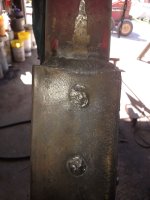
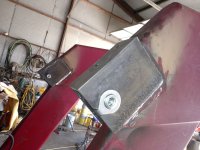
I've got two cracks developing in one of my FEL mounts.

One crack is in the edge of a piece of 1/2" steel plate (it is an 8" wide 1/2" thick plate with a 2" crack perpindicular to the edge which moves inward to the center of the plate. The hairline crack is all the way through both sides of the plate).

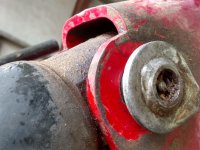
The other crack is in the edge of a piece of 5/8" steel plate and is about 1" long on both sides of the plate.

I've got two options. One is I have my local welder weld it but he can't get to it for a couple of weeks. The other is I try to weld it myself to be ready for the coming snow in a couple days. But my welding skills are no where near as good as his.

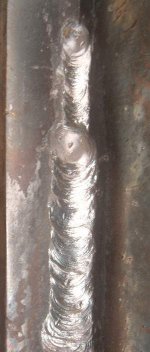
If I do it... I'm thinking I would need to grind a V groove over the crack on both sides of the plate and stick weld it with 7018? High amps for penetration of metal this thick?

Thanks for any thoughts!
As a now retired professional welder all my life I would v it out and use 6010 for the root pass and then 7018 for the hot pass (2nd) and also the cap. Remember that you can not down hand 7018. Grind or power wire brush the 1st (root pass) and then chip the slag and power wire brush the 2nd pass clean before doing the cap. So do the root and one hot pass then flip it over and grind the back side of the root pass. (100% penetration) From there if you want you can use 7018 totally on the back side. Do not let the Flux get ahead of you with 7018 or it will be trapped in the weld
. If you are new to welding and can set the part so you are welding on a slightly up hill slope that will help you keep ahead of the Flux. If the part is small enough to bury it in floor dry or cat litter and let it cool slowly that is also good.
 
   / FEL Mount Cracks #19  
REMEMBER IF WELDING ON A PIECE THAT IS ATTACHED TO THE TRACTOR ( OR ANY MACHINE) KEEP YOUR GROUND LEAD CLOSE TO THE WORK LEAD. DON'T--DON'T-- WELD WITH THE LEADS ON OPPOSITE SIDES OF A BERING OR PARTS THAT MOVE. KEEP THEM CLOSE.
Good adive and always disconnect the battery to stop from frying and circuit boards
 
   / FEL Mount Cracks
  • Thread Starter
#20  
Thanks for all the thoughts on this. I completed the crack repairs and then added some reinforcement on the bigger crack areas. I'll see how it holds up over time.

Thanks again.
 
 
Top