Gazebo Number One

   / Gazebo Number One
  • Thread Starter
#21  
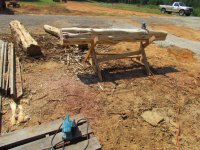
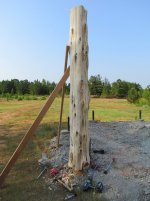
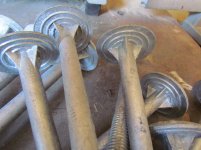
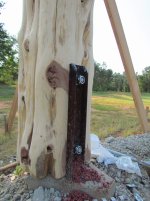
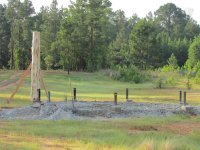
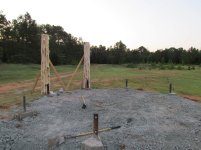
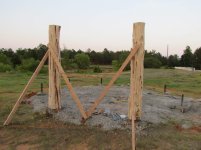
OK, now comes the real mystery. The Gazebos are octagonal, but the post footings are pentagonal.

When I come to visit, I will look at this for a long time and then my head will explode.

What is the reason? And I know you have one...

The footings are shaped to form an octogon on the outside edge. I brought the form back so it would be behind the C Channel, then ended it to create the five sides. If you draw a line from the outside tip of each footing, you get the Octogon shape of the gazebo.

Eddie
 
   / Gazebo Number One
  • Thread Starter
#22  
I built a stand to hold the logs, and started peeling bark. My Dad tried using the pressure washer, which did an OK job at getting the looser bark off, but it wasn't very good overall. A chisel works the best, but its slow going and kind of obsessive. Once you start, it's hard to stop!!!

Oscar likes to check out anything new, so he's always underfoot for a little bit, then he loses interest and goes off to play with the cat, or roll in the mud.

After the bark is removed, I cut it to 8 ft long and cut one side on the bottom so it's square. I need it to line up with the C channel, so it has to be flat for about 18 to 20 inches.

Eddie
 

Attachments

  • 25.jpg
    25.jpg
    1.1 MB · Views: 494
  • 26.jpg
    26.jpg
    1.1 MB · Views: 480
  • 27.jpg
    27.jpg
    1 MB · Views: 488
   / Gazebo Number One
  • Thread Starter
#23  
Before I could install the post, I needed to drill the holes into the C Channel for the 3/4 inch bolts. I used my special drill, which made it fast and easy.

The bolts are designed for logs and have a special head on them that is easily twice as big compared to a carraige bolt. These are 3/4 in by 12 in long.

I used the Mule to carry the log to the gazebo site. Then I just tilted it up!!! I had the braces already screwd to the stakes, so it was real easy to attach them once the post was where I wanted it.

With the post locked into position, I drilled the 3/4 in holes through the logs from the hole in the C Channel. To get the head to be flush, I had to chisel around the hole to create a flat area for the head of the bolts.

I bought nuts with nylon inserts in them, which went on fairly easily with a 1 1/4 inch socket. I then put my breaker bar on it and really put some pressure on it to get it as tight as I could.

One log done, seven more to go!!!

Eddie
 

Attachments

  • 31.jpg
    31.jpg
    1,021.4 KB · Views: 447
  • 30.jpg
    30.jpg
    1.1 MB · Views: 379
  • 29.jpg
    29.jpg
    748.9 KB · Views: 421
  • 28.jpg
    28.jpg
    1.1 MB · Views: 457
  • 32.jpg
    32.jpg
    858.5 KB · Views: 478
  • 33.jpg
    33.jpg
    1 MB · Views: 421
   / Gazebo Number One #25  
good start. How are you planning to do the floor? are you having it a few inches away from bottom of stones for snakes to hide in or a foot up in air to let air flow around to prevent rot and small animals to sleep in?

My neighbor where I grew up at first enclosed the bottom of floor with a shirt and within 2 years the floor started to rot. He replaced the floor and then added ports to let air in and out to prevent moisture buildup.
 
   / Gazebo Number One
  • Thread Starter
#26  
The floor was going to be brick pavers, but after looking at a bunch of them, I've changed my mind to flagstones. The base rock will be leveled out and compacted so it's three inches below te bottom height of the posts. Then when everything else is done, includeing paint and stain, I will spread sand and lay the flagstones.

There will be a road in front of the gazeob, so the floor height has to be an inch above the grade of the road when that's done.

Of the eight openings, four of them, along the pasture side will be getting a metal railing that I will weld up as a sheer wall panel and fit into the logs. That's the next big step in the process, and what I hope will give me my structural strength.

Then on the pasture side, I will add quite a few yards of dirt from just below the height of the flagstones, and sloping away from the gazebo, into the pasture. If I use enough dirt, it should look natural and not erode on me.

Eddie
 
   / Gazebo Number One
  • Thread Starter
#27  
He has a friend now.

The process of cleaning off the bark, then sanding and shaping the logs is taking quite a bit longer then I expected. Each Cedar is unique, and I want each one to be perfect, so I'm going over them with the best sander, then the orbital sander. They are coming out very nice, bit its very time consuming.

Eddie
 

Attachments

  • 2697.jpg
    2697.jpg
    967.1 KB · Views: 269
  • 2699.jpg
    2699.jpg
    867.7 KB · Views: 377
   / Gazebo Number One #28  
He has a friend now.

The process of cleaning off the bark, then sanding and shaping the logs is taking quite a bit longer then I expected. Each Cedar is unique, and I want each one to be perfect, so I'm going over them with the best sander, then the orbital sander. They are coming out very nice, bit its very time consuming.

Eddie

Eddie,
I inherited two draw knives from my Dad. They work well peeling posts and logs.
hugs, Brandi
 

Attachments

  • Draw Knife.jpg
    Draw Knife.jpg
    1.6 KB · Views: 213
   / Gazebo Number One #29  
I have to admit Eddie those ceder logs sure are beautiful after you get done with them.
Can't wait to see the finished product.

Wedge
 
   / Gazebo Number One #30  
He has a friend now.

The process of cleaning off the bark, then sanding and shaping the logs is taking quite a bit longer then I expected. Each Cedar is unique, and I want each one to be perfect, so I'm going over them with the best sander, then the orbital sander. They are coming out very nice, bit its very time consuming.

Eddie

Looking good. I like the rustic look of those logs. Being a perfectionist has it advantages and disadvantages. It takes a longer being a perfectionist but if I did it, it would take half the time but the logs wouldn't be dressed near as well and the finished product wouldn't look near as good. Can't wait to see the finished product.
 

Tractor & Equipment Auctions

CATERPILLAR 631E SERIES II MOTOR SCRAPER (A52706)
CATERPILLAR 631E...
2001 CHEVEROLET C6500 3 CAR ROLL BACK (A54607)
2001 CHEVEROLET...
2013 Cadillac ATS Sedan (A53424)
2013 Cadillac ATS...
2015 ISUZU NPR 16FT BOX TRUCK (A54313)
2015 ISUZU NPR...
V.E. ENTERPRISES 500 BBL FRAC TANK (A53843)
V.E. ENTERPRISES...
SKID STEER GRAPPLE (A53843)
SKID STEER GRAPPLE...
 
Top