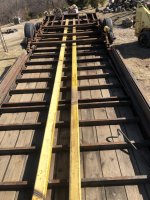
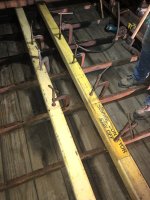
With the tubes spliced together we could now put them into the trailer. I know that manufactures were running the tubes to the center of the axles, but I thought I’d extend mine all the way back to the tail. We inserted both tubes at the same time and they went in without any problems. Only needed to lift up the center axle slightly to get them to fit.
You are using an out of date browser. It may not display this or other websites correctly.
You should upgrade or use an alternative browser.
You should upgrade or use an alternative browser.
Gooseneck trailer repair project
- Thread starter Cord
- Start date
- Views: 24720
/ Gooseneck trailer repair project
#21
")
blacktruck
Gold Member
Quite an ambitious project by any standard. It looks like you are really earning every victory you are getting in the process. Keep us posted please.
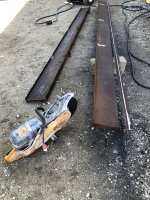
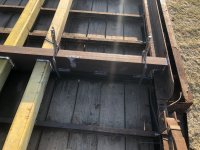
Got a few more updates for you guys. With the torque tubes welded in we could now add the torque arms. The goal is to transfer any twisting force from the trailer into the tubes. For the torque arms I used a 10” I beam salvaged from a mobile home. The beams are exceptionally light which is perfect for the application. I started by slicing each beam lengthwise to make it into a T. The T then got notched so it would fit over the tubes. The ends are also notched so the T will fit over the frame angle while providing clearance for the wiring. For as complex as these pieces were, I’m very happy with how they turned out.
Attachments

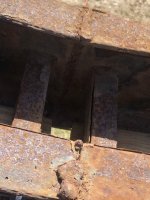
I mentioned in an earlier post about not being satisfied with the Load Trail build quality. What I’ve noticed is that there are several manufacturers vying to be the cheapest trailer out there. I guess they build what sells. Just wanted to let you know what you are buying.
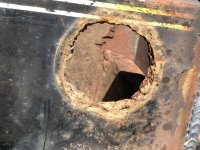
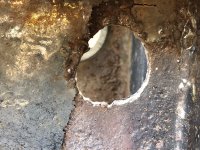
Where the wiring passes through a structural member they torched in a hole and didn’t use a gromit.
The light holes are torched in as well. We popped a few of the lights out and broke one because the fit was so tight.
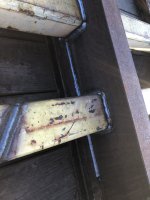
There appears to be two different weld qualities. The welds on the neck are very neat and professionally done. The welds under the deck were done as quickly as possible. Often there is porosity and the weld has a ropey look it.
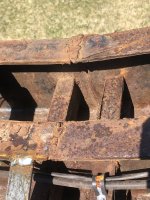
if you are wondering about the rust... this trailer is 6 years old.
Where the wiring passes through a structural member they torched in a hole and didn’t use a gromit.
The light holes are torched in as well. We popped a few of the lights out and broke one because the fit was so tight.
There appears to be two different weld qualities. The welds on the neck are very neat and professionally done. The welds under the deck were done as quickly as possible. Often there is porosity and the weld has a ropey look it.
if you are wondering about the rust... this trailer is 6 years old.
Attachments
crazyal
Super Member
I think you could have done everything the frame shop did too. I had to straighten a twisted trailer for a friend. What we did was used a couple 16' landscape timbers (8x8 I think). On each end we slid a timber sideways under the trailer with one end flush with the corner that needed to come down and sticking out the other. On the flush end we had a chain wrapped around the frame and timber. On the side the timber stuck out we put blocking on one of them and a 20 ton hydraulic jack. Between the jack and the frame was a piece of steel that stuck out both sides of the jack in line with the timber. As we jack it up the timbers flexed some but the trailer twisted back. When we reached the limit of the jack we blocked it up so we could let the jack down and put blocking under it and jack some more. The frame twisted back much easier than I expected.
blacktruck
Gold Member
I don't think I saw where you mentioned the year the trailer was thrown together or not. Looking at the last pics you posted, the rust and condition makes me think there was little or no preparation for paint or general finish when the trailer was new. I cannot imagine running wires through torched holes in the frame and I sure would never put a product out with welds like those. You're doing well trying to bring it back to life. Shame the OEM didn't do better along with the original owner.
The work you've done is impressive! The torched holes by the manufacturer is shocking to me. At least with modern lighting, it is easier to check details like that on newer trailers by popping out the grommets and lights for inspection. Between the torched holes and the sloppy welds that are hidden, you've definitely exposed their production plan... higher quality only in areas easily seen, and slop work where hidden.
bindian
Super Member
Dang, I weld better than that and I don't weld on stuff that gets on the roadway.I mentioned in an earlier post about not being satisfied with the Load Trail build quality. What I’ve noticed is that there are several manufacturers vying to be the cheapest trailer out there. I guess they build what sells. Just wanted to let you know what you are buying.
Where the wiring passes through a structural member they torched in a hole and didn’t use a gromit.
The light holes are torched in as well. We popped a few of the lights out and broke one because the fit was so tight.
There appears to be two different weld qualities. The welds on the neck are very neat and professionally done. The welds under the deck were done as quickly as possible. Often there is porosity and the weld has a ropey look it.
if you are wondering about the rust... this trailer is 6 years old.
With your skills, you coulda built a new trailer from scratch. Awesome job.
hugs, Brandi
