sandman2234
Super Member
- Joined
- Dec 4, 2005
- Messages
- 6,762
- Location
- Jacksonville, Florida
- Tractor
- JD2555 and a few Allis Chalmers and now one Kubota
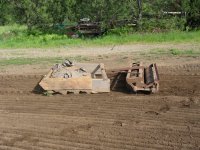
The one thing that I noticed about yours is the blades are straight across, which means you are only doing flat leveling. For some, this grader would be for their driveways, and mounting the blades at an angle from side to side would allow you to crown the road. The amount of tilt on your top link and the angle of the blades controls just how much crown.
I have seen where some people mounted them straight across like yours, but raised them 1/2 to 1" on one side, which means they will never be able to do flat leveling. I like the side to side angle because you can do both with it.
Although these types of graders appear very simple in design, there really is a lot of engineering built into them if you want them to work very good, to great, or not at all.
I would also like to see your notes when you get them scanned, as this is a project I started accumulating stuff for, and then didn't need the grader. I think I should put the stuff to good use, so I may go ahead and build the grader one day.
David from jax
") ... put me down for a copy of the plans.... it'll make a good welding project. I already have the grader blades, just need some other metal and I know where I can get it.
... put me down for a copy of the plans.... it'll make a good welding project. I already have the grader blades, just need some other metal and I know where I can get it.