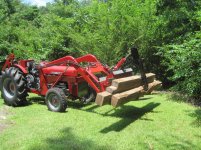
Few weeks ago I asked opinions from the board for a simple grapple positioning and profiling I had in mind to build. Well I finally completed it and it turned out just what I was hoping. This may not be for everybody but for me suits my purpose well.
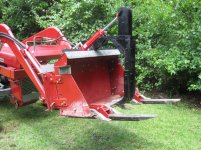
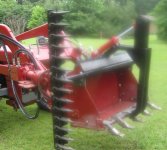
The claws consist of 3/4" x 2-1/2" and 1-1/4" stock welded and bolted with grade 8 and pipe spacers to provide 6" spacing . The assembly weighs about 95 lb. and it can be removed with two 1" pins. Since it needs to be lifted only an inch or two above ground, It can easily be mounted and dismounted even for a 74 year old fart like me. When removed, the 2 x 10 cylinder remains in place mounted on the bucket and it doesn't interfere with anything that I am aware of, so far.
The bottom of the claws consists of two bolted scarifiers (chisels removed) that can be moved up or down . So far I am okay where they are but I am still experimenting and if there is a need, the flexibility is there.
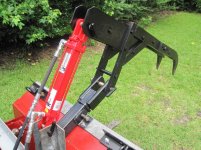
As shown in the pic, I used a 2" clevis adapter mounted sideways to hook up the assembly with a 1" pin. (You just can't beat these 2" receiver systems so versatile. I use them a lot).
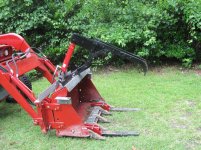
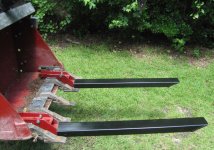
The short 19" forks slide in the bucket and secured at a fixed location with one bolt to the back of the bucket. The exact profile makes it firmly engage into the bottom of the bucket. For the most, I use the short forks but if I need longer ones, I slide the 36" 2x4" sleeve adapter, tight fit with spacers... again, one bolt.
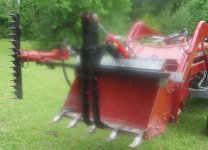
The sickle bar I built few months ago mounts in front of the bucket with two 5/8 bolts grade 8 bolts. This is a light duty bar taken from a walk-behind Gravely mower capable of cutting small twigs and vines in my wood trails.
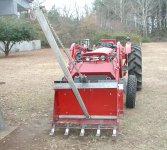
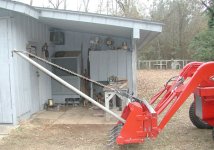
The bucket boom is fabricated with 2" pipe I had laying around. It has a 3/4" rod thru the bucket side walls for keeping it in place. Even though the pipe has a 2" dia. the right placement of the 3/4" holes on the side walls prevents any looseness. Not shown, a chain that connects to the bottom of the bucket to prevent up or down movements.
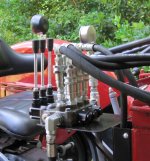
I had to replace the existing 2-spool valve with a 3-spool. Before I bought one, I inquired the hydraulic side of TBN. Since I have a 7 GPM PTO pump, the suggestion of using 8 GPM valve came from J.J., and it was a good move at that. I have now much smoother hydraulic control than I ever did with the old two-spooler (probably a 20-30 GPM). I would have guessed the bigger the capacity the better flow/operation you have. You may have better flow but not better operation. Learn something new every day.
The whole project including hoses, fittings, cylinder, valve and some metal was around $400.
The claws consist of 3/4" x 2-1/2" and 1-1/4" stock welded and bolted with grade 8 and pipe spacers to provide 6" spacing . The assembly weighs about 95 lb. and it can be removed with two 1" pins. Since it needs to be lifted only an inch or two above ground, It can easily be mounted and dismounted even for a 74 year old fart like me. When removed, the 2 x 10 cylinder remains in place mounted on the bucket and it doesn't interfere with anything that I am aware of, so far.
The bottom of the claws consists of two bolted scarifiers (chisels removed) that can be moved up or down . So far I am okay where they are but I am still experimenting and if there is a need, the flexibility is there.
As shown in the pic, I used a 2" clevis adapter mounted sideways to hook up the assembly with a 1" pin. (You just can't beat these 2" receiver systems so versatile. I use them a lot).
The short 19" forks slide in the bucket and secured at a fixed location with one bolt to the back of the bucket. The exact profile makes it firmly engage into the bottom of the bucket. For the most, I use the short forks but if I need longer ones, I slide the 36" 2x4" sleeve adapter, tight fit with spacers... again, one bolt.
The sickle bar I built few months ago mounts in front of the bucket with two 5/8 bolts grade 8 bolts. This is a light duty bar taken from a walk-behind Gravely mower capable of cutting small twigs and vines in my wood trails.
The bucket boom is fabricated with 2" pipe I had laying around. It has a 3/4" rod thru the bucket side walls for keeping it in place. Even though the pipe has a 2" dia. the right placement of the 3/4" holes on the side walls prevents any looseness. Not shown, a chain that connects to the bottom of the bucket to prevent up or down movements.
I had to replace the existing 2-spool valve with a 3-spool. Before I bought one, I inquired the hydraulic side of TBN. Since I have a 7 GPM PTO pump, the suggestion of using 8 GPM valve came from J.J., and it was a good move at that. I have now much smoother hydraulic control than I ever did with the old two-spooler (probably a 20-30 GPM). I would have guessed the bigger the capacity the better flow/operation you have. You may have better flow but not better operation. Learn something new every day.
The whole project including hoses, fittings, cylinder, valve and some metal was around $400.
Attachments
-
 1.jpg610.2 KB · Views: 444
 -
 2a.jpg669 KB · Views: 353
 -
 3.jpg706.8 KB · Views: 290
 -
 4.jpg513.5 KB · Views: 335
 -
 4a.jpg770.9 KB · Views: 353
 -
 5.jpg82.7 KB · Views: 211
 -
 5a.jpg89.9 KB · Views: 199
 -
 6b.jpg73.9 KB · Views: 393
 -
 6c.jpg99.2 KB · Views: 316
 -
 7.jpg111.2 KB · Views: 312
 -
 7a.jpg77.2 KB · Views: 336
 -
 8.jpg79.1 KB · Views: 310


