Loader help. grapple install. true 3rd function pics attached

   / help. grapple install. true 3rd function pics attached #1  

hitman104

New member
Joined
May 24, 2011
Messages
3
Tractor
Cub Cadet Ex450L
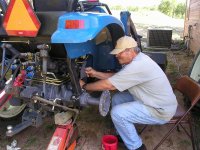
Hello all, im trying to make this as easy as possible. I have a tc40da. I a just wrapping up a grapple build. I am trying to do the true 3rd function as economically as possible. I attached pics for reference.

Can anyone answer these questions. Which port on the manifold in my pics is the pressure out line I need to run to a 3rd function solenoid.

Which port do I need to tee into or use etc for the return line from the solenoid.

What part numbers from surplus center is the best for the true 3rd function with the 3 way rocker switch setup?

Does anyone have a good source or part number on a 3 way spring loaded rocker switch?

Thanks in advance for your help!
 

Attachments

  • 2012-01-23_18-15-39_436-1.jpg
    2012-01-23_18-15-39_436-1.jpg
    17.8 KB · Views: 1,863
  • ForumRunner_20120123_183655.png
    ForumRunner_20120123_183655.png
    294 KB · Views: 1,614
   / help. grapple install. true 3rd function pics attached #2  
Some things you should consider if you plan to plumb it as you state. You see the three lines attached to the valve block. One is pressure, one is return and the third is power beyond. Since the loader valve is the first hydraulic component to receive oil in order for the three point hitch to operate you need pressurized oil supplied by the power beyond port. oil goes into the loader valve and if no hydraulic function is activated it goes out the power beyond port of the loader valve so pressurized oil can be supplied to the three point hitch. The return line in the loader valve is for exhausting oil from the loader valve when the loader is operated. This oil goes directly to sump and is not pressurized.

If you only use two lines into your third function valve, you will use the pressure port and the power beyond port. Doing this, however, causes the third function valve to be pressureized on the exhaust side of the valve whenever you use your loader or three point hitch. Most manufacturers do not recommend pressurizing the exhaust side of the valve. The other problem you will run into is if you use some other function while using the third function valve strange things will happen since you are forcing pressurized oil into the exhaust side of the third function valve and into the open spool. On loaders plumbed this way the loader can actually raise when you want to lower if you are also using the three point hitch.

The best setup would be to add a remote valve to the tractor and run hoses up to the loader. Or at the least install an elctro hydrualic switch valve into the boom or bucket circuit thus eliminating any potential problems. This type of valve has two solenoid operated hydraulic circuits and are controlled by a remotely located switch and your loader valve. Flip the switch one way and oil is supplied to that circuit, flip it the opposite way and oil is supplied to the second circuit. You should be able to find or order one at your local dealer or farm supply store. On farm equipment they use them so if the tractor only has a single spool valve installed you plug this valve into the couplers and it gives you the ability to run two separate circuits.
 
   / help. grapple install. true 3rd function pics attached #3  
Hitman, if you want to add a 3rd function to your joystick, you do not need to be at the diverter valve in your photos. You'll use the curl circuit at the quick connects where the loader attaches. Route the lines from the loader curl circuit (both lines) to a solenoid actuated diverter (3rd-function) valve you'll mount on the loader post. Add a button to the joystick that powers a high current relay to operate the diverter. Don't try to power the diverter directly with a switch. With this setup, when you press the button on your joystick, it switches the curl circuit to power your grapple. When you release the switch the 3rd function valve will go back to normal and pass power to the curl circuit on the loader.

So, the flow is from the quick-connects to the diverter. From the diverter, you attach the curl circuit for normal operation when the valve is de-energized, and the grapple circuit for 3rd function operation. When the valve is energized (with your joystick switch), you power your grapple. When the valve is de-energized you power the loader curl as normal. You will not have any partial operation of both curl and the grapple. It will be one or the other.

I have not made this modification to my tractor since I use a rear remote for my grapple. If you want to add a remote, you can power your grapple with a lever on the right fender, but since you say "3rd function" it makes me believe you want to use a diverter and then control the grapple with your joystick.

By doing your conversion as I described, you will easily remove the diverter and piping anytime you remove your FEL from the tractor. Hooking up the grapple to the tractor block you showed in your photos would mean a huge hassle if you ever take off the loader. You DO NOT want to hook directly to the tractor's hard plumbed lines.

There are several people who have done this 3rd function conversion by either buying parts or buying a kit. The conversion on a New Holland is not that much different than any other tractor if you install the 3rd function valve as I've described. You can buy a WR Long kit or spend a little less money and more planning time by piecing together the parts yourself. If you are not a hydraulics expert, I'd recommed the WR Long kit.
 
   / help. grapple install. true 3rd function pics attached #5  
I have not made this modification to my tractor since I use a rear remote for my grapple. If you want to add a remote, you can power your grapple with a lever on the right fender, but since you say "3rd function" it makes me believe you want to use a diverter and then control the grapple with your joystick.

Jinman, not to highjack this thread for a "3rd function" install, but can you elaborate on your "rear remotes" setup? Maybe the poster would consider this as a lower budget alternative to a true "3rd function" install. Is it truly less money? Did you install them yourself? How do they connect? What parts are involved/needed? Is it a kit or factory part?

Edit: Darn, I just found this thread http://www.tractorbynet.com/forums/hydraulics/232020-how-i-added-rear-remote.html This may answer it.
 
   / help. grapple install. true 3rd function pics attached #6  
Jinman, not to highjack this thread for a "3rd function" install, but can you elaborate on your "rear remotes" setup?

Yes, I have three factory remotes installed on my tractor. In the photos below, the first photo is a single remote valve. The 2nd photo is me installing the 2nd and 3rd factory remote valve. I have three levers on my right fender to operate the three remotes.

Back in 2001 when I bought my tractor, the first remote kit was $250, and the 2nd and 3rd were $215 each. New Holland suddenly found those to be popular options and upped the price to the point that now they are $700 or more for each one.

On your tractor, you order the remote and then have to order the "completion kit" separately. The remote kits are all similar valves and only the completion kits are different. There are two valves for your TC55DA tractor. One of them return-to-center valve with a detent position, and the other one has a float position much like your joystick float. I believe that's the two types of valves, but I'm not 100% certain. All of my remotes return to center when released with no detent or float. When running a log splitter, I have use a bungee to hold the lever full on.

The link you posted is to Piston's nicely self-built remotes. His operating valves are bolted to his fender and are not the factory remotes from Kubota. You could opt for that kind of conversion too. It will save you a bundle of money, but you'll have to order the valves and all plumbing components yourself instead of having them all supplied in a kit.
 

Attachments

  • RmtVlvPhoto3.JPG
    RmtVlvPhoto3.JPG
    58.1 KB · Views: 821
  • RemovePlate.JPG
    RemovePlate.JPG
    110.4 KB · Views: 2,992

Tractor & Equipment Auctions

2024 P.J. Trailer, VIN # 4P53F4924R1407534 (A44391)
2024 P.J. Trailer...
Ryobi Compound Miter Saw (A44391)
Ryobi Compound...
2016 GMC Terrain SLE2 SUV (A44572)
2016 GMC Terrain...
2008 INTERNATIONAL L9227 (A45333)
2008 INTERNATIONAL...
2022 Chevrolet Tahoe FL SUV (A44572)
2022 Chevrolet...
Ryobi One 18V Cordless Miter Saw (A44391)
Ryobi One 18V...
 
Top