Home-Made Circle-Jig for my Plasma Cutter

   / Home-Made Circle-Jig for my Plasma Cutter #21  
tomrscott, good job! I was wondering, do you drag the tip of the plasma cutter across the metal to be cut or is there a gap between the two? And if there is a gap, approximately how big of a gap. Thank you.
 
   / Home-Made Circle-Jig for my Plasma Cutter #22  
Great idea! I got a broken L-Tec plasma unit ($200) and am trying to fix it now.

One improvement suggestion for the jig: It would be nice if there was a hole centered in the magnet so a locating pin could be used to center the jig over a center punch mark. I know it is difficult to drill a magnet.

Something to keep in mind.

JRP
 
   / Home-Made Circle-Jig for my Plasma Cutter #23  
Very good design. May use your ilea in the future.
 
   / Home-Made Circle-Jig for my Plasma Cutter
  • Thread Starter
#24  
Well, I thought about the bar-bell style mounting, but frankly it is easier for me to drill four 1/2" holes on the drill press than one 1" hole.

I am just planning to use four 10" long 1/2" diameter carriage bolts right through the square holes JD provided in the wheel flange. I will be able to add or remove weights by removing four nuts. I think if I park the tractor on a side slope so that the weights tilt into the wheel I can add or remove them one at a time. I can put a shim between the rim of the weights, and the inside of the wheel to support the weights when the bolts are released. I can easily handle each 22 pound weight, but I want the rest of the nearly 500 pound stack to stay put while I add or remove the last few plates.

I think this will work pretty easily. Actually, I may never want to take the weights off. I desparately need the traction for grading my hill. /forums/images/graemlins/smirk.gif
 
   / Home-Made Circle-Jig for my Plasma Cutter
  • Thread Starter
#25  
I had some more gouging to do today to remove some rectangular reinforcing plates from the bottom of the large plate. So I decided leather cuff to protect the torch handle and trigger.

I made this in just a few minutes from some deer hide. I cut a 1" hole to put the torch head through, and then laced it up with a lace cut from the same hide.

Really works great! If you have a plasma torch, I highly recomend a leather cuff like this to protect the handle. When I got this plasma cutter, the handle was very badly scorched and cracked and the trigger was so badly burned and scorched that it barely operated. I replaced them with new parts, and then promptly started to do the same kind of damage when I began using it to gouge out welds.

In the next post I'll put a closeup where you can see the kind of scorching the leather took, protecting the torch.
 

Attachments

  • 589905-TorchCuff1.JPG
    589905-TorchCuff1.JPG
    66.2 KB · Views: 982
   / Home-Made Circle-Jig for my Plasma Cutter
  • Thread Starter
#26  
The deer hide actually shrinks where it gets scorched. It will probably need to be replaced after a while, but that's a lot better than destroying the torch handle.
 

Attachments

  • 589910-TorchCuff2.JPG
    589910-TorchCuff2.JPG
    69.4 KB · Views: 1,290
   / Home-Made Circle-Jig for my Plasma Cutter
  • Thread Starter
#27  
SRS,

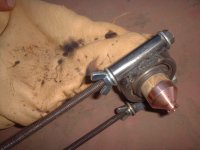
As I understand it, different plasma cutters work differently. Some work best with a small gap. The Hypertherm has a "drag tip" that has some castelations on the tip (notches like a castle wall) that I believe allow for some air flow to help stabilize the arc jet. It actually cuts best with very light drag pressure against the cutting surface. I have found that if the surface is smooth, it is easier to drag smoothly. If you find yourself jerking the tip, you will not get as smooth a cut. If I find the surface roughness is causing me to skip, I just lift it very slightly above the roughness and it seems to still cut just fine. Of course, if you get very much extra gap, it doesn't cut through as deeply.

Also greatly affecting the quality of cut is the electrode and nozzle condition. They gradually erode from normal use and eventually they cause the plasma jet to become unfocused and even spray out in a diagonal smear. At that point (or sooner if you want the best quality cut) the consumables need to be replaced.

They say that very clean dry air is VERY important to quality plasma cutting. I added a large 5 micron air filter and water separator in addition to the air filter and water separator in the Hypertherm. Initially, I had a desica gel drying cartridge, but it got used up and I need another. They change color from blue to pink when they absorb enough water. I guess the fact that it did change, tells me that I ought to get another one.

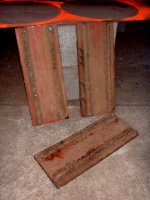
I've attached here a picture of three steel plates that I removed from the bottom of this plate today. They are about six inches by seventeen inches, half inch steel with some cuttoff ends on the surface. I was really kind of worried that these would be real tough, wasn't entirely sure what I was going to do because they were attached with good fat weld beads all the way around on all four sides. But today I decided I would try gouging out the welds and see if I could remove one. I used the same technique that I had used on the angle iron, except that getting the chisel started was a bit harder because of the continuous welds. But once I got it started, they came off pretty easily. Once I got a quarter inch gap, I saved some time by putting in a large pry bar and whacking it with a sledge. At that point it went pretty quickly. Once you've gouged out the bulk of the welds, they don't have much strength.

/forums/images/graemlins/smirk.gif
 

Attachments

  • 589980-BottomPlates1.jpg
    589980-BottomPlates1.jpg
    57.8 KB · Views: 814
   / Home-Made Circle-Jig for my Plasma Cutter
  • Thread Starter
#28  
Here's a closeup of some edges after gouging out welds with the plasma cutter. /forums/images/graemlins/smirk.gif
 

Attachments

  • 589983-BottomPlates2.jpg
    589983-BottomPlates2.jpg
    57.4 KB · Views: 744
   / Home-Made Circle-Jig for my Plasma Cutter
  • Thread Starter
#29  
JRP,

For my purpose I really don't need a center punch. I am positioning each disk to be tangent to adjacent edges. Given the variations of edges and kerf widths, it is just easier to get the maximum packing density of disks in the area I've got to work with this way.

I agree that if you had a center you needed to cut a circle around, then a a center hole would be useful, but that's not really what I'm doing.

Part way into cutting the disks, when I had ten cut out, I took them and laid them out in the pattern I was planning to cut for the next ten to make sure I was not running out of room. Then I sprayed some orange marking paint around the disks as a rough guide.
 

Attachments

  • 589987-layout.jpg
    589987-layout.jpg
    57.9 KB · Views: 749
   / Home-Made Circle-Jig for my Plasma Cutter
  • Thread Starter
#30  
I've got 30 tractor weight disks, 16" in diameter, 3/8 inch thick cut out now. twelve more to go from the plate I've got. Feels like the home stretch. The plasma cutter is working great, I'm getting better at cutting faster while keeping the movement steady so it doesn't flash back. It is pretty amazing how fast this thing will cut. I can do a disk in a few minutes.

Here's a picture I took this evening of the stack along with some of my scrap. The disks look like they're glowing hot, but It's just that Iv'e been using the cut disks as a layout guide stencil and painting orange marking paing around them.

Cheers! /forums/images/graemlins/smirk.gif
 

Attachments

  • 594066-stack of hot plates.jpg
    594066-stack of hot plates.jpg
    55.4 KB · Views: 823

Tractor & Equipment Auctions

2018 KENWORTH T680 TANDEM AXLE SLEEPER (A51222)
2018 KENWORTH T680...
2013 MAGNUM TRAILER GENERATOR TRAILER (A50854)
2013 MAGNUM...
2021 CATERPILLAR 259D3 SKID STEER (A51242)
2021 CATERPILLAR...
2006 GMC C7500 DUMP TRUCK (A51406)
2006 GMC C7500...
2020 John Deere 870GP Articulated Motor Grader (A49461)
2020 John Deere...
2016 Big Tex 24ft. T/A Flatbed Trailer (A50322)
2016 Big Tex 24ft...
 
Top