looknlearn
Gold Member
I have finally gotten around to resizing and orginaizing some of the pictures of our hoophouse raising. I hope these are a good size for those with slower internet connections. If not let me know.
We selected the place for the hoophouse to maximize sun on the hoophouse and the keep it away from trees which might drop a branch and damage the plastic.
So with the location selected and it measured out with stakes and string we put up the first hoop to see how it was gonna work.

Once we had it figured out Dad started framing out the end in that first hoop.

Then we drove sections of 1 3/4 inch (about 4.5 cm) in the ground for the legs of the hoops made of 1 3/8 inch (about 3.5 cm) to slip into.


While the layout was figured out and the small pipes were being cut and driven into the ground some of the guys were bending the hoops out of two sections of pipe which fit together at the ends. Unfortunately there were no pictures taken of the pipe bending jig but I tried to describe it here.http://www.tractorbynet.com/forums/rural-living/188810-frost-has-killed-my-garden-3.html#post2157094
Once all the short larger pipes were driven into the ground it was simple and easy to grab a hoop and insert each end into the pipes and then repeat with the next one.

Once enough of the hoops were installed some guys started working on the bracing down the ridge.


Once the all the hoops were completed the other end wall was built with a single door and framing for a vent in the future.

I think that was it for the first day.

The following day we did much of the bracing and plywooded the end wall.


We attached 2x4's along the first bend on the walls (see left wall in above picture) to attach the plastic to and for a solid attachment when we made the sides roll-up-able at a later date.
This was our completed hoophouse before the plastic was put up.

Here is what the completed hoophouse looked like when we put the compost in, right after planting, as it grew, and finally the jungle later in the summer.


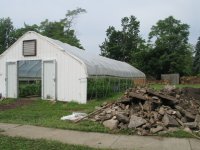
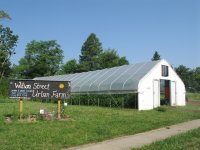
Here is the exterior in the summer and the rock pile. We installed roll up sides earlier last summer. These pictures were from last summer.
We selected the place for the hoophouse to maximize sun on the hoophouse and the keep it away from trees which might drop a branch and damage the plastic.
So with the location selected and it measured out with stakes and string we put up the first hoop to see how it was gonna work.
Once we had it figured out Dad started framing out the end in that first hoop.
Then we drove sections of 1 3/4 inch (about 4.5 cm) in the ground for the legs of the hoops made of 1 3/8 inch (about 3.5 cm) to slip into.
While the layout was figured out and the small pipes were being cut and driven into the ground some of the guys were bending the hoops out of two sections of pipe which fit together at the ends. Unfortunately there were no pictures taken of the pipe bending jig but I tried to describe it here.http://www.tractorbynet.com/forums/rural-living/188810-frost-has-killed-my-garden-3.html#post2157094
Once all the short larger pipes were driven into the ground it was simple and easy to grab a hoop and insert each end into the pipes and then repeat with the next one.
Once enough of the hoops were installed some guys started working on the bracing down the ridge.
Once the all the hoops were completed the other end wall was built with a single door and framing for a vent in the future.
I think that was it for the first day.
The following day we did much of the bracing and plywooded the end wall.
We attached 2x4's along the first bend on the walls (see left wall in above picture) to attach the plastic to and for a solid attachment when we made the sides roll-up-able at a later date.
This was our completed hoophouse before the plastic was put up.
Here is what the completed hoophouse looked like when we put the compost in, right after planting, as it grew, and finally the jungle later in the summer.
Here is the exterior in the summer and the rock pile. We installed roll up sides earlier last summer. These pictures were from last summer.