Clipse3GT
Silver Member
I know there is threads all over this forum on how to adjust to spec or over spec the PRV valve so I decided to make one for the MF GC 1700 series... we can't be worse than Kubota BX and John Deere 1 series owners. :thumbsup:
***I AM NOT RESPONSIBLE FOR DAMAGE DONE BY ADJUSTING THE PRV ON YOUR GC 1700 SERIES INCLUDING DAMAGE TO YOURSELF, EQUIPEMENT, PROPERTY, DOG, WIFE, KIDS, AND BEER!!!***
OEM SPECS
Maxiumum Output - GC1705/10 - 6.3 US Gal/min
Maxiumum Output - GC1715/20 - 6.9 US Gal/min
Pressure - Relief Valve Setting - 1920 psi
WHY?
The GC tractors have two hydraulic pumps that run everything on the tractor that is hydraulic. The majority of the hydraulic pressure is used by the HST, FEL, BH, and 3 Point. Now when we use all of those the pump provides us with flow of hydraulic fluid to move the ram/cylinder against resistance of something. The pump will provide flow to cylinder, when there is a opposing force on the other side the flow will have no where to go, thus provide you a pressure number. Once the pressure reaches 1920 psi (OEM MF SPEC for GC 1700's) the PRV valve will open and relieve the pressure from the component to prevent damage to the equipment. The side effect will be also you will not be able to provide any more flow thus pressure to the cylinder and it will stop or decrease lift/push/downward pressure. Basically, a safety system to prevent damage to operator and equipment. Over time, the spring in the PRV will start to start to degrade and will require less pressure to relieve, which means the PRV will open at a lower PSI than 1920 psi. The other reason the PRV was never set to spec by the OEM thus you will have decreased performance of your equipment.
TOOLS
Hydraulic Pressure Test Gauge that reads to 0-3000/5000 psi glycerin filled is easier to read (I got mine here from Ken's Bolt On Hooks need the one with 1/4" Quick connect for the GC 1700)
Ken's Bolt on Grab Hooks <<Hydraulics>>
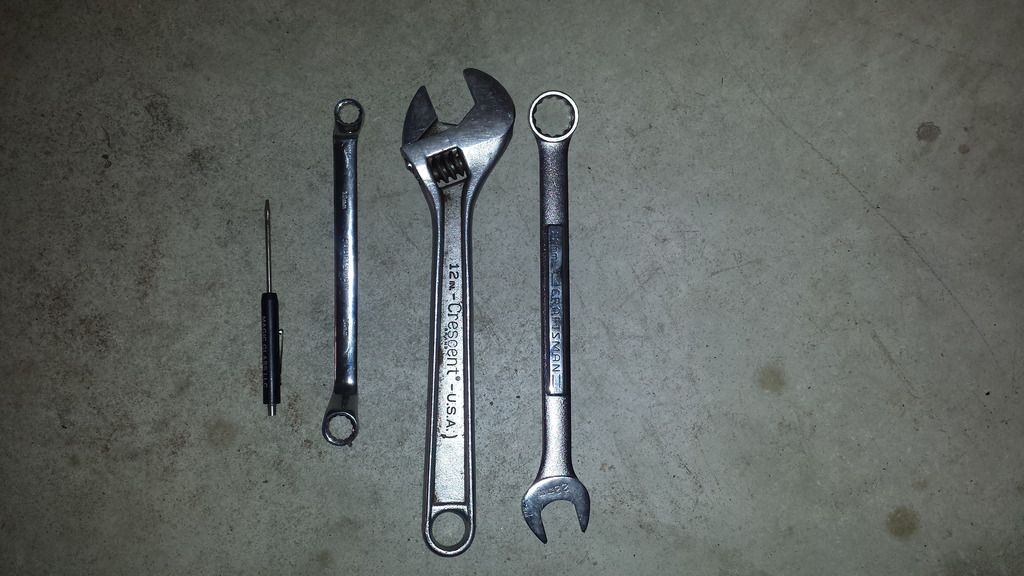
Pocket Screw Drive
Crescent Wrench 12-14"
22mm Wrench
14mm Wrench
Worklight
Beer
LOCATION
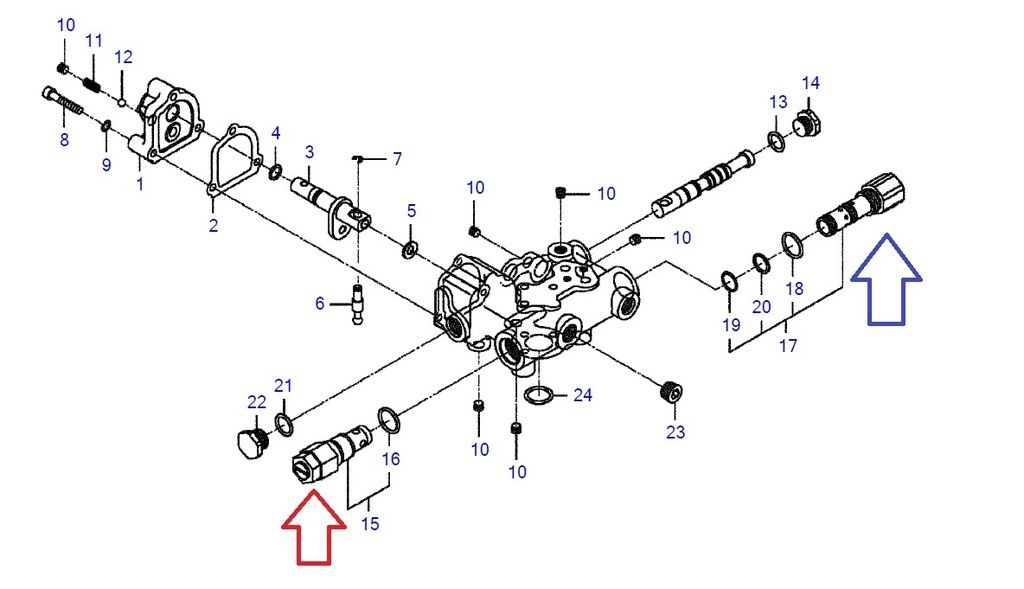
The PRV is located behind the mower height adjustment knob on the Left side of the tractor beneath the seat. The adjustment knob with bracket are in the way preventing easily adjusting the PRV. Need to do a little bit of work to get to it however you need a few basic tools only.

The PRV is the RED arrow in this parts diagram.
HOW?
1.) First let's check the OEM pressure relief valve setting on my GC 1720. Always good to have a baseline before you start adjusting stuff. Run your GC 1700 to operating temperature for about 10 minutes of so. You can cycle the FEL a few times with the joystick so the hydraulic fluid is not cold. Make sure your parking brake is set and tractor is in neutral. Also note the original position of the set screw for your reference.
2.) Turn OFF the tractor and relieve the pressure in the system by operating the FEL joystick to all 4 positions a few times.
3.) Plug the Hydraulic Pressure Gauge into any of the 4 ports for the FEL. I used port A or FEL raise function.
A - FEL Raise
B - FEL Lower/Float
C - Bucket roll back
D - Bucket dump/quickly
4.) Restart the tractor and you will "deadhead" the pump flow into the hydraulic pressure test gauge which turn will give you a PSI read out make sure the tractor is running at around 2000-2600 engine rpm at idle. Do not deadhead the gauge for more than 20-30 seconds at a time. Since it that fluid will have to go through the PRV at very high pressure and creates a lot of heat. The engine will sound like it got some load on it.
Tractor running at 2600 rpm. No flow going to the hydraulic test gauge. Since the loader joystick is not being operated to the raise position. The gauge will read 0 psi.
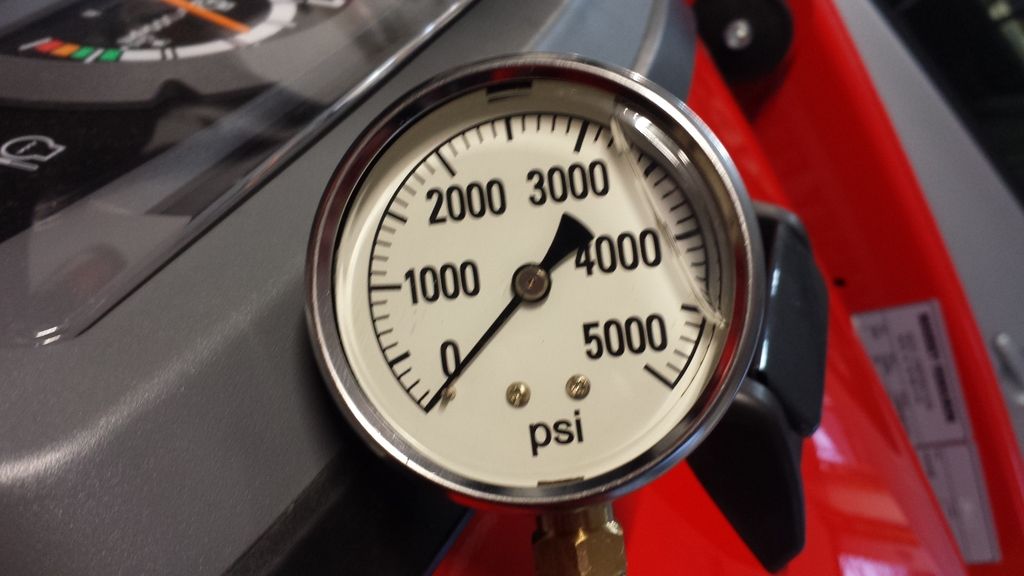
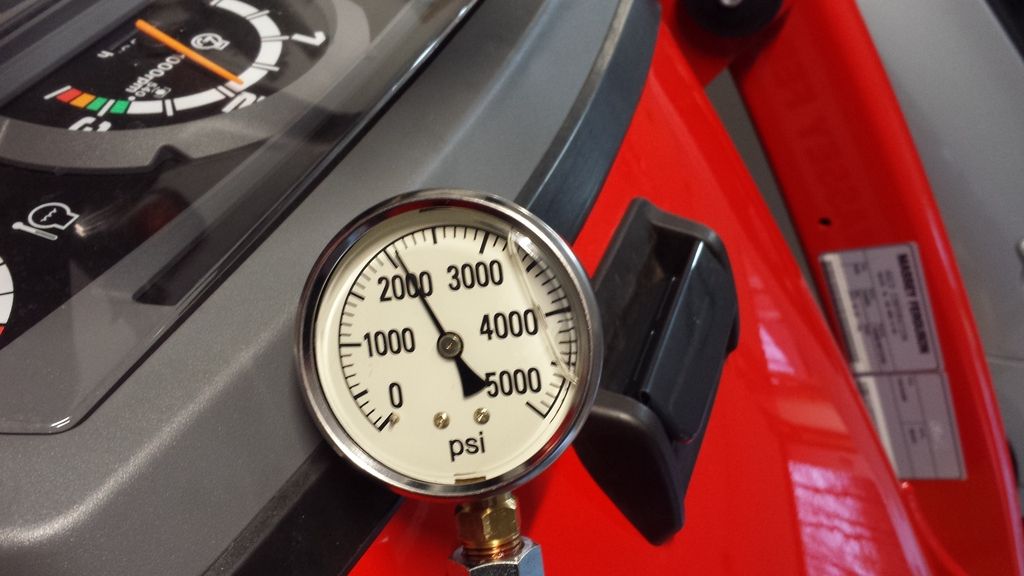
5.) For my initial reading I got around 1820-30 psi :thumbdown: , which is a little bit lower than factory spec. So it will need to be adjusted back to factory spec. When adjusting the PRV. You will have about 10% of room for adjustment to go above the PRV factory PRV setting. Most people state there is no issue going above 10% of factory spec or ~2100 psi. Some people even go 15% or ~2200 psi and a absolute max is 20% or ~2300 psi. The OEM hoses are rated for 3000 psi pressure. I decided to adjust it 10% above OEM setting.
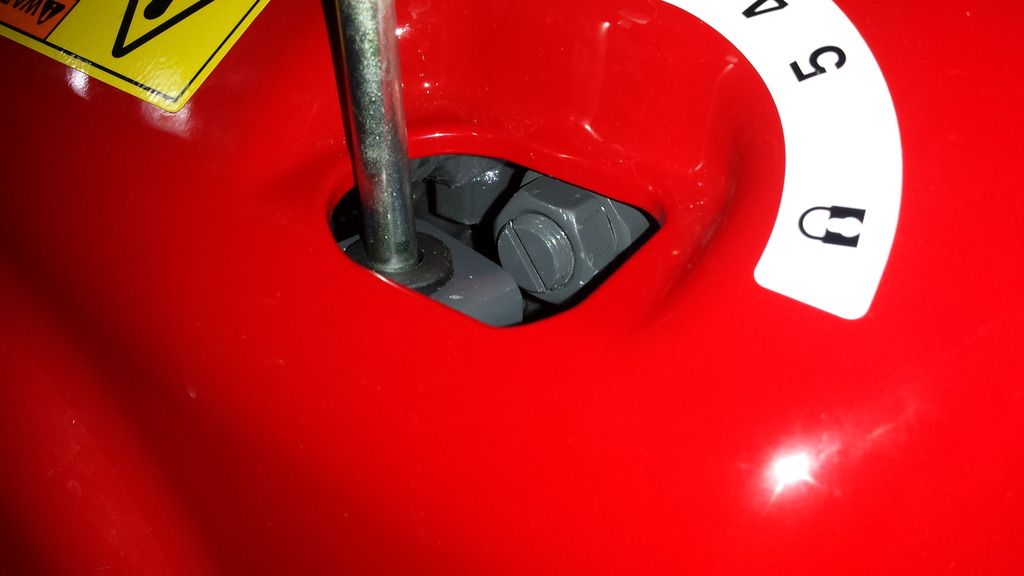
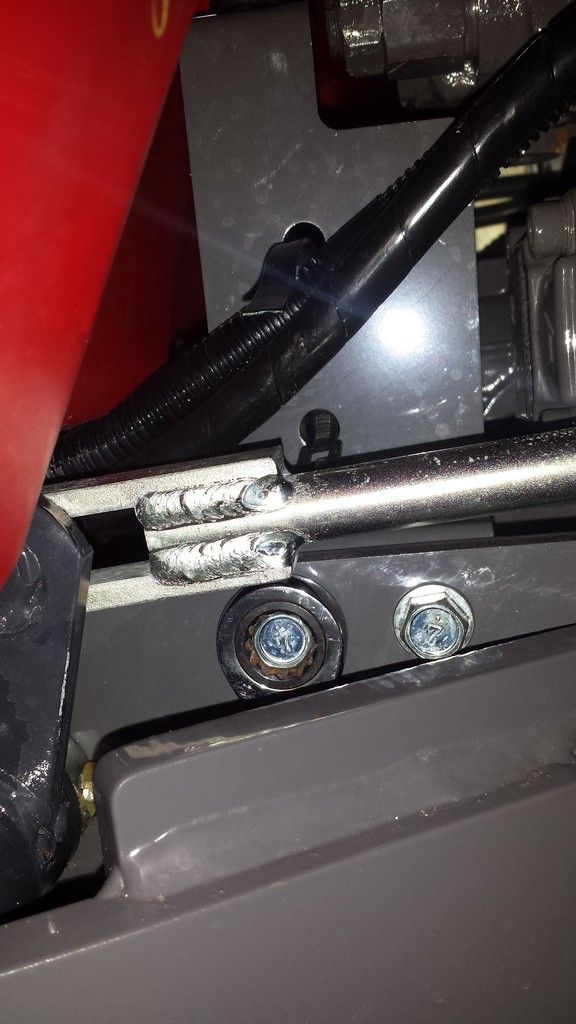
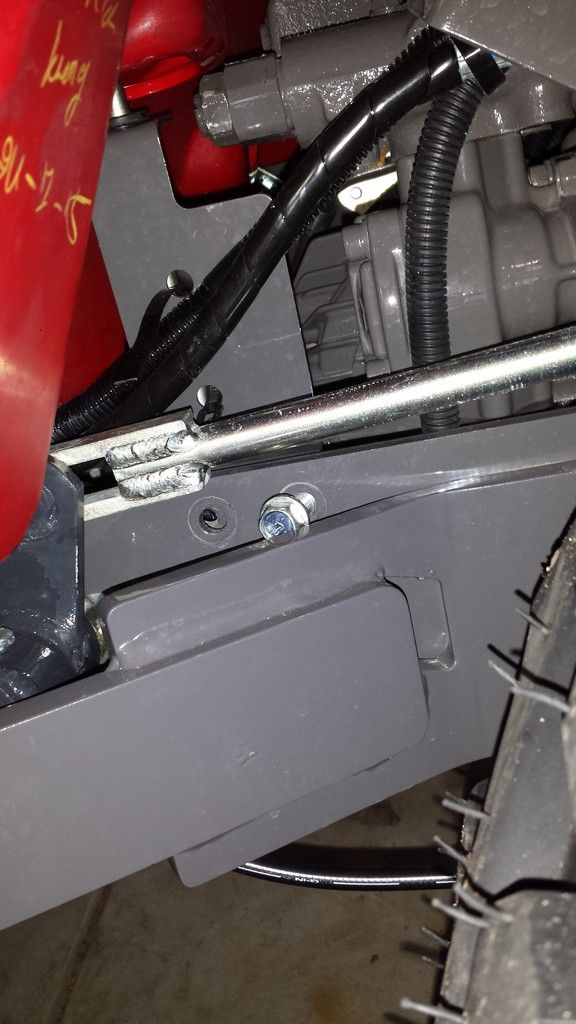
6.) After you have located the PRV and gathered your tools it's time to get to work. You will first need to remove these two 14mm bolts. They are located in front of the Left rear tire. Remove the left one first. Then you can go and loosen the right one it is easier not to remove it all the way.
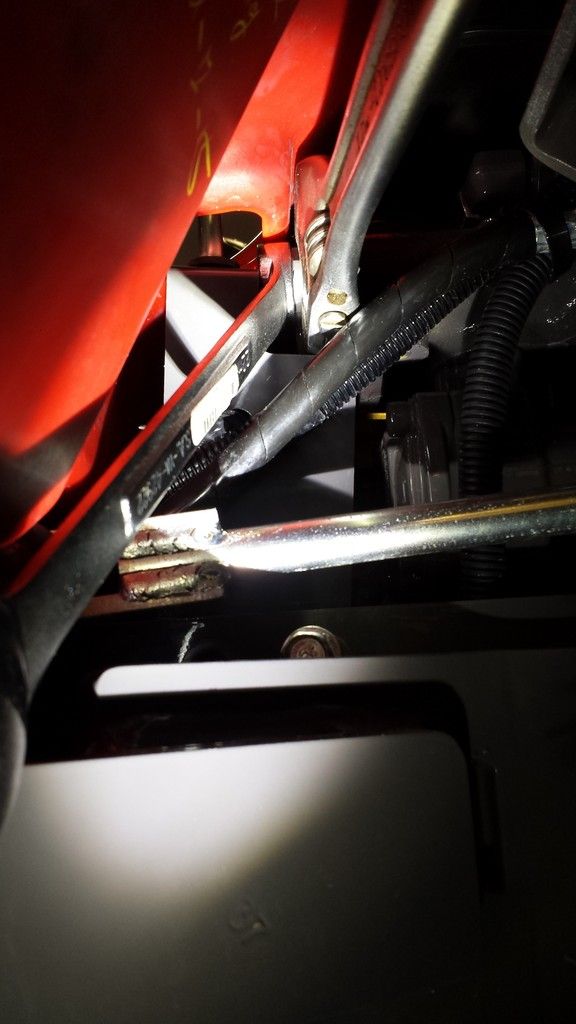
7.) Loosen the adjustable plastic strap and move the wires out of the way. The bracket with the mower height adjustment should easily move around a bit, which will give you enough room to adjust loosen the lock nut on the PRV.
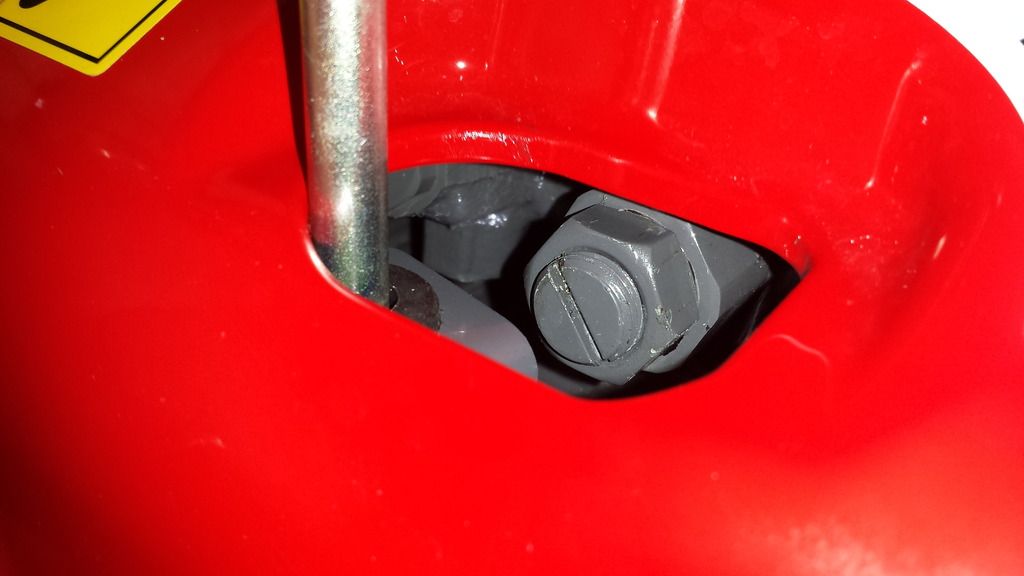
8.) Hold the PRV valve in place with the 12" Crescent wrench then slip the 22mm wrench on the nut. (Lefty loosey, righty tighty) Loosen the 22mm nut on the PRV, which will now allow you to adjust the large set screw.
9.) Always note the original position of your set screw on the PRV. Here is the OEM setting.
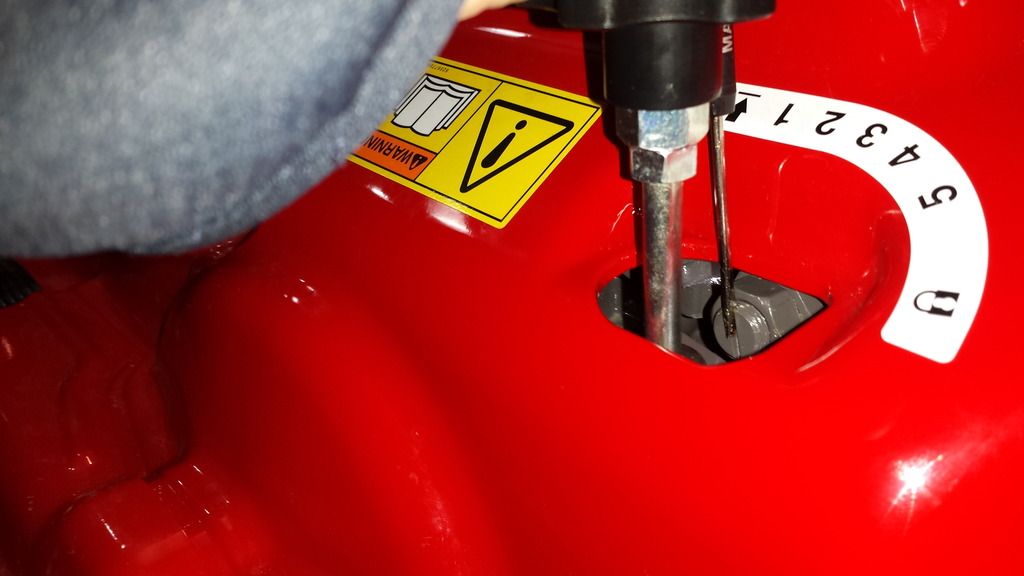
10.) Adjusting the PRV. To increase the PRV relief pressure ->Turn it clockwise. To decrease PRV relief pressure -> Turn it counter clockwise. So for our example here. We need to increase the PRV so therefore we turn it clockwise. I had to go about 1/4" of a turn to get the PRV set ~2100 psi. I used the small screw driver like a lever to increase the mechanical advantage to turn in the set screw you can also use a small allen key as a lever that fits in the slot on the set screw.
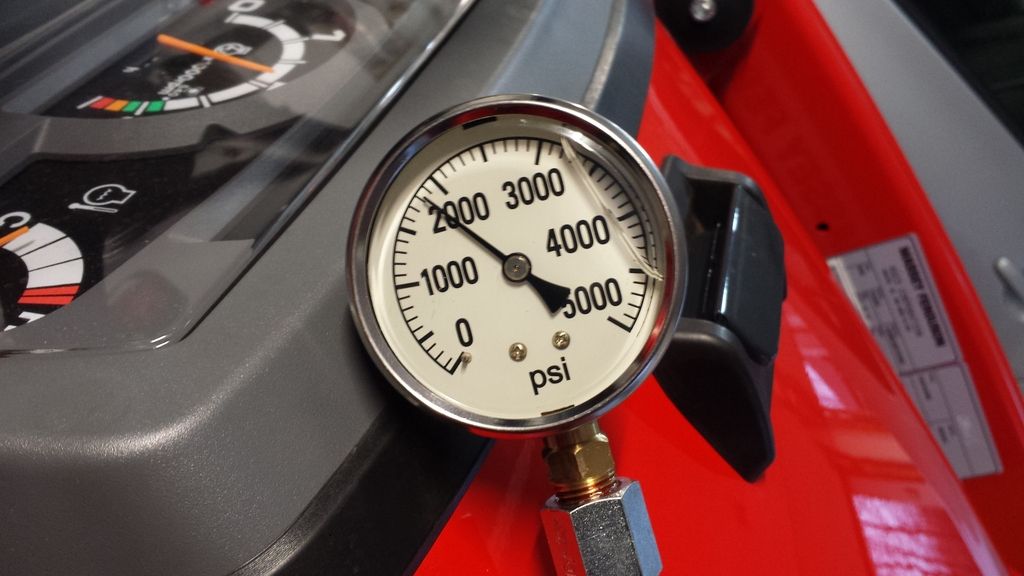
11.) Now go ahead and turn on the tractor. Go back up to 2000-2600 rpm and deadhead the test gauge for a few seconds. You can see our pressure just has increased to ~ 2100 psi. Sweet! :thumbsup::thumbsup::thumbsup:
12.) Now with the tractor running. Go ahead and tighten the 22mm lock nut. Go ahead and make sure you are at the correct RPM and deadhead the pressure gauge again to verify that your pressure did not increase or decrease or tightening the nut. If the pressure reads the same as before. You are done with adjusting the PRV.
13.) Final position of the PRV set screw after adjustment and tightening of the lock nut.

14.) Turn off the tractor. Relieve the pressure by moving the joystick a couple time and remove your hydraulic pressure test gauge. Now go ahead and reconnect the line back on for the FEL.
15.) Tighten the two 14mm bolts and reinstall the plastic zip tie around the wiring of the bracket.
16.) You are done, enjoy the new found power in your FEL or BH. Profit!!! :cool2: :dance1:
17.) Drink beer and clean up!!! :licking:
***I AM NOT RESPONSIBLE FOR DAMAGE DONE BY ADJUSTING THE PRV ON YOUR GC 1700 SERIES INCLUDING DAMAGE TO YOURSELF, EQUIPEMENT, PROPERTY, DOG, WIFE, KIDS, AND BEER!!!***
OEM SPECS
Maxiumum Output - GC1705/10 - 6.3 US Gal/min
Maxiumum Output - GC1715/20 - 6.9 US Gal/min
Pressure - Relief Valve Setting - 1920 psi
WHY?
The GC tractors have two hydraulic pumps that run everything on the tractor that is hydraulic. The majority of the hydraulic pressure is used by the HST, FEL, BH, and 3 Point. Now when we use all of those the pump provides us with flow of hydraulic fluid to move the ram/cylinder against resistance of something. The pump will provide flow to cylinder, when there is a opposing force on the other side the flow will have no where to go, thus provide you a pressure number. Once the pressure reaches 1920 psi (OEM MF SPEC for GC 1700's) the PRV valve will open and relieve the pressure from the component to prevent damage to the equipment. The side effect will be also you will not be able to provide any more flow thus pressure to the cylinder and it will stop or decrease lift/push/downward pressure. Basically, a safety system to prevent damage to operator and equipment. Over time, the spring in the PRV will start to start to degrade and will require less pressure to relieve, which means the PRV will open at a lower PSI than 1920 psi. The other reason the PRV was never set to spec by the OEM thus you will have decreased performance of your equipment.
TOOLS
Hydraulic Pressure Test Gauge that reads to 0-3000/5000 psi glycerin filled is easier to read (I got mine here from Ken's Bolt On Hooks need the one with 1/4" Quick connect for the GC 1700)
Ken's Bolt on Grab Hooks <<Hydraulics>>
Pocket Screw Drive
Crescent Wrench 12-14"
22mm Wrench
14mm Wrench
Worklight
Beer

LOCATION
The PRV is located behind the mower height adjustment knob on the Left side of the tractor beneath the seat. The adjustment knob with bracket are in the way preventing easily adjusting the PRV. Need to do a little bit of work to get to it however you need a few basic tools only.


The PRV is the RED arrow in this parts diagram.

HOW?
1.) First let's check the OEM pressure relief valve setting on my GC 1720. Always good to have a baseline before you start adjusting stuff. Run your GC 1700 to operating temperature for about 10 minutes of so. You can cycle the FEL a few times with the joystick so the hydraulic fluid is not cold. Make sure your parking brake is set and tractor is in neutral. Also note the original position of the set screw for your reference.
2.) Turn OFF the tractor and relieve the pressure in the system by operating the FEL joystick to all 4 positions a few times.
3.) Plug the Hydraulic Pressure Gauge into any of the 4 ports for the FEL. I used port A or FEL raise function.
A - FEL Raise
B - FEL Lower/Float
C - Bucket roll back
D - Bucket dump/quickly
4.) Restart the tractor and you will "deadhead" the pump flow into the hydraulic pressure test gauge which turn will give you a PSI read out make sure the tractor is running at around 2000-2600 engine rpm at idle. Do not deadhead the gauge for more than 20-30 seconds at a time. Since it that fluid will have to go through the PRV at very high pressure and creates a lot of heat. The engine will sound like it got some load on it.
Tractor running at 2600 rpm. No flow going to the hydraulic test gauge. Since the loader joystick is not being operated to the raise position. The gauge will read 0 psi.

5.) For my initial reading I got around 1820-30 psi :thumbdown:
, which is a little bit lower than factory spec. So it will need to be adjusted back to factory spec. When adjusting the PRV. You will have about 10% of room for adjustment to go above the PRV factory PRV setting. Most people state there is no issue going above 10% of factory spec or ~2100 psi. Some people even go 15% or ~2200 psi and a absolute max is 20% or ~2300 psi. The OEM hoses are rated for 3000 psi pressure. I decided to adjust it 10% above OEM setting. 
6.) After you have located the PRV and gathered your tools it's time to get to work. You will first need to remove these two 14mm bolts. They are located in front of the Left rear tire. Remove the left one first. Then you can go and loosen the right one it is easier not to remove it all the way.

7.) Loosen the adjustable plastic strap and move the wires out of the way. The bracket with the mower height adjustment should easily move around a bit, which will give you enough room to adjust loosen the lock nut on the PRV.

8.) Hold the PRV valve in place with the 12" Crescent wrench then slip the 22mm wrench on the nut. (Lefty loosey, righty tighty) Loosen the 22mm nut on the PRV, which will now allow you to adjust the large set screw.

9.) Always note the original position of your set screw on the PRV. Here is the OEM setting.

10.) Adjusting the PRV. To increase the PRV relief pressure ->Turn it clockwise. To decrease PRV relief pressure -> Turn it counter clockwise. So for our example here. We need to increase the PRV so therefore we turn it clockwise. I had to go about 1/4" of a turn to get the PRV set ~2100 psi. I used the small screw driver like a lever to increase the mechanical advantage to turn in the set screw you can also use a small allen key as a lever that fits in the slot on the set screw.

11.) Now go ahead and turn on the tractor. Go back up to 2000-2600 rpm and deadhead the test gauge for a few seconds. You can see our pressure just has increased to ~ 2100 psi. Sweet! :thumbsup::thumbsup::thumbsup:

12.) Now with the tractor running. Go ahead and tighten the 22mm lock nut. Go ahead and make sure you are at the correct RPM and deadhead the pressure gauge again to verify that your pressure did not increase or decrease or tightening the nut. If the pressure reads the same as before. You are done with adjusting the PRV.
13.) Final position of the PRV set screw after adjustment and tightening of the lock nut.

14.) Turn off the tractor. Relieve the pressure by moving the joystick a couple time and remove your hydraulic pressure test gauge. Now go ahead and reconnect the line back on for the FEL.
15.) Tighten the two 14mm bolts and reinstall the plastic zip tie around the wiring of the bracket.
16.) You are done, enjoy the new found power in your FEL or BH. Profit!!! :cool2: :dance1:
17.) Drink beer and clean up!!! :licking: