Backhoe Installing a Bradco backhoe

   / Installing a Bradco backhoe #1  

JohnInCA

Bronze Member
Joined
Nov 12, 2001
Messages
86
Location
San Diego, CA
Tractor
NH TC40D
For those of you considering a backhoe, here's something of interest. I have purchased a Bradco 408 backhoe and subframe mounting kit for a NH TC29D. I'm going to be posting pictures of the installation process as it progresses. First, a few comments about the subframe kit. It is designed so that no part of the 3pt hitch has to be removed when the backhoe is mounted. To install, the FEL must be removed (because the rear FEL mounts will be unbolted), and the rear tires must be removed. The subframe requires that four of it's pieces be welded together (two just "tacked"), and two of it's pieces must be tack welded to the tractor (I'll show all of this required welding in detail later). Now, let's get started with the pictures...


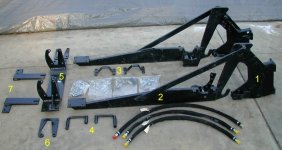
Here's a picture of the pieces of the subframe kit.

Part #1 - This is the portion that is bolted to the backhoe. It attaches to two hooks on part #2 (the top hook can't be seen, as I have the two parts hooked together at the top). This is the only part that comes off with the backhoe when it is removed.

Part #2 - This is the main part of the subframe. The lower area (that has the "2" on it) is 1" thick steel plate. It bolts to the axle housing at the rear, and to part #5 at the front.

Parts #3 - These are straps that go over the top of the axle, and bolt to part #2, which is underneath the axle

Parts #4 - These are two large pins with handles which lock parts #1 and #2 together when the backhoe mounted on the tractor.

Part #5 - This piece bolts to the same holes as the rear mounts for the FEL.

Parts #6 - These are two spacers that go between the rear FEL mounts and part #5. (I guess I'll find out later why they used spacers here, instead of just making part #5 the correct dimension between the uprights)

Parts #7 - These two pieces bolt to the part of the tractor frame underneath the engine. They must be welded to part #5 after installed and all bolts tightened. The next picture will show how part #5 and parts #7 must be welded to each other.
 

Attachments

  • 5-101294-Subframe1a.jpg
    5-101294-Subframe1a.jpg
    127.8 KB · Views: 1,245
   / Installing a Bradco backhoe
  • Thread Starter
#2  
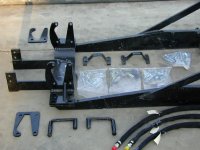
This picture show how parts #7 and parts #5 must be welded together, after all bolts are tightened. Note the slots in parts #7 would be fully engauged with part #5.
 

Attachments

  • 5-101295-Subframe2a.jpg
    5-101295-Subframe2a.jpg
    125.7 KB · Views: 964
   / Installing a Bradco backhoe
  • Thread Starter
#3  
This picture shows the portion of part #2 which bolts to the axle housing.

Item #8 - Shaft that replaces the OEM mounting point for the lower 3pt arms.

Item #9 - One of 5 bolt holes which attach part #2 to the side of the axle housing.
 

Attachments

  • 5-101304-Subframe3a.jpg
    5-101304-Subframe3a.jpg
    120.6 KB · Views: 536
   / Installing a Bradco backhoe
  • Thread Starter
#4  
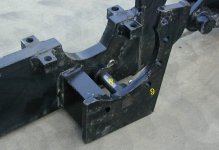
Picture #4 shows how part #5 connects to parts #2. The bolted connection between the two part #2 pieces and the part #5 piece are to be tack welded together.
 

Attachments

  • 5-101310-Subframe4a.jpg
    5-101310-Subframe4a.jpg
    141.5 KB · Views: 458
   / Installing a Bradco backhoe
  • Thread Starter
#5  
Just for comparison, here's a picture of the subframe mounting kit for a TC35/40/45D. The dealer had order the wrong kit, so I had to wait 4 more weeks to get the correct kit. Anyway, notice how many fewer pieces, and how simple it looks. All parts are flat plate steel (3/4" thick!), and no welding is required.
 

Attachments

  • 5-101313-Pc190011.jpg
    5-101313-Pc190011.jpg
    144.6 KB · Views: 853
   / Installing a Bradco backhoe #6  
John - That one looks a little like the 609 subframe I had on my L4310. There was no welding required on that one either.

Nice pics and descriptions!
 
   / Installing a Bradco backhoe
  • Thread Starter
#7  
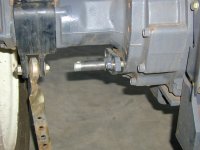
Picture 5 shows the removal of the OEM lower 3pt arm mounting bracket. This will be replaced by the shaft on part #2 shown in picture #3.
 

Attachments

  • 5-101316-Install5a.JPG
    5-101316-Install5a.JPG
    142 KB · Views: 538
   / Installing a Bradco backhoe
  • Thread Starter
#8  
Ok, that's as far as I could get before it was too dark to work. I'll be continuing in the morning, so I should be able to post more pictures tomorrow evening...
 
   / Installing a Bradco backhoe #9  
Before you weld, make sure the backhoe mounting plates which should already be on the hoe match up to the tractor mounting plates. I dont know in your case, but maybe if you weld first, you may not be able to make adjustments. The alignment is very tight on the mounting plates and they dont allow much room for error. Just something to consider.
Welcome to the bradco family! Your tractor mounting plates are considerably different than my 3710 Kub but the hoe plates seem very similar.
 
   / Installing a Bradco backhoe
  • Thread Starter
#10  
Thanks for the advice. The instructions do tell you to attach the backhoe before you have even tightened any of the bolts. I'm sure you have just pointed out why!


Tractor & Equipment Auctions

2002 Genie S125 125' Manlift (A45336)
2002 Genie S125...
Lockwood 14ft Even-Flow Box (A47369)
Lockwood 14ft...
2017 Ford F-150 Pickup Truck (A44571)
2017 Ford F-150...
2009 Honda Pilot AWD SUV (A46684)
2009 Honda Pilot...
Heavy-Duty 4-Wheel Rolling Warehouse Cart  74in x 32in (A44789)
Heavy-Duty 4-Wheel...
2015 Freightliner 122SD T/A Wet Kit Day Cab Truck Tractor (A46683)
2015 Freightliner...
 
Top

Looks like your ad blocker is on.

×

We rely on ads to keep creating quality content for you to enjoy for free.

Please support our site by disabling your ad blocker.

Continue without supporting us

Choose your Ad Blocker

  • Adblock Plus
  • Adblock
  • Adguard
  • Ad Remover
  • Brave
  • Ghostery
  • uBlock Origin
  • uBlock
  • UltraBlock
  • Other
  1. In the extension bar, click the AdBlock Plus icon
  2. Click the large blue toggle for this website
  3. Click refresh
  1. In the extension bar, click the AdBlock icon
  2. Under "Pause on this site" click "Always"
  1. In the extension bar, click on the Adguard icon
  2. Click on the large green toggle for this website
  1. In the extension bar, click on the Ad Remover icon
  2. Click "Disable on This Website"
  1. In the extension bar, click on the orange lion icon
  2. Click the toggle on the top right, shifting from "Up" to "Down"
  1. In the extension bar, click on the Ghostery icon
  2. Click the "Anti-Tracking" shield so it says "Off"
  3. Click the "Ad-Blocking" stop sign so it says "Off"
  4. Refresh the page
  1. In the extension bar, click on the uBlock Origin icon
  2. Click on the big, blue power button
  3. Refresh the page
  1. In the extension bar, click on the uBlock icon
  2. Click on the big, blue power button
  3. Refresh the page
  1. In the extension bar, click on the UltraBlock icon
  2. Check the "Disable UltraBlock" checkbox
  1. Please disable your Ad Blocker
  2. Disable any DNS blocking tools such as AdGuardDNS or NextDNS

If the prompt is still appearing, please disable any tools or services you are using that block internet ads (e.g. DNS Servers).