Installing CK30HST Remote Kit Pics

   / Installing CK30HST Remote Kit Pics #1  

mrutkaus

Platinum Member
Joined
Feb 1, 2004
Messages
991
Location
15 mi. N. of Winchester VA
Tractor
Kioti CK30HST, Kubota BX-1500,
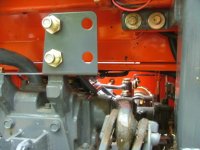
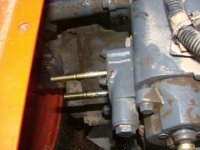
Installed kit, worked slowly, took me about 4 hours.

Don't need to remove tire as instructions say. Not too hard, study everthing a few times before you start and of course keep everthing very clean; the box works well to keep all the parts in until you are finished.

Seemed to work with no leaks, don't have anything to hook it to yet but put load on tractor in both forward and back control positions.

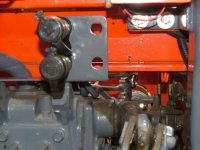
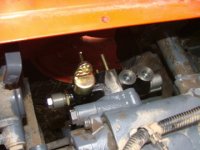
Not sure of order of pics. Got the kit from Rick Wallace for about $290 incl. shipping.

Mike
 

Attachments

  • DSCF2755.JPG
    DSCF2755.JPG
    58.4 KB · Views: 2,962
  • DSCF2756.JPG
    DSCF2756.JPG
    60 KB · Views: 2,554
  • DSCF2758.JPG
    DSCF2758.JPG
    64.1 KB · Views: 2,329
  • DSCF2759.JPG
    DSCF2759.JPG
    62.9 KB · Views: 2,236
  • DSCF2760.JPG
    DSCF2760.JPG
    60.6 KB · Views: 2,447
Last edited:
   / Installing CK30HST Remote Kit Pics
  • Thread Starter
#2  
More pics.

I used a little teflon tape on open threads, someone else here said they had a leak without it.

Careful no extra o rings included in kit and you have to re-use the existing ones on the existing big cap held on by the two bolts that are replaced by the threaded shafts...

Do both remotes (a second, different, kit is needed) at the same time as to put a second set on you must remove the threaded shafts (which they told you to put permanent thread lock on) and put the valve you previously installed on the outside position, I think.)

I just got the single remote kit but the mount at the rear of the tractor had space for the second set.

Mike
 

Attachments

  • DSCF2764.JPG
    DSCF2764.JPG
    88.8 KB · Views: 1,612
  • DSCF2765.JPG
    DSCF2765.JPG
    84.4 KB · Views: 1,449
  • DSCF2769.JPG
    DSCF2769.JPG
    83.7 KB · Views: 1,478
Last edited:
   / Installing CK30HST Remote Kit Pics #3  
Thanks for the pictures.
What are you planning to use the remotes for ? I added a hydraulic top link a few years back and highly recommend one.
 
   / Installing CK30HST Remote Kit Pics
  • Thread Starter
#4  
Going to get a Woods Backhoe soon! Saw a rusted toplink at a yard sale Saturday, am also thinking of one of those.

Mike
 
   / Installing CK30HST Remote Kit Pics #5  
Good info...
I was considering a tip and tilt one day
Heres a couple questions for those who may wonder (me):
What can you do with a single remote?
What can be further accomplished with a dual remote?
 
   / Installing CK30HST Remote Kit Pics #6  
Good Post & Pics !! I am also probably adding a rear digger this summer, am also thinking Woods. What are you getting? The 80x? You've inspired me to consider installing my own rear remotes.
 
   / Installing CK30HST Remote Kit Pics
  • Thread Starter
#7  
Yes, the BH80X, it seems to be the most powerful/biggest available by far for the CK30 and costs I guess $1000 more than the 2375.

With a single remote you can power a post hole digger, a backhoe, a top link cylinder to put down pressure on 3pt attachments, or a log splitter.

Dual remotes are beyond me perhaps a rear blade that tilts by pressure while simultaneously using down pressure...

In installing the kit just go slowly, read everything 3 times, don't lose the o rings and tighten everything firmly but don't go overboard (no torque specs supplied in instructions). And note the outlets at the back are bolted in with a lock nut and that o rings go on two places where each output line goes into the valve.

Mike
 
   / Installing CK30HST Remote Kit Pics #8  
mrutkaus said:
With a single remote you can power a post hole digger, a backhoe, a top link cylinder to put down pressure on 3pt attachments, or a log splitter.

You can also power equipment attached to the FEL such as a grapple or a hydraulic sickle attachment by running hydraulic lines from the rear remote to the FEL.
 
   / Installing CK30HST Remote Kit Pics #9  
Island Tractor:
You wrote back in 2007:
You can also power equipment attached to the FEL such as a grapple or a hydraulic sickle attachment by running hydraulic lines from the rear remote to the FEL.

Can you tell me anything about this Sickle Attachment...I am look at something similar called a Samari I think. $1,360 + delivery sounds like a nifty contraption. Also, my DK35 doesn't have rear remotes and I will be needing that as well. Mfg says you can tap into the dump protion of the FEL, but seems to me that would be great to have working when using the attachment???
 
   / Installing CK30HST Remote Kit Pics #10  
If I recall correctly, the Samuri is basically a hydraulic powered hedge trimmer that mounts to the FEL. I would think that the hydraulic output from rear remotes on a DK35 would be more than adequate to run something like that. The basic strategy would simply be to run a pair of hoses from the rear remotes to the FEL torque tube and then attach the Samuri with a second pair of short hoses via Pioneer quick connects. Run the hoses over the rear axle then under the operator station and finally up the FEL mounting post and down to the torque tube. Weld or bolt on a bracket for the hoses (or be lazy like me and just zip tie them into place). You'd need to spec the hydraulic requirements of the sickle to decide what size hose you'd need. I'd guess 3/8 would be adequate but 1/2 would certainly do it.

You said that you don't currently have rear remotes. Do you have a DK35se? I thought they came with one set standard. In anycase, installing a set of remotes is basically an afternoon (or two) project or you can easily have a dealer do it for you. As I recall an extra set cost me about $350 a few years ago at time of tractor delivery.

Once you have the rear remotes and fittings/hoses attached, it would be as simple as pushing the remote lever out of neutral/off to make the mower cut. Put it back into the off position to stop it. It would be a simple on off proposition.
 
   / Installing CK30HST Remote Kit Pics #11  
I installed a single remote kit few weeks ago too. It did leak a little so I used Teflon tape to fix it. Yes, do read over the instructions, because you do not need to remove the tire or the finder as instructed. It took me about two hours. It was easy enough to install, just keep everything clean. I laid everything out on an old News paper before starting. I paid the same price including shipping. I am looking at buying a grapple that mounts on the bucket, one that will not break the bank. Suggestions? I've been lookin at "The Thumb" model.


More pics.

I used a little teflon tape on open threads, someone else here said they had a leak without it.

Careful no extra o rings included in kit and you have to re-use the existing ones on the existing big cap held on by the two bolts that are replaced by the threaded shafts...

Do both remotes (a second, different, kit is needed) at the same time as to put a second set on you must remove the threaded shafts (which they told you to put permanent thread lock on) and put the valve you previously installed on the outside position, I think.)

I just got the single remote kit but the mount at the rear of the tractor had space for the second set.

Mike
 
   / Installing CK30HST Remote Kit Pics #12  
I am looking at buying a grapple that mounts on the bucket, one that will not break the bank. Suggestions? I've been lookin at "The Thumb" model.

The Thumb looks reasonable to me. Bucket grapples are basically all the same if you are going to permanently attach the grapple via weld or bolts. Make sure you get the right size for your bucket so the upper jaw either meets or slightly overbites the bucket lip. Also be sure to reinforce the upper bucket lip where you attach the grapple. If you want to be able to take it off then there are a couple of other manufacturers, ATI and Add A Grapple are two good brands of that type.
 
   / Installing CK30HST Remote Kit Pics #13  
Thanks Island Tractor for the info on the Aux Hydraulics. About what I would expected.

I was hoping that you had some experience with the hydraulic FEL mounted cutter gizmo...I think your right, the Samari is a big hedge trimmer. But may be kinda what I need... I have a couple miles of trails through the woods that I want to keep pruned back and about 30 acres of Hay field that the trees want to keep encroaching into.

Before I buy it I sure would like to talk to someone who has used one... who is not trying to sell me one....
 
   / Installing CK30HST Remote Kit Pics #14  
I just received the 322026 kit but it had no instructions! All I got is a box full of parts! Would anyone have a copy of the instructions ? TIA
 
   / Installing CK30HST Remote Kit Pics #15  
   / Installing CK30HST Remote Kit Pics #16  
These are for the 2nd remote kit on my 2006 DK45s. I don't know if it will help you or not.

View attachment 552156
View attachment 552157
View attachment 552158
View attachment 552159
View attachment 552160

As others mentioned. it is not necessary to remove the wheel. I thought the big loaded tire was more than I could handle solo. Working from below was possible if difficult.

I have the cabbed version of that same tractor. From the instructions, it looks like this kit could be installed without having to remove the cab, right?
 
   / Installing CK30HST Remote Kit Pics #17  
I don't see a need to remove the cab, but I don't have a cab. My kit (that included those instructions) was supposedly for the cab model and there was no mention of removing the cab. In my experience, removing the seat was a pain because it was heavy and hard to access the bolts. If you remove the right rear wheel, there is a removable access plate in the fender that makes installation much easier. But working solo with no safe way to maneuver that big, heavy wheel, I opted to do the work from the top and below. That was tedious but safer, IMO.
 
   / Installing CK30HST Remote Kit Pics #18  
Thanks, ritcheyvs. If run hoses from my rear remotes up to my FEL grapple, but sometimes find it hard to hang the 3PH top link...it hits the hose couplers. Do you have this issue, too? Would it be made even worse by having a second set of remotes in the bracket, ie, for a top and tilt setup?
 
   / Installing CK30HST Remote Kit Pics #19  
Not really. The bracket for my rear remotes is to the right of center. I have a hydraulic top link so I don't use the original setup to hang (store) the top link. Instead I just use a loop of rope to hang it from the bracket.
 

Tractor & Equipment Auctions

Toyota SR1-BET35 3,500 LB Stand-On Electric Forklift (A59228)
Toyota SR1-BET35...
2002 Ford F-550 Crew Cab Landscape Dump Truck (A56858)
2002 Ford F-550...
Brock 48'x16' Flat Bottom Grain Storage Tank (A57148)
Brock 48'x16' Flat...
1996 Ford Ranger Pickup Truck (A59230)
1996 Ford Ranger...
500 BBL FRAC TANK (A58214)
500 BBL FRAC TANK...
14C SCRAPER (A58214)
 
Top