Ernie-32
Bronze Member
For those of you looking ahead for information before starting this type of maintenance, every 400h, here's my experience;
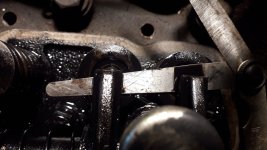
Access to the adjusters is really easy, although it helps to also unwind the rubbers of the cylinderheadcover as if they were nuts, in stead of forcing them off.
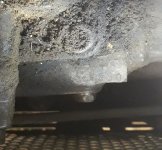
Next issue is locating the marker on the crankshaft pulley that shows Cyl1 (front) is at TopDeadCenter if opposite on engine markpoint. I looked and looked and looked again, but did not succeed to find any marking on the pulley! Access to the pulley and the marker on the engine is really limited.
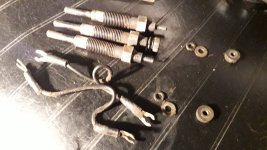
Next challange is overturning the engine slowly with pressure building up in cylinders. So I removed all 3 glowplugs (once disconnected I measured them at 1 Ohm resistance each, which is perfect) and lifted the rear axel while blocking one rear wheel and shifting into 3rd (high) gear to use the other wheel to push the cranckshaft around. This works pretty well.
Unfortunatley thanks to the pre-burn chamber where each glowplug and injector reside, it is not possible to let some sort of soft plastic or wooden pin down in the opening of the glowplug to determine the top position of the piston. See drawing. Taking out the injectors could have helped, but since my tractor runs very well, I don't want to disturb what seems okay.
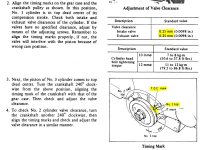
So I watched for each set of valves to be shut and felt if both had about their maximum play. Then measured that play (.20mm still has movement, .25mm none, .30mm does not enter) for each cylinder and to my big surprise this 40 year old tractor had perfectly adjusted valves!
Reassembled the head cover (no need to replace the joint) and put back the glowplugs adding a little graphite on their threads.
Maybe someday someone somewhere finds this info usefull.
Access to the adjusters is really easy, although it helps to also unwind the rubbers of the cylinderheadcover as if they were nuts, in stead of forcing them off.
Next issue is locating the marker on the crankshaft pulley that shows Cyl1 (front) is at TopDeadCenter if opposite on engine markpoint. I looked and looked and looked again, but did not succeed to find any marking on the pulley! Access to the pulley and the marker on the engine is really limited.
Next challange is overturning the engine slowly with pressure building up in cylinders. So I removed all 3 glowplugs (once disconnected I measured them at 1 Ohm resistance each, which is perfect) and lifted the rear axel while blocking one rear wheel and shifting into 3rd (high) gear to use the other wheel to push the cranckshaft around. This works pretty well.
Unfortunatley thanks to the pre-burn chamber where each glowplug and injector reside, it is not possible to let some sort of soft plastic or wooden pin down in the opening of the glowplug to determine the top position of the piston. See drawing. Taking out the injectors could have helped, but since my tractor runs very well, I don't want to disturb what seems okay.
So I watched for each set of valves to be shut and felt if both had about their maximum play. Then measured that play (.20mm still has movement, .25mm none, .30mm does not enter) for each cylinder and to my big surprise this 40 year old tractor had perfectly adjusted valves!
Reassembled the head cover (no need to replace the joint) and put back the glowplugs adding a little graphite on their threads.
Maybe someday someone somewhere finds this info usefull.
Attachments
-
 TDC marking on crankshaft pulley.JPG379.1 KB · Views: 554
 -
 glowplugs 1 Ohm resistance.jpg498.2 KB · Views: 362
 -
 in and out dot25mm.jpg460.4 KB · Views: 288
 -
 easy access valve adjusters.jpg586.5 KB · Views: 302
 -
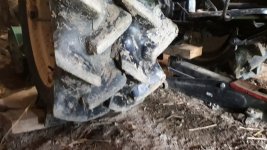 lifting rear, blocking one wheel.jpg515.4 KB · Views: 258
 -
 looking top down on pulley.jpg302.5 KB · Views: 258
 -
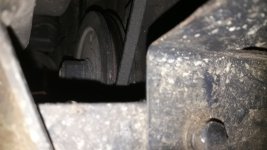 unreachable crankshaft pulley.jpg376.2 KB · Views: 277
 -
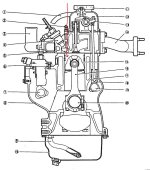 Glowplug removal gives no access to cilinder directly.JPG273.7 KB · Views: 446
Last edited:


")