Jinma 284 fuel sender

   / Jinma 284 fuel sender
  • Thread Starter
#11  
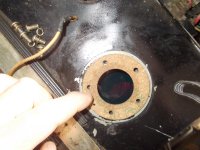
There is a single steel strap that runs from side to side. There was a rubber sleeve for the strap but nothing for under the tank. Also the tank mounting plate bolts directly to the bracket that sets down over the steering box.
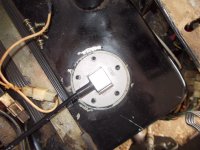
In this picture you can kind of see the ribbed matting that is under the tank. I assembled this tractor from the crate myself. There were no extra parts. At the time I did not like the idea of bare metal tank resting on bare metal plate so I added the ribbed rubber mat to prevent fretting between the surfaces. It was some left over tool box drawer liner I had on hand at the time.

The mounting plate and brackets were all installed at the factory. The tank was in place but tipped so the filler neck pointed towards the seat. All I had to do was loosen the strap, set the tank in place and tighten it down. And add the ribbed mat.

Some vibration isolators would be nice but they would have to be pretty low profile to not raise the tank too far. I'd have to take a close look at excess thread length on the strap to see if a new one would need to be fabricated. I may have some low profile Lord style mounts in some old computer parts. They would be very old and likely either rotted or hard as a rock. I think I know which box in the shop to dig through.

In other news, my KUS system arrived today and I will try to get it mounted as soon as I have a chance to take things apart. I guess I better look for those mounts first!
 

Attachments

  • WP_20210609_19_07_59_Pro.jpg
    WP_20210609_19_07_59_Pro.jpg
    1.7 MB · Views: 128
  • 100_0227 (2019_02_19 01_42_27 UTC).JPG
    100_0227 (2019_02_19 01_42_27 UTC).JPG
    714.9 KB · Views: 130
   / Jinma 284 fuel sender #12  
I assembled mine also back in '07 and I did the same thing with the tank.
Be sure and let us know where you picked up that kit or a link and good luck.
Might want to stay indoors for the next few days anyway!!
 
   / Jinma 284 fuel sender
  • Thread Starter
#13  
OK, it is in and working. What an ugly project that turned out to be. But I sort of expected that. Here is a link to the sender/gauge combo I used:
FUEL TANK GAUGE METER SENDER 8" STAINLESS WEMA KUS UPFR-BB-240-33 BLACK GAS 8 " | eBay
First off, the new setup was just fine. The big problem I had was getting it to fit. That and messing with the hood. Fortunately I had changed the instrument cluster mounting so it was easy to remove. (I should make a new thread about that). Then the hood has always been a PITA to deal with. Had difficulties when I first assembled the tractor. I think I have made progress on solving that problem, might have to make a thread for that too.
The big issue was the Jinma fuel sender is not an exact fit to the standard sender mounting configuration. It is close but off just a little. The holes are clocked at the proper angles and were close enough that my crude measurements led me to think it was the international standard. The difference is the bolt holes are on a slightly larger diameter circle than the standard. Even holding the new gasket up against the old sending unit this was difficult to see. Only when I dropped the new sender into place with no gasket and looked straight down could I see why the screws wouldn't start into the flange. I didn't get a before picture but here is the new gasket setting on the flange and it is off just a little bit.
 

Attachments

  • DSCN5118.JPG
    DSCN5118.JPG
    2.5 MB · Views: 142
   / Jinma 284 fuel sender
  • Thread Starter
#14  
To correct this problem I decided to make eggs out of the holes on the new sender. A little hand work with a round file and soon it was doable. Ugly and not the preferred fix but without a lathe or milling machine this was the best I could do. Fortunately the new sender had a thick enough and large enough flange that this was possible. Then the next issue stuck it's head up. The new sender and the new gasket were considerably thicker than the original and now the mounting screws were too short! Since the design does not have the screws going all the way into the tank (good idea) you need the proper length screws or nothing works. I opted for using the old gasket which made the 10mm long screws just barely enough. For the new gasket I think 15mm length would work, but might have to add a washer if too long. Here is the modified sender. I own it now...
 

Attachments

  • DSCN5119.JPG
    DSCN5119.JPG
    2.4 MB · Views: 137
   / Jinma 284 fuel sender
  • Thread Starter
#15  
Next problem was finding a flat spot on the dash that would accommodate the new gauge. This is close to flat and acceptable. Then there was the wiring issues. The harness is short enough that when I moved the panel for access about half the wires for my switches pulled off. After finding a bad crimp and getting things back the way they were, the new gauge worked just fine even the backlight!
Someday I will re-wire this thing from the battery to the tail lights with proper quality wire and terminals. For now it functions and I have projects to do that it is needed for...

Oh, the hood problem, turns out the mounting brackets had the slots cut wrong and the screws all had to go in at an angle. A real PITA trying to install a washer, lock washer and nut in a blind hole. Some plasma surgery made a world of difference!
 

Attachments

  • DSCN5125.JPG
    DSCN5125.JPG
    2.3 MB · Views: 139
   / Jinma 284 fuel sender
  • Thread Starter
#16  
It just dawned on me the proper way to handle the sender screws being too short is to clean the tank flange threads really good and then install some studs with thread locker. Then the sender could be installed with washers, locks and nuts. Unfortunately I didn't have anything on hand to even make studs that size anyway. <SIGH>
I really need a nut and bolt store next door.... Oh, and a bearing shop and a hydraulic shop. :)
 
   / Jinma 284 fuel sender #17  
It just dawned on me the proper way to handle the sender screws being too short is to clean the tank flange threads really good and then install some studs with thread locker. Then the sender could be installed with washers, locks and nuts. Unfortunately I didn't have anything on hand to even make studs that size anyway. <SIGH>
I really need a nut and bolt store next door.... Oh, and a bearing shop and a hydraulic shop. :)
I would have installed one of those on the dozer if I didn't have to remove the ROPS, the hood, and the whole weldment for the wishbone lift cylinders. Very nice clean job btw.
 

Tractor & Equipment Auctions

Hitachi Zaxis 350 LC (A51573)
Hitachi Zaxis 350...
(1) HD 24ft Free Standing Corral Panel (A51573)
(1) HD 24ft Free...
Как зайти с телефона на кракен. kra39ac.cc  | Kraken зайти на площадку? как пополнить кошелёк? Правила диспута
Как зайти с...
2012 Ford Expedition XLT SUV (A51694)
2012 Ford...
2017 FREIGHTLINER CASCADIA TANDEM AXLE SLEEPER (A52576)
2017 FREIGHTLINER...
2010 Ford Edge SE SUV (A51694)
2010 Ford Edge SE...
 
Top