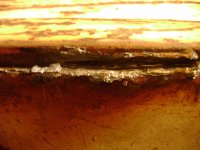
Looks pretty nice. Often they recommend a cutting rate around 1" every three seconds. Too slow will result in more slag at the bottom of the kerf. I referenced two different charts I keep with my torch and one recommended a -0 tip for 1/4" and the other what you used, a -00 tip so you are right in the ballpark.
You are using an out of date browser. It may not display this or other websites correctly.
You should upgrade or use an alternative browser.
You should upgrade or use an alternative browser.
learning to torch cut
- Thread starter deereman75
- Start date
- Views: 6249
More options
Who Replied?
/ learning to torch cut
#21
OP
deereman75
Veteran Member
- Joined
- Apr 29, 2011
- Messages
- 1,912
- Location
- canada
- Tractor
- Deere 2120, Warner & Swasey 6000# offroad forklift, Case W9B loader, various non-running decorations
Looks pretty nice. Often they recommend a cutting rate around 1" every three seconds. Too slow will result in more slag at the bottom of the kerf. I referenced two different charts I keep with my torch and one recommended a -0 tip for 1/4" and the other what you used, a -00 tip so you are right in the ballpark.
I was looking at a tip chart for these airco style torches, and it said for 1/4 inch, move 1/2 inch every second. I know a 0 tip might have been better, but it really is a bit too big for my acet tank. Hey it made nice clean cuts, so I am happy.
weldermike
Platinum Member
- Joined
- Jun 18, 2011
- Messages
- 599
- Tractor
- kubota L4400
There you go bud!
Shield Arc
Super Member
I own my tanks, but I never get the same ones back on fill ups, so I run them until there is only black smoke coming out of the tip.Just a side question here. How low can you let the torch tanks go? There is 100 psi in my oxy, and 50 psi in my acet. I want to get as much out of them as possible, but I heard you should always leave a bit of pressure.
I know exactly what you are saying. But on the other hand I come from the carbon arc era, but a plasma is pretty cool for scarfing.No jake by washing I mean feathering your oxygen flow so you can dismantle stuff that is welded together. For instance, the harder the material the quicker it heats up(the weld) so you can feather your torch and wash down a weld without cutting into and gouging your base metal. same with bolts and stuff when dealing with thin metals. Plasma cutters are good for certain things, but they only cut, thats it.
Attachments
monckywrench
Silver Member
- Joined
- May 26, 2009
- Messages
- 168
No law against using LP and getting a larger tip for some jobs. I use both.I know a 0 tip might have been better, but it really is a bit too big for my acet tank. Hey it made nice clean cuts, so I am happy.
For fun, practice not only cutting old bolts and rivets, but washing old nuts off rusted bolts.
Victor tips and clones are readily available (they've been the same since the 1920s at least).
We had students practice cutting for the first full day of class. Even for a light use that will pay off because when your are very comfortable with torch work you'll use it for more jobs.
Shield Arc
Super Member
washing old nuts off rusted bolts..
I got stuck doing that one day to a 3-inch bolt with over 100-tons on it. When the nut let go it sounded like a cannon went off!:shocked:
OP
deereman75
Veteran Member
- Joined
- Apr 29, 2011
- Messages
- 1,912
- Location
- canada
- Tractor
- Deere 2120, Warner & Swasey 6000# offroad forklift, Case W9B loader, various non-running decorations
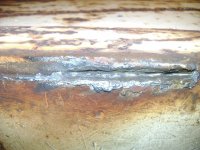
Well here is another picture of one of the cuts I made. This one is a heck of a lot better. The side you see is the bottom of the cut.

rcowan
Gold Member
What Roy said.
RC
RC
When I was cutting, my biggest problem was moving too slow. The metal would flow back together behind the torch.
Once I speeded up a bit, the cuts were cleaner.
Gary Fowler
Super Star Member
- Joined
- Jun 23, 2008
- Messages
- 11,998
- Location
- Bismarck Arkansas
- Tractor
- 2009 Kubota RTV 900, 2009 Kubota B26 TLB & 2010 model LS P7010
You have to learn to adjust your gas flow for the thickness of metal even with a small tip. 5psi is a good middle of the range start but it might be a little too hot for thin stuff so you can adjust down. Then adjust your O2 pressure till you get the flame like ShieldArc showed with sizzling sound. The tip must be kept clean to make a good cut. Look at your cut and it is very clean of slag which indicates that you torch was set right and that travel speed was good as not much dross on the cut.
NOW, see those little lines running down the cut, those are mostly caused from rust specks, dirt or other impurities on the surface. It is similar to when you are backblading with the FEL and hang a rock, you get a big gouge in your surface. Cutting torches do the same thing, it the pick up a little impurity, it pushs it thru the molten metal leaving a gouge. So if you want perfectly smooth cuts, take a minute to run a grinder over your cut line first. Just like welding, a clean surface makes all the difference in the world. From the rest of it it looks like you have a steady hand, tip seemed to be clean and gas set right. The only other advice I can give you is to make sure you are comfortably positioned to make your cut. When you set up, swing the torch from one side of the cut to the other and make sure you dont get into a bind before you get to the end. IF you feel like you are binding, stop the cut, reposition, do the swing thing and then start your cut again. Just like when welding, dont get in a bind, stop get comfortable and restart. You can do everything better when you are comfortable rather than straining.
One other thing, everytime you pick up a torch unless you know for certain that the tip is perfectly clean, take out your tip cleaners and clean the tip. Get in the habit of cleaning the tip each time the torch has been laid up for a while and you will always have a nice cut. Clean it, set the gas pressure (experience is going to help there) set the oxygen pressure ,25-40 depending on the thickness. If it take more than 40 psi on the gauge when pushing thr high pressure handle to push thru a cut, then your tip is generally too small. There are a few exceptions to this when you are cutting really thick material like 4" thick or more but 40 psi will usually cut up to 2" thick material you just have to adjust your cutting speed and tip size to allow the metal to preheat correctly.
when you get to where you can follow a straight and contoured line and get good cuts, then start practicing following the lines and putting on a bevel at the same time. Correctly done the bevel will be the same angle all the way around the cut. We used to have to cut and bevel pipe freehand when I was welding and by doing a lot of it, you CAN get good enough to cut and bevel a pipe in position in one cut that can be ready to weld with just small amount of filing to put on some land.
OP
deereman75
Veteran Member
- Joined
- Apr 29, 2011
- Messages
- 1,912
- Location
- canada
- Tractor
- Deere 2120, Warner & Swasey 6000# offroad forklift, Case W9B loader, various non-running decorations
Well the info about the lines caused by crud on the plate makes sense, seeing as the stuff I was cutting was covered in spatter, rust, and 6011 slag. I wish I could do some more work right now, but we just had the deck rebuilt, and since my shot is under it, it is all under a tarp in the yard. (and I am out of oxygen) Thanks for the advise. After I saw how nice I can cut after I learned how, I had no desire for a plasma.You have to learn to adjust your gas flow for the thickness of metal even with a small tip. 5psi is a good middle of the range start but it might be a little too hot for thin stuff so you can adjust down. Then adjust your O2 pressure till you get the flame like ShieldArc showed with sizzling sound. The tip must be kept clean to make a good cut. Look at your cut and it is very clean of slag which indicates that you torch was set right and that travel speed was good as not much dross on the cut.
NOW, see those little lines running down the cut, those are mostly caused from rust specks, dirt or other impurities on the surface. It is similar to when you are backblading with the FEL and hang a rock, you get a big gouge in your surface. Cutting torches do the same thing, it the pick up a little impurity, it pushs it thru the molten metal leaving a gouge. So if you want perfectly smooth cuts, take a minute to run a grinder over your cut line first. Just like welding, a clean surface makes all the difference in the world. From the rest of it it looks like you have a steady hand, tip seemed to be clean and gas set right. The only other advice I can give you is to make sure you are comfortably positioned to make your cut. When you set up, swing the torch from one side of the cut to the other and make sure you dont get into a bind before you get to the end. IF you feel like you are binding, stop the cut, reposition, do the swing thing and then start your cut again. Just like when welding, dont get in a bind, stop get comfortable and restart. You can do everything better when you are comfortable rather than straining.
One other thing, everytime you pick up a torch unless you know for certain that the tip is perfectly clean, take out your tip cleaners and clean the tip. Get in the habit of cleaning the tip each time the torch has been laid up for a while and you will always have a nice cut. Clean it, set the gas pressure (experience is going to help there) set the oxygen pressure ,25-40 depending on the thickness. If it take more than 40 psi on the gauge when pushing thr high pressure handle to push thru a cut, then your tip is generally too small. There are a few exceptions to this when you are cutting really thick material like 4" thick or more but 40 psi will usually cut up to 2" thick material you just have to adjust your cutting speed and tip size to allow the metal to preheat correctly.
when you get to where you can follow a straight and contoured line and get good cuts, then start practicing following the lines and putting on a bevel at the same time. Correctly done the bevel will be the same angle all the way around the cut. We used to have to cut and bevel pipe freehand when I was welding and by doing a lot of it, you CAN get good enough to cut and bevel a pipe in position in one cut that can be ready to weld with just small amount of filing to put on some land.
