My Grapple Project (part 1)

   / My Grapple Project (part 1) #1  

kubotabilly

Gold Member
Joined
Feb 7, 2005
Messages
344
Location
Central PA
Tractor
3430 HSTC, BX 2200
Hello Guys & Gals,
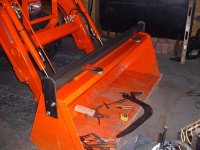
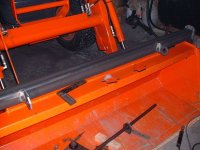
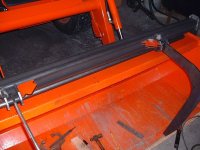
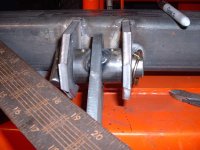
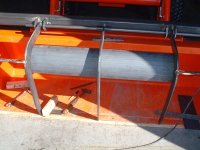
Everyone likes pictures so sit back and grab your favorite beverage /forums/images/graemlins/blush.gif and watch me build my grapple /forums/images/graemlins/grin.gif. I had no blueprints for this project but I would like to thank Pineridge & Ron Hall for all their help in answering all my questions. The first thing on the agenda is to locate and tack the support rail for the 3 grapple arms. I used 3 x 3 x ¼” wall square tubing for the rail and 3/8” flat stock for the mounting plates on the ends of the bucket. Throughout the project all the pieces were just tacked until I knew for sure it was what I wanted and placed where it should be placed. (pic 1)

Bill
 

Attachments

  • 625794-my grapple1.JPG
    625794-my grapple1.JPG
    58.5 KB · Views: 1,577
   / My Grapple Project (part 1)
  • Thread Starter
#2  
Next I placed the 2 outside mounts for the outside arms. The mounts are placed 37 ½” apart. These pieces are 3/8” flat stock with a 1-1/32” hole punched in them to receive the 1” pins. (pic 3)
 

Attachments

  • 625796-my grapple3.JPG
    625796-my grapple3.JPG
    54.7 KB · Views: 1,131
   / My Grapple Project (part 1)
  • Thread Starter
#3  
After the outside mounts are in position it’s time to position the second half of the outside mounts. To make this job easy, I used a piece of 1” rod as a drift pin to align and tack the mounts. (pic 4)
 

Attachments

  • 625800-my grapple4.JPG
    625800-my grapple4.JPG
    54 KB · Views: 975
   / My Grapple Project (part 1)
  • Thread Starter
#4  
After the mounts are tacked it’s time to tack the arms to the bushings. Square off the 3” rail to align the arms. The bushings are 1-1/2” OD schedule 80 pipe drilled out to 1-1/32” ID to receive the 1” pins. Note the holes in the bushings. These holes will later receive grease fittings. (pic 10)
 

Attachments

  • 625802-my grapple10.JPG
    625802-my grapple10.JPG
    52.1 KB · Views: 981
   / My Grapple Project (part 1)
  • Thread Starter
#5  
It’s finally starting to take shape. I used a piece of ¼” flat stock and shaped it to match the inside contour of the arms. (pic 8)

That's enough work for one night. More tomorrow night.

Bill
 

Attachments

  • 625815-my grapple8.JPG
    625815-my grapple8.JPG
    52.8 KB · Views: 1,163
   / My Grapple Project (part 1) #6  
Bill it's looking real good so far. /forums/images/graemlins/grin.gif

Nice to see another grapple project spring to life.
 
   / My Grapple Project (part 1) #7  
Bill; Excellent job! How did you cut your workpieces? Sure doesn't look flamecut without alot of grinding. Are you one of the lucky few with a plasmatorch? /forums/images/graemlins/wink.gif
 
   / My Grapple Project (part 1) #8  
</font><font color="blue" class="small">( I used a piece of ¼” flat stock and shaped it to match the inside contour of the arms. )</font>

Bill, nice job so far. /forums/images/graemlins/cool.gif I envy you guys with a workshop to build in. I get to do my work on my driveway. /forums/images/graemlins/laugh.gif The 1/4" flat stock will add a lot of strength to your arms. It will also be a web to help catch and grip material.

I have one question about your bucket. Do you ever think you will add a toothbar? If you do, you may find the grapple arms are too short and the tips need to extend out another 4"-6". It looks like it would be simple to weld in another piece onto each of the three arms just in front of the pivots, but what about the hydraulic cylinder mount? could you possibly build the mount so you could have two hydraulic ram pin holes or at least relocate the pin easily? This may never be a problem, but in your photo showing the arm tips well within your bucket, I just thought about the addition of a toothbar and how that would effect grapple operation.

I'm looking forward to more photos. Keep 'em coming. /forums/images/graemlins/smile.gif
 
   / My Grapple Project (part 1)
  • Thread Starter
#9  
johnday,
My arms were all cut by a computerized plasma cutter, unfortunately it wasn't mine. I plan on getting one (not computerized) this winter. Probably a Milller 625. And your right, there is very little grinding.

Bill
 
   / My Grapple Project (part 1)
  • Thread Starter
#10  
"I envy you guys with a workshop to build in. I get to do my work on my driveway".

Jim,
I saw some of your "driveway" projects already and they always turn out factory perfect /forums/images/graemlins/laugh.gif. Jim, I believe on 4/1/05 I posted photos of my home made toothbar. It's in Build it yourself on the second page, take a look. Many more photos to come, but tonight was a disaster /forums/images/graemlins/mad.gif, stay tuned for part 2 of my grapple project.

Bill
 

Tractor & Equipment Auctions

71054 (A49346)
71054 (A49346)
71057 (A49346)
71057 (A49346)
2014 Dodge Ram 5500 4x4 Bucket Truck with Altec AT40M - 45FT Boom, Jib Winch and Utility Bed (A51039)
2014 Dodge Ram...
John Deere Gator XUV835M 4X4 Utility Cart (A48082)
John Deere Gator...
2005 WINNEBAGO WORKHORSE W22 RV (A50854)
2005 WINNEBAGO...
Kubota 24in Quick Attach Compact Excavator Tooth Bucket (A51039)
Kubota 24in Quick...
 
Top