OP
You are using an out of date browser. It may not display this or other websites correctly.
You should upgrade or use an alternative browser.
You should upgrade or use an alternative browser.
My Grapple Project (part 1)
- Thread starter kubotabilly
- Start date
- Views: 11971
More options
Who Replied?
/ My Grapple Project (part 1)
#21
OP
kubotabilly
Gold Member
OP
kubotabilly
Gold Member
OP
kubotabilly
Gold Member
OP
kubotabilly
Gold Member
Part 3 - Back on track)
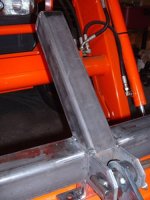
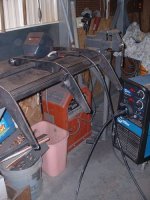
Next, over to the welding table for some serious welding. I started this project using my Lincoln AC/DC welder and I was so frustrated over the “L” shaped arm dilemma that I vented my frustrations by buying a Millermatic 251 mig welder /forums/images/graemlins/shocked.gif. I feel a lot better now /forums/images/graemlins/grin.gif. Big Blue does a mighty fine job!!! /forums/images/graemlins/laugh.gif(pic16)
Next, over to the welding table for some serious welding. I started this project using my Lincoln AC/DC welder and I was so frustrated over the “L” shaped arm dilemma that I vented my frustrations by buying a Millermatic 251 mig welder /forums/images/graemlins/shocked.gif. I feel a lot better now /forums/images/graemlins/grin.gif. Big Blue does a mighty fine job!!! /forums/images/graemlins/laugh.gif(pic16)
Attachments
OP
kubotabilly
Gold Member
Part 3 - Back on track
Boy, I feel good /forums/images/graemlins/laugh.gif /forums/images/graemlins/laugh.gif /forums/images/graemlins/laugh.gif. It was a vacation day well spent /forums/images/graemlins/grin.gif. That's it for today everyone, more tomorrow night. I'm going to reply to several previous posts and call it a night.
PS> Here's what I felt like doing last night to the neighbors JD 585 /forums/images/graemlins/blush.gif.
Bill
Attachments

OP
kubotabilly
Gold Member
RedRocker,
I gave the wrong Miller Plasma cutter number in one on my previous posts, it should of been the 375 plasma cutter. The 375 is not a cnc setup but it's a great machine.
Bill
I gave the wrong Miller Plasma cutter number in one on my previous posts, it should of been the 375 plasma cutter. The 375 is not a cnc setup but it's a great machine.
Bill
OP
kubotabilly
Gold Member
Steven,
And pics you shall have /forums/images/graemlins/grin.gif. I think I have things back on track /forums/images/graemlins/wink.gif
Bill
And pics you shall have /forums/images/graemlins/grin.gif. I think I have things back on track /forums/images/graemlins/wink.gif
Bill
OP
kubotabilly
Gold Member
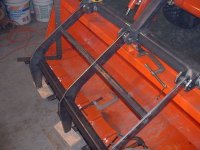
</font><font color="blue" class="small">( I have done some work on the geometry of the grapple arm and cylinder pivot locations. I wrote a simple spreadsheet to allow me to plug in placement values and it will compute my cylinder stroke. )</font>
WhiteRock,
Jim said in a previous post that he "envys people with a work shop". I envy people like yourself that have brains to figure out problems. I'm no dummy but I do most of my projects by the old trial and error method. I do appreciate your offer on the spreadsheet perhaps I can make future changes that would benefit me. I'll PM you my email address. As far as the number of cylinders, I'm using one and I did think of mounting 2 outside the arms as you suggest, but I would of had to make my grapple wider and I really didn't want the extra weight.
OP
kubotabilly
Gold Member
Dan,
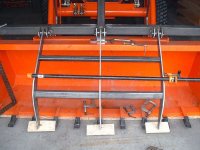
I was going to buy my cylinder from Northern but then I found the same thing at TSC fro the same price. Here's a thought on hydraulic hose routing. Hydraulic hoses are like extension cords, they have a memory. Just rout them where you want them and let them hang that way for a few days and presto, they will always return to the way you originaly placed them. Having your grapple open wide enough is the toughest part of the design. All I can say is keep looking at all those grapple pictures and keep looking at posts on this website and with a little bit of help from above your grapple will work the way you want it to /forums/images/graemlins/laugh.gif
PS> I have enough grapple photos that I can heat my house for 1/2 of next winter /forums/images/graemlins/grin.gif
Bill
